I have a very reasonably priced local supplier for 1/8 to 1/4 inch (3.1 mm to 6.3 mm) thick aluminum plate stock where I can just drive over and load the truck up with usually 2 x 2 foot sheets as these fit my 2x2 CNC machine bed size. But the sheets are raw, unbrushed/unsanded/unpolished.
Aluminum plate needs to be sanded in order for it to look finished. Anodizing services are ridiculously expensive for the small run hobbyists. Where a 2x2 foot sheet of 1/4 inch thick aluminum already anodized might cost as much as 10 sheets of raw stock! So anodizing seems to be out.
What kind of finishing do other DIY chassis builders like to do on raw aluminum plate stock?
This guy on youtube is bringing aluminum plate to a mirror finish and I kind of like the idea of completely sanding an entire sheet, then putting it into the CNC for cutting out several amp chassis in one CNC session afterwards. Since the CNC can cut all the holes without affecting the finish, its easier to do the grunt work of finishing prior to cutting the panel holes.
YouTube
Do you think a mirror finish like this would hold up well on an amp chassis if I apply several coats of a good aluminum wheel polish over it all?
Hiya Windcrest,
I've made a few projects using square aluminium profiles as chassis. It's actually not too hard to get a really even mirror-like finish. Aluminium is a pretty soft metal so you need to be really careful not to polish one spot too much or you'll end up with a recessed area which is nigh-impossible to fix (reflections ends up looking a bit warped).
However, because it's so soft (Mohs hardness ~2.5), aluminium scratches really easily. I've found even rubbing it with a cloth when it's dusty can leave scratches. But if you're careful and don't have kids / pets / angry hornets around it'll be fine.
I experimented with spraying the polished metal with a clear enamel coat, which worked pretty well but took a lot of effort to get a finish I was happy with.
Another option (which is now my default) is to brush the surface of the metal. Remove any surface blemishes, wrap some sandpaper around a very straight plank of wood and give it a few good, straight swipes. Heck, you could even make some pretty cool wavy designs. You can try different grit ratings for different brushed appearance. If you struggle to get the brushings straight you can make a jig from a couple blocks of wood. The brushed finish makes minor scratches impossible to see.
Edit: found a useful video for ya YouTube
And one last point - be very careful at the corners of your panel. It's really easy round them.
Last edited:
Anodising is easier than you might think. Though big sheets would require large tubs of acid.
The chemicals are cheap - but do warrant caution
Take a look at some of the online tutorials and give it a try.
Why would you do this ? Well, aluminium is super reactive and without protection your finish WILL degrade with time.
The chemicals are cheap - but do warrant caution
Take a look at some of the online tutorials and give it a try.
Why would you do this ? Well, aluminium is super reactive and without protection your finish WILL degrade with time.
I posted in a thread a while back where someone was trying to deal with some oxidized aluminum equipment the process I go through with my aluminum which is also from a scrap yard near me. It is a simple approach. Post #11.
https://www.diyaudio.com/forums/construction-tips/325985-removing-strong-corrosion-vintage-solid-amp-silver-plates-2.html#post5516984
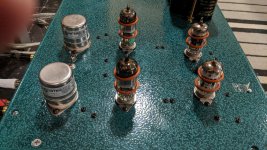
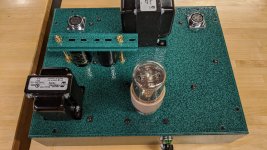
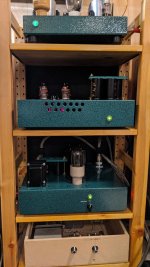
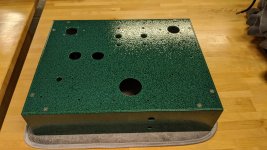
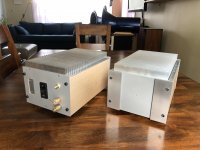
I attached a pic of one of my most recent projects which is a pair of F2J monoblocks I built from scratch. I wanted some contrast, so with these I glass beaded and waxed some of the chassis parts.
https://www.diyaudio.com/forums/construction-tips/325985-removing-strong-corrosion-vintage-solid-amp-silver-plates-2.html#post5516984
I attached a pic of one of my most recent projects which is a pair of F2J monoblocks I built from scratch. I wanted some contrast, so with these I glass beaded and waxed some of the chassis parts.
Attachments
Just (spray) paint it black... To my mind plain aluminium (and esp. brushed) looks cheap (like kitchen foil!). Anodized is better, esp black anodized and is extremely hard-wearing, but paint is easy and cheap substitute.
Titanium would be wonderful (tough and very easy to anodize to a range of colours), but its a pig to work with and its not usable for heat-sinking being a poor conductor of heat.
Titanium would be wonderful (tough and very easy to anodize to a range of colours), but its a pig to work with and its not usable for heat-sinking being a poor conductor of heat.
I posted in a thread a while back where someone was trying to deal with some oxidized aluminum equipment the process I go through with my aluminum which is also from a scrap yard near me. It is a simple approach. Post #11.
https://www.diyaudio.com/forums/construction-tips/325985-removing-strong-corrosion-vintage-solid-amp-silver-plates-2.html#post5516984
I attached a pic of one of my most recent projects which is a pair of F2J monoblocks I built from scratch. I wanted some contrast, so with these I glass beaded and waxed some of the chassis parts.
Thanks for the link about wet sanding it! That is probably what I'm after. I'll have to google what glass beading is all about, is that a coating?
Just (spray) paint it black... To my mind plain aluminium (and esp. brushed) looks cheap (like kitchen foil!). Anodized is better, esp black anodized and is extremely hard-wearing, but paint is easy and cheap substitute.
Titanium would be wonderful (tough and very easy to anodize to a range of colours), but its a pig to work with and its not usable for heat-sinking being a poor conductor of heat.
Understood everyone has different tastes. I kinda like the hh Scott, Sansui, and many other makers in 60s and 70s that used brushed aluminum for amps and receivers, before everybody went black in the 90s for receivers and other gear.
My matter of taste pet peeve is seeing screws on a panel top that are holding on something underneath, so they have no logical apparent reason to be seen on the top. When I see the screws for the tube sockets and transformers that looks ok to me, because they have a seen purpose to be there. But a top with many random screws to me looks shabby. Pete Millet has gone through much work to hide top screws in some of his projects. I may bridge brackets underside to avoid top screws.
Hiya Windcrest,
Edit: found a useful video for ya YouTube
And one last point - be very careful at the corners of your panel. It's really easy round them.
Thanks for this, that is a nice finish, and clear coat aluminum wheel paint probably for the front panel. The panel with the tubes I'll brush but no clear coat. My back panel is for Jacks and heatsink probably no clear coat there either. The sides are wood.
. I'll have to google what glass beading is all about, is that a coating?
Abrasive blasting.
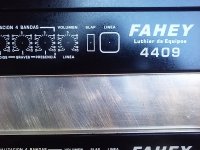
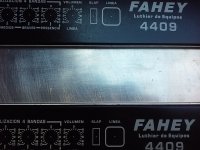
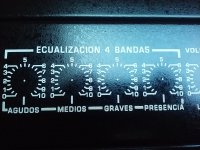
I make my own Guitar and Bass amplifier panels out of raw 1.6mm aluminum sheet, which I cut - bend - treat - paint - silkscreen - punch in-house.
After cutting and bending aluminum gets wet sanded with medium grit wetordry paper simply to remove gross scratches and blemishes, and get a rough surface which facilitates painting.
No special scratched pattern is searched for since it will disappear under large drop spray painting ... a common finish in MI amplifiers.
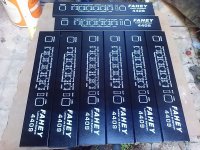
This is this morning´s batch, not too many since quarantine sales are sllloooowwwww but since I sold two 100W Bass amplifiers, I made 8, had used the last one past Friday.
Can make 1 if strictly necessary and urgent, but setting up machines, cleaning silkscreen panel and tools, cleaning spray paint pistol, etc. is the same for 1 or many, so usually 8 is the minimum batch, up to , say, 30 or 40 .
For a "Powdercoat look" equivalent which would make me set up an oven , I use instead, first a two component wash primer precoat, and then, believe it or not, Nitro or Acrylic "car paint" which is very noble, easy to use, clean, reuse (it´s thinner based), can be touched up (Musicians abuse their equipment), etc.
Currently using excellent Akzo Nobel products, including their traditional "Taxi Black" car paint.
After cutting and bending aluminum gets wet sanded with medium grit wetordry paper simply to remove gross scratches and blemishes, and get a rough surface which facilitates painting.
No special scratched pattern is searched for since it will disappear under large drop spray painting ... a common finish in MI amplifiers.
This is this morning´s batch, not too many since quarantine sales are sllloooowwwww but since I sold two 100W Bass amplifiers, I made 8, had used the last one past Friday.
Can make 1 if strictly necessary and urgent, but setting up machines, cleaning silkscreen panel and tools, cleaning spray paint pistol, etc. is the same for 1 or many, so usually 8 is the minimum batch, up to , say, 30 or 40 .
For a "Powdercoat look" equivalent which would make me set up an oven , I use instead, first a two component wash primer precoat, and then, believe it or not, Nitro or Acrylic "car paint" which is very noble, easy to use, clean, reuse (it´s thinner based), can be touched up (Musicians abuse their equipment), etc.
Currently using excellent Akzo Nobel products, including their traditional "Taxi Black" car paint.
Attachments
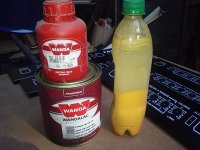

Is that a bottle of orange juice for orange peel effect?https://files.diyaudio.com/forums/images/icons/icon12.gif
Very nice panels.
Very nice panels.
Thanks ")
It´s the chromate part of 2 component wash primer, the secret weapon to make any paint stick HARD to Aluminum.
It separates if left standing so it must be shaken well before mixing, hence the transfer to a plastic soda bottle
The activator in the red bottle is basically phosphoric acid and ethanol, to attack aluminum surface creating pores where paint sticks, plus triggering paint base hardening.
First few hours you can lift it with a fingernail ... once it fully hardens (a few days) you need to grind it off
- Status
- This old topic is closed. If you want to reopen this topic, contact a moderator using the "Report Post" button.
- Home
- Design & Build
- Construction Tips
- How do you finish your aluminum plate stock for DIY amps?