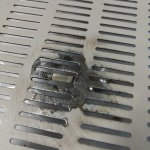
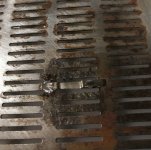
Long story short, this amp must have sat in a damp place and the top cover rusted all the way through in one part.
Well I don't have any gear for brazing, or equipment for working sheet steel, and this cover only needed a small repair, just to get it reasonable until I can secure a better cover.
I cut some nickel strip to size with scissors (it's 0.2 mm x 8mm strip) bent it to match the hole, and soldered it in place.
Once it's had a few coats of paint I think it will look passable. It's almost certainly possible to do a tidier job than I did, although this was the second go after a trial run.
Figured this technique might help someone out or inspire similar ideas [emoji6]


Before plastics and for classic cars the dents and dings were filled in with solder and then filed to look smooth. For bodywork the solder was 60% lead and 40% tin. It normally flows to a nice smooth finish.
First coat of paint should be automotive sandable primer. Second coat can be wrinkle finish paint if you can find it.
First coat of paint should be automotive sandable primer. Second coat can be wrinkle finish paint if you can find it.
Long story short, this amp must have sat in a damp place and the top cover rusted all the way through in one part.
Well I don't have any gear for brazing, or equipment for working sheet steel, and this cover only needed a small repair, just to get it reasonable until I can secure a better cover.
I cut some nickel strip to size with scissors (it's 0.2 mm x 8mm strip) bent it to match the hole, and soldered it in place.
Once it's had a few coats of paint I think it will look passable. It's almost certainly possible to do a tidier job than I did, although this was the second go after a trial run.
Figured this technique might help someone out or inspire similar ideas [emoji6] View attachment 777436 View attachment 777437
Hammer it flat before painting it. You can heat up the solder with a propane torch before hammering it. Use a dolly of course.
Clean all the corrosion off before painting. If you don't etch it with acid, then use self etching primer from the auto parts store.
I did some auto restoration. I used a method called an acid scrub, where you keep spraying acid on the metal and scrubbing it until it changes color. The metal gets brighter; sometimes almost white, when you've etched it enough.
Paint doesn't stick to rust. Rust always comes back. You have to get rid of it all.
Before plastics and for classic cars the dents and dings were filled in with solder and then filed to look smooth. For bodywork the solder was 60% lead and 40% tin. It normally flows to a nice smooth finish.
First coat of paint should be automotive sandable primer. Second coat can be wrinkle finish paint if you can find it.
I did lead work before. You heat it up, slap it into shape with a paddle, then file it. OEMs used lead seams back in the day. It was mandatory for a correct restoration. It was fun to work with too.
Yeah I should have taken all the rust off, it was a bit quick and dirty just to see if it could work. Might go back in next weekend and strip it all back to bare, tidy it up a bit better before painting. Original finish was a beige wrinkle, very hard to get, might go with enamel and heat it up while it sets to get the desired finish
Take it to a powder coating shop as they will sand blast and recoat the right way.
This is just for an old Hitachi I picked up cheap. A fun project and to learn on, maybe use myself if it works well enough.
Since the case is basically "throwaway" I figured I would have a go, and maybe learn something, but it's not worth paying someone to fix. No demand for vintage Japanese amps here unless they are Kenwood, Technics or Sansui...and even the broken ones of those go for STUPID amounts of money
I would leave the rust and use this over it now that you’ve gotten it cleaned up a bit.
Loctite(R) Extend Rust Neutralizer Spray
You don’t sand this product after its been applied, just prime right over it.
Loctite(R) Extend Rust Neutralizer Spray
You don’t sand this product after its been applied, just prime right over it.
- Status
- This old topic is closed. If you want to reopen this topic, contact a moderator using the "Report Post" button.
- Home
- Design & Build
- Construction Tips
- Repair a rusted through steel cover with nickel strip and solder