I have completed my Criton 1TD and I'm ready to apply a veneer to the MDF cabinets. The largest panel is 12" x 14" and I'll be using paper backed red oak veneer.
I have read for hours on this topic and and have watched all the videos on the web.
I have original formula contact cement, gel contact cement, and, plenty of TiteBond II. I have both rollers and brushes, titanium edge utility knife blades, and I also have access to a wood shop with routers. I have never used a router but I have done quite a bit of wood working.
I am considering either of the contact cements or using the iron method with the TiteBond II.
What I'd like to know is which of these is the easiest and most fail proof.
I have two concerns about which I have not read anything in all my research:
1. a problem with glue on the edges gumming up the blade when I trim the veneer.
2. ease of spreading TiteBond II as this stuff seems to dry quickly. I believe the original TiteBond may be better but I've never used it.
These speakers will be treated with kid gloves and don't need to be bullet proofed.
Do you have experiences you can share to help make the final decision.
Hi Cinook,
I have worked with pre-glued iron veneer before and that worked really well for me.
If you are using contact adhesive, the main problem I have found is keeping the surfaces apart until you need them to contact. You can do this by using small wooden rods between the surfaces to keep them apart and slowly move them down as you need the two surfaces to connect. Also as you iron, use a small felt-covered wooden block to hold the veneer down for a few seconds as it cools before moving on.
With regards to trimming the veneer edges and clogging up the blade:
I have used two trimming methods before both by hand as machine trimming is too fast to correct any mistakes.
One is to hold a piece of wood on the good surface and then use a scalpel to gently cut from the unwanted side. Use the scalpel slowly over several cuts and this will give you a sharp corner. The order in which you veneer is important as you want to hide trimmed edges. I have found that doing the vertical sides first and then the tops and front hides trimmed edges. Very, very light sanding finishes it off - I hope I have explained that clearly.
The other method is to get hold of a veneer trimming tool. It has a Stanely blade inside it and you just run along the edge and it cuts cleanly, but takes some practice. This should not clog up.
As always, I would practice a couple of pieces first.
Cheers
Mike
> small wooden rods between the surfaces to keep them apart
An alternate, readily available in the US, is PEX pipe. The home-store has 5' and 10' *straight* lengths (it is cheaper/foot in a roll but that's more than you need and the curl never comes out). Cheap! Glue won't stay stuck. Afterward, makes good permanent plant stakes/markers. There's a tool to cut it square for plumbing but if you have any kind of saw that's fine for laminate/plant sticks.
An alternate, readily available in the US, is PEX pipe. The home-store has 5' and 10' *straight* lengths (it is cheaper/foot in a roll but that's more than you need and the curl never comes out). Cheap! Glue won't stay stuck. Afterward, makes good permanent plant stakes/markers. There's a tool to cut it square for plumbing but if you have any kind of saw that's fine for laminate/plant sticks.
I have worked with pre-glued iron veneer before and that worked really well for me.
+1.
I have a small test box, using iron-on wood veneer over MDF. Been sitting out in the shop for nearly 15 years with no climate control whatsoever. I'll dig it out and snap a picture for you if you'd like. No tools used other than an iron and a new razor blade for applying the veneer.
+1.
I have a small test box, using iron-on wood veneer over MDF. Been sitting out in the shop for nearly 15 years with no climate control whatsoever. I'll dig it out and snap a picture for you if you'd like. No tools used other than an iron and a new razor blade for applying the veneer.
Thank you all for your replies.
What glue did you use? What was the working time? Did you add water?
A bit of an investment but awesome results!
VacuPress Pumps, Bags, Tools | Vacuum Pressing Systems
Regards,
Dan
VacuPress Pumps, Bags, Tools | Vacuum Pressing Systems
Regards,
Dan
What glue did you use? What was the working time? Did you add water?
Heat-activated glue is already on this type of veneer, not even tacky at room temp. You lay it in place, take as much time as you need to position it, then apply heat with an iron.
I'm not sure what widths are available.
There’s also the tried and true iron-on technique using a light coat of yellow carpenters glue ( or special veneer glues) rolled on each surface, let dry past tack-up (up to 15min depending on ambient conditions), then proceed with hot iron. I’ve done literally hundreds of boxes this way, and the only few bubbles I’ve got were from inattention to fully coating both surfaces, or waiting too long.
Whichever method you employ, prep b6 fill any voids at joint lines, pre-size them with a light coat of glue, then sand the entire exterior as smooth as possible to eliminate telegraphing of joints through the veneer.
Whichever method you employ, prep b6 fill any voids at joint lines, pre-size them with a light coat of glue, then sand the entire exterior as smooth as possible to eliminate telegraphing of joints through the veneer.
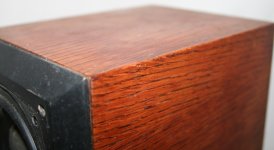
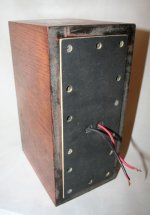
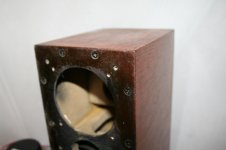
This was done around 2003, the glue has held up very well given how it's been stored. 100°F with high humidity is not uncommon in our summers. Band-it brand veneer, IIRC.
Chris, I'll try yellow glue sometime. I put that s*** on everything!
Chris, I'll try yellow glue sometime. I put that s*** on everything!
Attachments


Last edited:
Tim, that veneer job has held up really well. I hope I can do as well.
I will probably use the method as described by chrisb. I'm going to start cutting veneer tomorrow and hoping I don't mess it up. I'm using red pine which was pretty cheap but I still want to get it right.
I will probably use the method as described by chrisb. I'm going to start cutting veneer tomorrow and hoping I don't mess it up. I'm using red pine which was pretty cheap but I still want to get it right.
- Status
- This old topic is closed. If you want to reopen this topic, contact a moderator using the "Report Post" button.
- Home
- Design & Build
- Construction Tips
- Pick a way to apply Veneer to MDF