Hi, I went on a quest to try perfect a repeatable process for DIY pcb manufacturing that would allow use of WSON and similar miniature packages and really narrow traces. I eventually found a method that is both easy and cheap and produces repeatable results.
The method uses the old toner transfer method, that you all know. But the secret is in the details. Here's my recipe:
Would be great if anyone can repeat my success using this method, and report what laser printers and settings that where used.
Note! The actual backing paper tip I got from a video on YouTube, I'll se if I can find the link again. However, that was the only time I have seen that type of paper used, so I felt it needed a bit of attention - especially with the actual results at hand!
Note2! The 10 year old toner cartridge of my printer is actually partly bad, and gives poor blackness even at density=5. I need to replace it. But even so, the results were quite good!
The method uses the old toner transfer method, that you all know. But the secret is in the details. Here's my recipe:
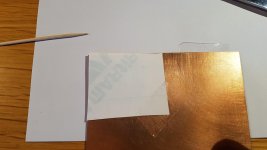
- The paper! What I use is the backing paper of vinyl rolls used for making signs. These rolls can be bought fairly cheaply from a hobby store carrying stuff for the Silouette Cameo (a hobby vinyl cutter) and similar. The same vinyl rolls are also used by all of the sign making shops that are available in every city. The backing paper is scrap to them, so it should be possible to get for free. If you have a roll with vinyl, cut out a part that is slightly bigger than the PCB card, remove and dispose of the vinyl and tape the paper on the center of a usual A4/legal paper with glossy side up. Standard office tape will work fine, no need for special heat resistant tape. The paper has some coating on it, it looks like vax, and is what makes this paper so special. The toner will just barely stick to the paper, and during the heat transfer process, ALL of it is released. Just peel it off and you are done!
- The laser printer. Different brands have different toner, and therfore yields different results. The brand and model I use is a HP LaserJet 1010. I would not however recommend this particular model since it is obsolete and not officially compatible with Win10. If someone has this printer though I can assist though to get it working!
A Samsung CLX-3305W I had did not work with the backing paper, the toner would not disperse evenly, it formed clumps instead.
A very good guess is that HP laserjets with 4-number identity codes are likely to work, like the 1200, 2015 a.s.o. The ones with 3-number codes are less likely to work. But it would be nice if someone could make some tests and report success/failure - Set density to highest (5). If a modern HP, this setting should be in Printer Properties. There is also a way to send PLJ command codes to the printer to set this manually. I found a way to do this for the LJ 1010, since it did not expose this setting from the driver I used.
We want the most dense and thick toner coverage, hence the density=5 setting. - Print with a heavy paper setting, that will make the printer use a higher fuser temperature, to make the toner stick. I used a setting for 95-105g paper, and that made the toner stick, but no more.
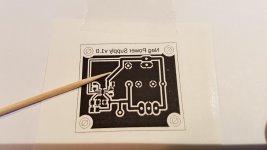
- If all went well, the print should yield a dense black image of the circuit. Remember to choose the right layers and mirroring as usual to get just the traces and pads and no silkscreen etc.
- Move the backing paper to a prepared pcb card with a shiny and clean copper surface as usual when doing toner transfer. Use some permanent ink to touchup any minor dropouts if any.
- For the actual heating I use a heat transfer press, that normally is used for making T-shirts with heat transfer vinyl. I have a chinese brand that came really cheap and also had a plate press. The plate press was actually perfect to use for pcbs, but the usual t-hirt press works nicely too. What this machine gives is a way to set distinct values for pressure, temp and time. What worked best for me was 50s at 285F. That made the transfer complete, and very minor smearing. To short time or low temp and the process isn't completed resulting in dropouts, to high temp or too long and the result is a bit smeared out. Actually just a (very) minor bit of smearing worked best as it the allows the toner to melt down into the copper and produce the best coverage and etching results.
You may need to run a few tests to dial this in. In general it seems time is shorter with this paper than with standard glossy paper. - Let the pcb cool a minute and then slowly peel the paper off. It should come off leaving ALL of the toner on the copper.
NO water, NO rubbing, No paper fibres left!")
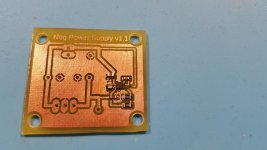
- Etch as usual and clean toner off with clean acetone - it comes off really easy. Remember that acetone is bad for your skin and no good to inhale.
Would be great if anyone can repeat my success using this method, and report what laser printers and settings that where used.
Note! The actual backing paper tip I got from a video on YouTube, I'll se if I can find the link again. However, that was the only time I have seen that type of paper used, so I felt it needed a bit of attention - especially with the actual results at hand!
Note2! The 10 year old toner cartridge of my printer is actually partly bad, and gives poor blackness even at density=5. I need to replace it. But even so, the results were quite good!
Attachments


Last edited:
- Status
- This old topic is closed. If you want to reopen this topic, contact a moderator using the "Report Post" button.