Hello,
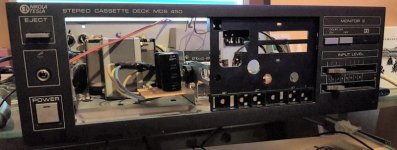
I`m reusing the cassis of old tape deck for my DIY STK442-090 amplifier.
I must fill the holes on the frontplate. I must fill everything (including big hole) except the hole for existing power switch and holes for pots (I cleaned them and they work like new).

I`m thinking of getting pieces of metal welded into the holes and then applying the putty over it.
Was anyone doing this before, is this the way to go or do you know any other opions?
Thank you")
I`m reusing the cassis of old tape deck for my DIY STK442-090 amplifier.
I must fill the holes on the frontplate. I must fill everything (including big hole) except the hole for existing power switch and holes for pots (I cleaned them and they work like new).
I`m thinking of getting pieces of metal welded into the holes and then applying the putty over it.
Was anyone doing this before, is this the way to go or do you know any other opions?
Thank you
Last edited:
It's a little hard to say without seeing what you are doing, but I would consider getting a nice new piece of anodized aluminum perhaps 1mm or 2mm thick and fit it right on top of the old one. The switches going through the new and old plate will hold it in place, although you could also add some decorative hex socket head screws in the corners.
Welding pieces into the holes has a large chance of making the metal distorted (warped), and then you have the problem of putting a nice finish on it, which is actually a lot more difficult than it might seem.
--Buckapound
Welding pieces into the holes has a large chance of making the metal distorted (warped), and then you have the problem of putting a nice finish on it, which is actually a lot more difficult than it might seem.
--Buckapound
edit Buckapound beat me to it
Or have some thin metal cut to cover the entire front, mark through the needed holes and replicate them before "reskinning" the front with some pretty bolts to fix it in place.
Or mount smoked perspex behind the hole and fit some led VU meters there.
Or have some thin metal cut to cover the entire front, mark through the needed holes and replicate them before "reskinning" the front with some pretty bolts to fix it in place.
Or mount smoked perspex behind the hole and fit some led VU meters there.
I did a very similar thing, converted an old marantz amp chassis to a SKA amp. I used a thin piece of aluminum from home Depot to cover the original front piece. Looks ok. Another alternative is to totally replace the front piece with a new one. Let's you have more freedom in design. Either way repurposing an old chassis is a great way to go.
Paul
Paul
What was said before, "skin" it with new material or take some masking tape and cover one side of the hole and fill the hole with epoxy. I am partial to JB weld but even one of those 5 minute epoxy jobs will work. Crown the epoxy so that you can sand it flush. Works fine for me.
Andrew
Andrew
Don't shoot a dark chassis with an all-white monitor behind it. People are missing the fact that you can not fill a *cassette door* with a smear of JBWeld.
Door kick plates. Cover the whole center section with antique brass, or cheap aluminium you can paint black.
Door Kick Plates - Door Accessories - The Home Depot
Door kick plates. Cover the whole center section with antique brass, or cheap aluminium you can paint black.
Door Kick Plates - Door Accessories - The Home Depot
Attachments
Last edited:
Yes, I was thinking about putting new piece of aluminium over the existing frontplate. But than I would need someone with cnc or something to cut rectangular holes for potentiometers and power switch if I want them to look nice or I will replace power switch and potentiometers with round ones, but I would realy like to keep them
Last edited:
I quite like black ABS sheets - they're plenty soft enough to drill holes and file out rectangular openings with small hobby files - but of course that lends them to the risk of scratching and marring once in use.
The thin metal kick plates that PRR suggests would certainly give you nice metal look, but they'd have their own challenges in machining holes without deforming the material. Slightly thicker (up to 3mm) aluminum plates probably have an advantage there, and are still fairly easy to work by hand. Once completed, wet sand down to about 400G and finish with either clear or colored top coat.
The thin metal kick plates that PRR suggests would certainly give you nice metal look, but they'd have their own challenges in machining holes without deforming the material. Slightly thicker (up to 3mm) aluminum plates probably have an advantage there, and are still fairly easy to work by hand. Once completed, wet sand down to about 400G and finish with either clear or colored top coat.
With great care you can cut a rectangular hole in a thin piece of aluminum by hand. Match your blank panel to the face and using a scribe or sharp tipped knife trace on the back the edges of the hole. Now just keep running a sharp razor knife over the lines until it cuts all the way through to the front.
Yes, I was thinking about putting new piece of aluminium over the existing frontplate.
But than I would need someone with cnc or something to cut rectangular holes for potentiometers
and power switch if I want them to look nice or I will replace power switch and potentiometers with
round ones, but I would realy like to keep them
Front Panel Express: Front Panel Design Software and CAD Conversion Service: Home
...cut rectangular holes for potentiometers and power switch...
They are switch/sliders, and look good as is.
You just want to fill the center, and cover some labels (or re-label them with fake functions).
BTW: _I_ love the "Nikola Tesla" logo. Maybe not so impressive when used as a brand-name on a local-market cassette deck, but Nikola watches over all of us.
Attachments
Last edited:
How do you cope with the thickness?Right now I'm making a preamp with oak in the front and signal selector and volume knob in ebenholtz.
I understand, if I can I use existing metal sometime there are subfront in some chassis often i fabricate mounts etc whatever i need.
I use different ways to build depending on how the existing chassis looks, some may be reinforced before I begin to build.
Picture maybe? Have too be in the morning I have get in bed after all fireworks has ended now.
Anders
I use different ways to build depending on how the existing chassis looks, some may be reinforced before I begin to build.
Picture maybe? Have too be in the morning I have get in bed after all fireworks has ended now.
Anders
Last edited:
I agree on covering the face with new metal. Scuff up the backside of the new piece and the face of the cassette deck and epoxy them together. If both surfaces are scuffed and degreased before epoxy is put down, they won't come apart. A good source of aluminum is commercial baking sheets from a restaurant supply store. Sometimes they have used ones for sale. They are thicker than consumer ones yet you can still cut them on a table saw or even by hand. If you have a router you can use a flush-edge laminate trimmer bit to even it or use a file if you don't. I hope you post progess of your project again.

- Status
- This old topic is closed. If you want to reopen this topic, contact a moderator using the "Report Post" button.
- Home
- Design & Build
- Construction Tips
- Reusing old chassis -filling holes on frontplate