I am getting ready to veneer for the first time, a pair of Waynes Dayton speakers. I've got birch wood (cross grain) backed veneer. Last night, before attempting this for the first time I wanted to do a little testing to see how things worked. I roughed the pieces with 80 grit and applied two coats of Weldwood water based contact cement to a scrap of veneer and a piece of 1x2, I don't have any scrap MDF. I tried a piece of wax paper between them to see how that would work on the speakers. The wax paper pulled out, but not as easily as I thought/hoped, but it worked. I used a 1x3, slightly rounded at the end for a veneer scraper to press the veneer on.
Everything I read online said get it right because once they touch that's it, period. I thought I'd test this out and tried pulling the veneer off. It pulled right up. It felt as though it was stuck with rubber or chewing gum, but it pulled up at the end. I was pretty surprised at this after what I read online.
Now I am pretty concerned because I don't know if I did it wrong, I shouldn't be using this glue or I really need to wait 7 days for full curing before it is permanently stuck. What's the deal?
I put a few small test pieces of veneer on there at the same time and tried pulling one off this morning, it was more difficult, but it came off as well.
I've got a lot of time and money in these and want the veneer to be done right and not come off. Please give me your opinion.
I have used heat lock on mine. It does not bond until you use a clothes iron on it with a wet tee shirt. It allows you to place it before it bonds. I also built a vacuum press but have failed to use it yet.
Heat Lock? Iron-On Veneer Glue - $13.95
Heat Lock? Iron-On Veneer Glue - $13.95
+2 for iron on glue method for veneer - I happen to use the same yellow wood glue as for construction (usually Franklin Titebond Original Type I, or Dural AW2300) - although I can no longer get my wife to visit the shop in a wet T-Shirt  - seriously, I don't worry about a slight degree of scorching from the iron, and it'll need a light sanding before finishing anyways.
- seriously, I don't worry about a slight degree of scorching from the iron, and it'll need a light sanding before finishing anyways.Did you let the contact cement cure enough before you applied the 2 parts together? The contact cement that I have used in the past had a suggested time for that in the directions. If I remember right, it had to evaporate some of the volatiles, leaving the surface "less than glossy".
I also had a batch that exceeded its expiration date, so it wouldn't stick well.
I also had a batch that exceeded its expiration date, so it wouldn't stick well.
Last edited:
I have used contact cement for a couple of projects now and they have all worked fantastically.
I apply the contact cement to both surfaces and wait until the cement is tacky but wont pull up when I pull my finger away.
I use a 4" J roller and really bear down on it.
I can immediately trim with a razor knife and sand the edge smooth with no separation problems.
Is the contact cement fresh?
Are you waiting long enough before bonding?
Are you using enough pressure?
Regards,
Rich
Water based contact cement is slightly different than the solvent based. The solvent based does work better.
For the water based, the glue must show no color at all, and become glossy looking. You have to coat *both* pieces or it won't work well at all. One of the problems is getting an even coat without raised areas. Pros spray the stuff. Once dry and glossy, then putting the two pieces together makes a very solid connection.
Best to perfect the system using scrap first.
Heat activated glue for veneer is a fine way to go. The pro veneer shops (high end furniture) use a very very large heated press to apply the veneer, they apply the glue themselves.
Shouldn't take all that much pressure for the water based contact cement to bond. But no matter what the stuff is just not as good as solvent based cement. 3M makes some spray type contact cements (here in the USA), solvent based. But they are a way to go if you want smoother application to the surfaces.
For solvent based stuff, one really must use a respirator type mask rated for the solvent(s).
_-_-
Enough pressure is why I chose a 4" J roller instead of a 6 or 8.
Just for good measure I go around the edges an extra time at the end.
First I lay the veneer down by hand curving the veneer away from the cabinet.
Using only pressure from my hands at first smoothing it with my fingers.
Then I will roll front to back, then side to side then at diagonals.
Lastly I make a trip around the edges to ensure good bonding at the edges.
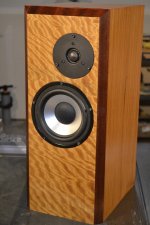
Recently my kids knocked one of my speakers off its stand and it hit the floor and took a chunk out of the wall, it hit right on the rear left cormer of the speaker.
The veneer job is only about a year old but all the damage was to the floor and wall.
All I needed to do was wipe the speaker off and you would never know anything happened.
Oh, I used gunstock oil as the finish so there wouldn't be any solvent issues.
Just for good measure I go around the edges an extra time at the end.
First I lay the veneer down by hand curving the veneer away from the cabinet.
Using only pressure from my hands at first smoothing it with my fingers.
Then I will roll front to back, then side to side then at diagonals.
Lastly I make a trip around the edges to ensure good bonding at the edges.
Recently my kids knocked one of my speakers off its stand and it hit the floor and took a chunk out of the wall, it hit right on the rear left cormer of the speaker.
The veneer job is only about a year old but all the damage was to the floor and wall.
All I needed to do was wipe the speaker off and you would never know anything happened.
Oh, I used gunstock oil as the finish so there wouldn't be any solvent issues.
Agreed that solvent based contact beats latex/water based, and spraying is definitely the way to go. Compressor driven with cheap siphon feed pot gun allows for excellent adjustment of glue thickness - I like a very fine spray whenever I use contact.
But I'll stick to iron on yellow PVA for my veneering - far easy to make fine adjustments with grain alignment - particularly on complex faced boxes like the faceted mini-Onken style of which I've build scores. Contact is instant, and usually permanent - definitely very messy to remove if correction required for misalignment or bubbles, etc.
But I'll stick to iron on yellow PVA for my veneering - far easy to make fine adjustments with grain alignment - particularly on complex faced boxes like the faceted mini-Onken style of which I've build scores. Contact is instant, and usually permanent - definitely very messy to remove if correction required for misalignment or bubbles, etc.
I have used contact cement for a couple of projects now and they have all worked fantastically.
I apply the contact cement to both surfaces and wait until the cement is tacky but wont pull up when I pull my finger away.
I use a 4" J roller and really bear down on it.
I can immediately trim with a razor knife and sand the edge smooth with no separation problems.
Is the contact cement fresh?
Are you waiting long enough before bonding?
Are you using enough pressure?
Regards,
Rich
It was a brand new can of contact cement.
I waited 45 around an hour between coats and after second coat. As I saw in one video I put the back of my arm on it and it did not pull hair. The glue surface was not completely smooth, but as well as I could get with a brush.
It was definitely stuck, but I assumed that it would not be possible to pull it off without either leaving part of the veneer or pulling part of the MDF off. This was not the case. I was able to trim around the edge fine.
I used a 1x3 piece of pine with a small radius curve across the 3 inch edge as a veneer scraper and ran it from the middle to each edge several times with quite a bit of force, enough to put a bit of a shine on the veneer. I read that a j roller would not exert enough force on the two ply and that a scraper was mandatory.
Should it be impossible to pull off immediately after application? that is the impression I got from reading online. I am concerned that this will not be reliable long term, or will it be ok after it fully cures after 7 days?
@bear "3M makes some spray type contact cements (here in the USA), solvent based. But they are a way to go if you want smoother application to the surfaces." do you know what this is called? I am only interested in a smoother application as it relates to the bond, I don't think any minor glue imperfections would show through the veneer.
actually variations in thickness or webbing of contact will definitely telegraph through thinner paper backed or true "natural" veneers - and likely be amplified by any finish top coats
edit: did you say 2 ply (wood backed) veneer? - telegraphing not so much a problem there
edit: did you say 2 ply (wood backed) veneer? - telegraphing not so much a problem there
Last edited:
I have never heard of using two coats of contact cement.
Only 1 coat per side to be bonded.
+1
I have never heard of using two coats of contact cement.
Only 1 coat per side to be bonded.
I use foam brushes with great success.
Thanks, I'll give that a try.
as for 3M contact sprays - this company makes an absolutely bewildering array of products , but you can start here
*Spray Adhesives
A quick google search would return many other brands of aerosol contact cements, likely to vary by your location, but including such as StaPut, Weldwood, Locktite, and probably numerous big box / chain store's house brands.
We use the StaPut S200 (clear) aerosol for site work, and Wilsonart 950 (red) spray for shop layups
Thanks for all of the help, I think it's going to be ok.
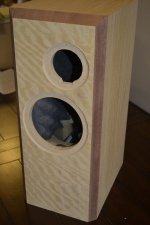
In case this may help anyone with a future project this is something I came up with. I was concerned about cutting all of the holes through the veneer (pre cut in box) as to how hard it would be and how ragged it would be if I cut it with a knife but I came up with a method that worked really well. I started by cutting out the veneer up to a half inch maybe less with a dremel cutting bit. Then I added a small washer to the bottom of the larger sanding drum, this let me cut the veneer back to almost the edge of the opening. A little 80 grit and it lines up perfectly, nice round circles, smooth as butter. I did the same on the flared port, just a little more sandpaper.
In case this may help anyone with a future project this is something I came up with. I was concerned about cutting all of the holes through the veneer (pre cut in box) as to how hard it would be and how ragged it would be if I cut it with a knife but I came up with a method that worked really well. I started by cutting out the veneer up to a half inch maybe less with a dremel cutting bit. Then I added a small washer to the bottom of the larger sanding drum, this let me cut the veneer back to almost the edge of the opening. A little 80 grit and it lines up perfectly, nice round circles, smooth as butter. I did the same on the flared port, just a little more sandpaper.
Just FYI, I had absolutely NO problems with my last veneering project.
I went over the driver areas a little extra just in case, cut the driver holes through the veneer and even in highly figured veneer there was no problems with even the slightest splitting.
I used a carbide spiral upcut bit, a compression or downcut spiral would be even better since they wouldn't be pulling up on the veneer.
Attachments
For contact adhesive
Using some small stickers maybe 1/2" square, as long as needed,lay a odd number across the side of the box, lay the veneer on top,align and remove the center one first, press the center of your veneer against the box use your j roller to press it in and slowly work towards both ends removing one sticker at a time.
Using some small stickers maybe 1/2" square, as long as needed,lay a odd number across the side of the box, lay the veneer on top,align and remove the center one first, press the center of your veneer against the box use your j roller to press it in and slowly work towards both ends removing one sticker at a time.
- Status
- This old topic is closed. If you want to reopen this topic, contact a moderator using the "Report Post" button.
- Home
- Design & Build
- Construction Tips
- I thought contact cement would be stronger