I know my limitations when woodworking well enough to have enlisted the help of a friend I've been able to bribe into helping. I have all the components for building the Audax home theater speakers, except I'm going with a NHT1259 based sub instead.
This friend is a good cabinetmaker, I'm just wondering if anyone knows of a good reference to a web page, or can just tell me specifically, of any tips specifically for enclosure building.
For example, it looks like t-bolts are the way to go for mounting the drivers to the enclosures, right? Do glue blocks eat up enough interior space that I need to jigger the dimensions to take them into account? I'm looking at doing just a basic flat black wood veneer for a finish. And I don't know why, but grilles really throw me off - I have grill fasteners from Madisound, but building the grills themselves....? (Yes, I thought now that my kids are grown that they'd be safe, but visitors and possible grandkids make my want to error on the side of caution.)
Thanks in advance for any pointers!
Barrett
For a loudspeaker quality plywood with butt joints is more than sufficient.
Threaded inserts are much more reliable than t-nuts. ANyone who has had one come loose will never use them again.
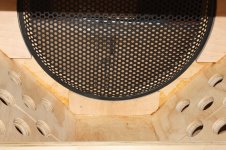
I am not a big fan of grills, if you need them small neo magnets in the grill and imbedded under the veneer work very well.
dave
Threaded inserts are much more reliable than t-nuts. ANyone who has had one come loose will never use them again.
I am not a big fan of grills, if you need them small neo magnets in the grill and imbedded under the veneer work very well.
dave
For a loudspeaker quality plywood with butt joints is more than sufficient.
Threaded inserts are much more reliable than t-nuts. ANyone who has had one come loose will never use them again.
I am not a big fan of grills, if you need them small neo magnets in the grill and imbedded under the veneer work very well.
dave
I'm planning on using 3/4" MDF for all the speakers with the exception of the subwoofer, where I'm planning on using 1" MDF. I like the idea of using magnets for the grills - I can pull some from failed hard drives here at work that should be more than strong enough to hold them in place.
I'm planning on using 3/4" MDF for all the speakers with the exception of the subwoofer, where I'm planning on using 1" MDF.
I will not use MDF for loudspeaker construction, i do not believe it suitable for a quality speaker.
Plywood is both stiffer (12mm would replace your 3/4", and 18mm is as stiff as 1 1/4" MDF). Ply is also better damped, and has less energy storage. Woofers in particular benefit from the higher stiffness of plywood.
You will get lots of people whowilldispute my stance, but we have built out of both, compared, and decided that the loss of quality is not worthwhile. We do use MDF for some very specific purposes and things like decorative bases and such.
dave
Dave & I agree to disagree regarding grilles - if even only light cloth covered MDF frames for hiding the cones. I've developed a method that seems to work just fine for making the frames, but leave the fabric to an artist - a car stereo installer with over 30rys of experience working with fabrics / vinyl, trunk liner, etc.
The magnets in question are the little 1/4" rod Neo magnets from Lee Valley or similar. They're not cheap, as you'll need a minimum of 16 per single set of grilles, but with careful countersinking under the veneer are completely invisible and work like a charm. They never break, and leave a "brazilian smooth" surface to the enclosure when the grilles are removed - try to get that image out of your head")
If you're concerned about a higher degree of protection than those would allow, the choices of attractive metal covers in sizes appropriate to your enclosures is more limited than you can fabricate with cloth.
I have used Hedlock type of grille fasteners in the past, and they're at least as much as buried magnets, and subject to the male pins breaking off.
I'd certainly counsel against using T-Nuts, - when a wood screw isn't deemed adequate, threaded inserts would be my recommendation.
Friends don't let friends use MDF - but as Dave noted, that's a subject that can quickly devolve in religiosity.
With today's glues, simple butt joints, or at the most, half depth dadoes / rabbets are more than sufficient for any domestic speaker I've ever built. Since you mention plan to veneer the boxes, you can use brad nailer or even counter sunk screws to ensure structural integrity. Use autobody Bondo filler and a flush sanding prior to the veneering.
While you didn't ask yet about veneering, I'd recommend doing so after the fabrication of cases, and using paper backed sheets and the iron-on method vs raw real veneer and/or contact cement.
The magnets in question are the little 1/4" rod Neo magnets from Lee Valley or similar. They're not cheap, as you'll need a minimum of 16 per single set of grilles, but with careful countersinking under the veneer are completely invisible and work like a charm. They never break, and leave a "brazilian smooth" surface to the enclosure when the grilles are removed - try to get that image out of your head
If you're concerned about a higher degree of protection than those would allow, the choices of attractive metal covers in sizes appropriate to your enclosures is more limited than you can fabricate with cloth.
I have used Hedlock type of grille fasteners in the past, and they're at least as much as buried magnets, and subject to the male pins breaking off.
I'd certainly counsel against using T-Nuts, - when a wood screw isn't deemed adequate, threaded inserts would be my recommendation.
Friends don't let friends use MDF
- but as Dave noted, that's a subject that can quickly devolve in religiosity. With today's glues, simple butt joints, or at the most, half depth dadoes / rabbets are more than sufficient for any domestic speaker I've ever built. Since you mention plan to veneer the boxes, you can use brad nailer or even counter sunk screws to ensure structural integrity. Use autobody Bondo filler and a flush sanding prior to the veneering.
While you didn't ask yet about veneering, I'd recommend doing so after the fabrication of cases, and using paper backed sheets and the iron-on method vs raw real veneer and/or contact cement.
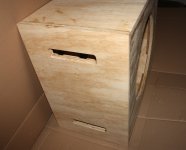
in my youth I used screws, and lots of them
now I'm lucky to have nice big clamps
only used a few small steel nails for control
and they are pulled out again
very precise cuts is the key
and soak the wood well with good glue
but assembling can be quite tricky
this time I tried a different bracing
proved very easy to mount afterwards
btw, normally I prefer to use a router to make assembling easier and more precise
but at present I have no real workshop
this is cheap and dodgy quality plywood
but it is light, and just right for this portable box
Attachments
I've had great results from very similar damping procedure to Troels Gravesen for my application. Sound tested them each stage with better and better results. I'd go with Birch Ply if using only one material for walls.
Cabinet-damping
Cabinet-damping
As Nigel mentioned thin carpet used for loudspeakers can cover multitude of errors in terms of cabinet finish and wear yet bear in mind that carpet on baffles with tweeters will effect the sound sometimes for the better and sometimes not.
I don't cover the baffle with carpet I just paint it.
The baffle is mostly covered by the grill anyway.
Is these to be bespoke pieces of artisanal quality cabinetry, or "road-crew proof" Pro PA gear?
Either way you can likely find more than enough advice here
These speakers will be in our living room, so there is a need for a high WAF quotient ("Wife Approval Factor").
That being said, I'm leaning towards a simple flat black wood veneer finish, hoping that "less is more".
I have a vast experience of creating cabinets with every known technique that then become suitable for burning. This is some of what I've learned:
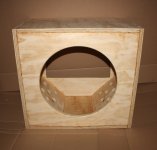
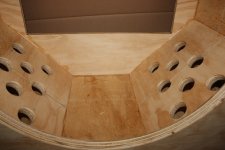
Your friend will know how to cut and assemble a box but have him make the top and bottom panels inside the front sides and back. Using the same saw setting, cut extra panels for interior braces, quantity as needed. Cut or rout those so they allow air to pass freely and use them to square the construction during glue-up as well as stiffening the boxes.
Even though the joints look tight after glue-up, fill them with Bondo or Plastic Wood or Dunham's Rock Hard anyway, sanded smooth. Even backed veneer will telegraph any imperfections.
Go to Tape-Ease.com and buy 4x8 sheets of NBL (no black line) vener. Apply with contact adhesive (not water-based, it's ****); there's tons of advice on their site and legions of others on application. Use dowels (because they're round) to keep the veneer away from the panels while aligning. Yellow glue and an iron is problematic, use Contact.
Attachments
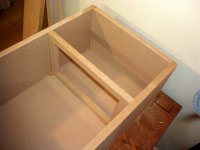

...cut extra panels for interior braces, quantity as needed. Cut or rout those so they allow air to pass freely and use them to square the construction during glue-up as well as stiffening the boxes.
Braces are best if they divide a panel such that the aspect of the sub-panel is greater than the original panel. ie the "shelf" brace in Bill's box would be better if they were oriented vertically.
dave
Bill - I've built more & veneered more than a few pairs of speaker enclosures myself (some of which have been burned as well) and would beg to differ with your position on contact vs iron-on for the veneer itself. The latter allows far more latitude for precise grain alignment/ matching around an enclosure's perimeters. Contact is instant and completely unforgiving
With thin paper backed veneers without vapor barriers, there can also be an issue with solvent based finishing products penetrating through and causing the solvent based contact to release.
edit: I should qualify that I tend to use the 10mil paper backed only, as I'll often want to fold the veneer around a radiused or beveled edge as well as trim out vent and shallow cut-outs for flush mounted drivers and terminal cups. Much easier to accomplish with the thinner product, but more time does need to be taken in surface prep to avoid telegraphing joints, etc.
And my position's probably no surprise, but the location and direction of bracing can make quite a difference.
as well) and would beg to differ with your position on contact vs iron-on for the veneer itself. The latter allows far more latitude for precise grain alignment/ matching around an enclosure's perimeters. Contact is instant and completely unforgiving With thin paper backed veneers without vapor barriers, there can also be an issue with solvent based finishing products penetrating through and causing the solvent based contact to release.
edit: I should qualify that I tend to use the 10mil paper backed only, as I'll often want to fold the veneer around a radiused or beveled edge as well as trim out vent and shallow cut-outs for flush mounted drivers and terminal cups. Much easier to accomplish with the thinner product, but more time does need to be taken in surface prep to avoid telegraphing joints, etc.
And my position's probably no surprise, but the location and direction of bracing can make quite a difference.
Last edited:
I've built more & veneered more than a few pairs of speaker enclosures myself
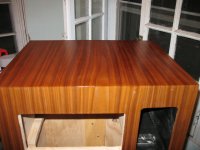
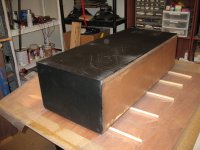
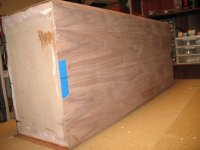
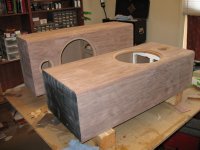
Most of these pictured in post #1.
dave
A close friend, and the finest cabinet maker I know, swears by iron and PVA along with yourself and probably legions of builders. I tried it a few times and it just didn't work for me. Even with thick NBL veneer I got glue ridges telegraphed, bubbles, etc.
There may be aural advantages to the orientation of baffles but I only have so much time for the hobby so strengthening, breaking up harmonics and squaring the assembly all at once trumps that.
The king of glues for me is Powdered Plasticised Resin, PPR, mandatory with unbacked veneer, but it's tedious and requires fortunes in clamps. Toxic as hell too! Next would be hide glue but the melting, stirring, scraping, etc. is also tedious and time-consuming. No clamps, though. Always one or the other when I book match or mix species.
I don't find matching a problem with Contact Adhesive with a little planning and NBL rounds a 1/2" radius with no problem; seat the front and then roll the box over.
With NBL there's no chance of finishing solvents ruining the Contact Adhesive bond, especially as I almost always prime with amber or white de-waxed shellac.
You get comfortable with a product and a process that works and there's plenty of room for us to differ in that. Keep building!
Attachments
Hi guys, Chris i know you have mentioned in a previous post of your use of the rod type magnets as opposed to the thinner round type. Unfortunately LV only gives a strength rating to thinner type,going there and trying to compare hands-on was inconclusive, trying to seperate tiny magnets to compare strength didn’t work that well.
The staff member at LV seem to think the larger the surface area the stronger it would be. Have you ever done any comparative tests regarding this.
Our veneering process is different then what most are typically doing, our thicker 1/16"- 3/32" veneers are glued to the sub-strait before carcass assembly and the magnets will be installed,drilled in from the back leaving approx 3/32"-1/8" of material between the 2 magnets. I can,t remember the rod magnet you suggested but i would guess the 1/4" x 1/2" long to be the most effective one, my other choice would be the 1/2" diameter flat at 9lb strength or even the 3/4" dia flat at 22lb strength
A full mock-up or 2 or 3 may not be out of the question to determine the right balance between strength and easy removal.
Paul - my veneering is post assembly and with the much thinner paper backed product, I find that 1/4 x 1/4" magnet in both the cabinet face and grille frame are generally quite strong enough for the 1/4" MDF frames I fabricate. I've never weighed any of them, but a grille frame for most smaller enclosures should be no more than a few ounces, so the higher strength units seems overkill to me.
A recent exception is an enclosure recently completed for mid 70s vintage Tannoy 12" Dual Monitors. The chosen design had a very narrow front baffle and the owner wanted round grilles, so there wasn't enough margin to fit the magnets outside the drive frame. In this case I used 3/8" MDF for the frame rings and 1/4 x 1/2" magnets that protruded far enough to attach to the #10 flat hex head sheet metal screws with which the drivers were mounted to the enclosures. It took a couple of thin nylon washers to raise the head of the screws to reach contact point with the magnets, but it worked out well enough in the end.
A recent exception is an enclosure recently completed for mid 70s vintage Tannoy 12" Dual Monitors. The chosen design had a very narrow front baffle and the owner wanted round grilles, so there wasn't enough margin to fit the magnets outside the drive frame. In this case I used 3/8" MDF for the frame rings and 1/4 x 1/2" magnets that protruded far enough to attach to the #10 flat hex head sheet metal screws with which the drivers were mounted to the enclosures. It took a couple of thin nylon washers to raise the head of the screws to reach contact point with the magnets, but it worked out well enough in the end.
Last edited:
- Status
- This old topic is closed. If you want to reopen this topic, contact a moderator using the "Report Post" button.
- Home
- Design & Build
- Construction Tips
- Enclosure building specific techniques for general cabinetmaker?