So we kept going on our experiments, bypassing the last caps we had to in hope to improve further the signal. We thought in particular of the +12V analogue feed to the TI chip, as that is likely to impact sound (first internal amplification stage amongst other things).
The last caps we had to try were the three 470uF caps, note already bypassed with 2.2uF X7R. Would an additional 0.1uF C0G bring something?
We tried each cap one by one and TBH the sonic differences were nil or near 0. None of these caps responded really to this additional bypass.
So our remaining bypass caps went in the end back were they last brought some sonic benefits, at the legs of the big PS caps.
Another bit that brought no change was to add up solder at the terminals to make a more direct connection, were the tiny wires stand. Yes, it doesn't look great the way it is done at factory, yes, it seems it made a difference at least in Rich's case and I have no reason to doubt him. But on our amps, perhaps because the production process was better or we were just lucky, it made no difference. Of course it is still worthwhile checking, your amp might be different, and perhaps desoldering everything, possibly swapping the tiny cable, and resoldering everything properly might improve something. Perhaps... we leave that to others")
As of us, we feel we did all what we could resonably do during the lockdown, avoiding desoldering and dremeling, so merely adding things. We came to the point were difference are too subtle to our ears, kind of diminishing returns in our POV, so unless someone comes with a brillant idea we are done in that area. Xell, nearly, there are still these Wimas I would like to try as OPA PS bypass when I have the units on hand again.
The tweaks amps sound really great, and we are yet not done with the heavy mods!
Enjoy music
Claude... and Gilles
The last caps we had to try were the three 470uF caps, note already bypassed with 2.2uF X7R. Would an additional 0.1uF C0G bring something?
We tried each cap one by one and TBH the sonic differences were nil or near 0. None of these caps responded really to this additional bypass.
So our remaining bypass caps went in the end back were they last brought some sonic benefits, at the legs of the big PS caps.
Another bit that brought no change was to add up solder at the terminals to make a more direct connection, were the tiny wires stand. Yes, it doesn't look great the way it is done at factory, yes, it seems it made a difference at least in Rich's case and I have no reason to doubt him. But on our amps, perhaps because the production process was better or we were just lucky, it made no difference. Of course it is still worthwhile checking, your amp might be different, and perhaps desoldering everything, possibly swapping the tiny cable, and resoldering everything properly might improve something. Perhaps... we leave that to others
As of us, we feel we did all what we could resonably do during the lockdown, avoiding desoldering and dremeling, so merely adding things. We came to the point were difference are too subtle to our ears, kind of diminishing returns in our POV, so unless someone comes with a brillant idea we are done in that area. Xell, nearly, there are still these Wimas I would like to try as OPA PS bypass when I have the units on hand again.
The tweaks amps sound really great, and we are yet not done with the heavy mods!
Enjoy music
Claude... and Gilles
Attachments
So, what are the heavy mods requiring my tools (mostly) and my skills (unlikely now given Gilles skill development with this fun project)?
Well, I have on my TODO list:
1- Remove the existing volume pot
2- Replace the signal output filter, that is 4 output coils and 4 output caps with dedicated ones
3- Replace the PS caps with better ones for Class D, same capacity value
4- Try increasing the PS caps capacity by adding some external caps
5- Try an additional Wima bypass on the OPA PS
I will also keep an eye on Mark's 6A SMPS filter to come... this should be better than the one I designed.
So... when are we permitted to meet again to do all that?
Enjoy music
Claude
Following what we did, for those not confident with the soldering iron, not wanting to desolder anything, just playing with thin add-ons easy to do and undo, and keeping the casing, safety, functions etc.
These are the amp mods one could do...Total mod material cost is at Mouser's 19E WITH TAX... Meaning the cost of a modded Aiyima with its PS is less than 85E!
The bypass caps used are all tiny Murata that all fit underboard and can be soldered either way (no polarity), either 10uF/25V or 2.2uF/50V "X7R type", or Murata 0.1uF/50V "C0G type". Links at Mouser below:
https://www.mouser.fr/ProductDetail/Murata-Electronics/RCER71E106K3A2H03B?qs=Zt%252BKPUOg4ofsQVPTPVDJLw%3 D%3D
RCE5C1H823J2A2H03B Murata Electronics | Mouser France
RCER71H225K2A2H03B Murata Electronics | Mouser France
The recommended Op amp to fit is TI's excellent dual OPA1656:
https://www.mouser.fr/ProductDetail/...52BbIcnQ%3D%3D
For the OPA PS bypass we also used Elna Silmic II
https://www.mouser.fr/ProductDetail/Elna/RFS-35V100ME35?qs=HV/SjD3ivR%2BgiKy0fOOcuQ==
Last but not least, you could for similar cost also use Wima MKP10 for the PS OPA bypasses instead of the recommended C0G caps.
The easy mods are the following:
1) Resolder properly the output wiring to LS terminals
=> Cost 0, gain probably 0, depends on your unit
2) Replace the 2 removable OP amps with 2 x OPA1656 (these have to be soldered on adapters by you or any decent student)
=> Op amp cost 5.5E, gain +5
3) Big PS caps bypass, with each 2x 2,2uF and 1x 0.1uF (so 6 in total)
=> Cost 4E, gain +2.8
4) Bypass all 9 electrolytic caps around the op amps with 0.1uF
=> Cost 3.8E, gain +2
NOTE: bypassing the middle one only gives already +1
5) Bypass the three 470uF caps with each one 2.2uF cap, and the 100uF and 22uF ones with each one 0.1uF cap
=> Cost 3.4E, gain +1... you to decide if worth doing "while at it"...
6) Op amp PS, bypass each of the 2 op amp PS with 10uF Elna Silmic II + 10uF X7R + 0.1uF
=> 3.6E, gain +4
You then end up with a sonic upgrade that is 3 times the step the widely acclaimed and massively perceived sonic step OPA1656 represents => Say a modded unit that works significantly better for 19E material cost.
I hope this is of interest
Claude
Attachments
Some of you asked us "what are the most cost efficient easy to do mods"?
Based on the above post, for the "very leazy, very greedy, ungifted with a soldering iron starving student", the mods you could consider are:
1) Resolder properly the output wiring to LS terminals
=> Cost 0, gain probably 0 - depends on your unit but worth checking it is OK
2) Replace the 2 removable OP amps with 2 x OPA1656 (these have to be soldered on adapters by you or any decent student)
=> Op amp cost 5.5E, gain +5
3) Big PS caps bypass, with each 2x 2,2uF and 1x 0.1uF (so 6 in total)
=> Cost 4E, gain +2.8
4) Bypass the electrolytic caps "in the middle of the row of 5 under the the op amps" with 0.1uF
=> Cost 0.3E, gain +1
5) Op amp PS, bypass each of the 2 op amp PS with 10uF Elna Silmic II + 10uF X7R + 0.1uF
=> 3.6E, gain +4
This is the bare minimum, no reason not to give it a try... and a few hours and Euros later you have a significantly better amp.
Enjoy music
Claude
Last one for the road, as we are unlikely to post soon again here.
This is mainly for our host Rob, as he has been very kind letting us posting so widely here...
We have not carried out the following mod, as we don't need to: we went for an external volume pot to control in one go both amps. However, should I want a cheap mod to replace the existing (presumably very avreage) volume pot, I would consider the following:
DACT Type SMD Steeped Attenuateur 21 etape Controle du volume10/20/50/100/250K | eBay
For less than 10$ you are likely to end up with a pot that is very small and possibly as good as an Alps Blue. Not the best performer, doing though a reasonably good job, but again space is an issue and quite good VFM... Cost is low to give it a try, I would chose the 20k value. Note it is a stepped attenuator, so only 21 volume positions, not continuous. If you want continuous, look at the small Alps series, likely to fit straight on the pot board.
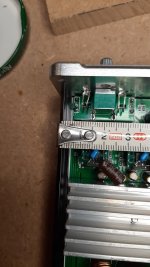
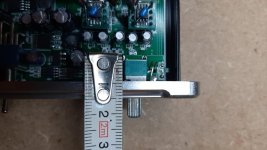
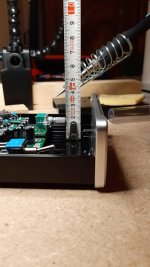
Will this stepped attenuator fit? You to decide! Gilles went the trouble to measure everything so you can make you own mind.
IMHO it will require fiddling to get the damned volume board out and then some more fiddling to make this pot fit. You are likely to need to drill to offset the shaft hole upwards, and you may want to purchase a bigger volume knob to mask the offset estheticaly.
My guess is you would need to fit the pot in such a way that the connectors are upside, right or left, so it fits in. Not an issue: makes soldering even easier and don't forget once the volume knob is in place you can fit it such a way no one can see the rotation you went for.
Anyway, this is what we can give you to get started: guys let us know how you do it!
Claude... and Gilles
This is mainly for our host Rob, as he has been very kind letting us posting so widely here...
We have not carried out the following mod, as we don't need to: we went for an external volume pot to control in one go both amps. However, should I want a cheap mod to replace the existing (presumably very avreage) volume pot, I would consider the following:
DACT Type SMD Steeped Attenuateur 21 etape Controle du volume10/20/50/100/250K | eBay
For less than 10$ you are likely to end up with a pot that is very small and possibly as good as an Alps Blue. Not the best performer, doing though a reasonably good job, but again space is an issue and quite good VFM... Cost is low to give it a try, I would chose the 20k value. Note it is a stepped attenuator, so only 21 volume positions, not continuous. If you want continuous, look at the small Alps series, likely to fit straight on the pot board.
Will this stepped attenuator fit? You to decide! Gilles went the trouble to measure everything so you can make you own mind.
IMHO it will require fiddling to get the damned volume board out and then some more fiddling to make this pot fit. You are likely to need to drill to offset the shaft hole upwards, and you may want to purchase a bigger volume knob to mask the offset estheticaly.
My guess is you would need to fit the pot in such a way that the connectors are upside, right or left, so it fits in. Not an issue: makes soldering even easier and don't forget once the volume knob is in place you can fit it such a way no one can see the rotation you went for.
Anyway, this is what we can give you to get started: guys let us know how you do it!
Claude... and Gilles
Attachments

Last edited:

We are still spending most of the WE tweaking and comparing the 2 amps, so more to come, but as a warning to ALL.
It is easy to unsolder the existing coils and solder new ones.
It is real PITA to take out the existing output filter caps. Defo not for beginners.
We didn't succeeded removing the volume board! We will dremel it out, possibly the best solution!
There are 2 of us, we are equiped with proper temp regulated soldering irons, hand sucking pumps (3 of them) and now on top a proper professional heating soldering vacuum pump (10 times bigger than the amps) with variable heat and permanent vacuum on trigger.
On the first amp it took us 4h to remove the output filters, with the 2 of us pushing / pulling through the holes. We were on the verge of giving up, but decided to carry on, worst case wrecking the boards and we nearly did so on several occasions. The second amp was a 2h job, because we knew already how far to push / what effective process to use, and also because 3 of the caps came quite easily and only 1 with a lot of difficulties. On the first amp all caps were solid and the solder used of the problematic kind (stuck in the holes like glue).
Aiyima is using different solders and assembly processes, quite clearly, and even adding our solder of flux didn't work as nothing seemed to be compatible to the 2 or 3 stuff they used. Some parts though are very easy to remove. The volume board... is either glued and soldered, or mecanicaly forced and soldered... or again soldered with whatever very low quality solder that won't come off even with professional tools. At least not on our units, admittely we have only 2 of them.
These mods... I really hope they do bring sonic benefits, as they are not easy to perform, and cost time and money.
Defo not for beginners... I would be surprised to read how many did really replace "more than the output coils" and "Dc coupling caps" - read "output caps" and "volume board", and of course how it went.
Claude and Gilles, enjoying family and HIFI
Last edited:
A thought..
I'm planning to add PFFB to my TPA3255EVM board. (i actually have two of them).
Would it be relatively easy to add that to the Aiyima board as well? I can see the point in replacing the coils, TI clearly shows in their documentation that they make a big difference to distortion levels. Replacing the caps is in my view not the most critical thing, maybe bypass then with 0,1 uF cap would suffice?
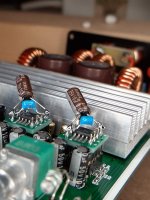
OUTPUT FILTER MOD
So it was PITA to say the least, because of the caps removal. DEFO not for beginners.
I won't share the values I used as these are specific to Gilles LS and some might stupidely just try the same parts whereas all is calculated for 10R above 10kHz and fits in a double casing so emissions are not a prob.
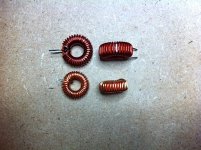
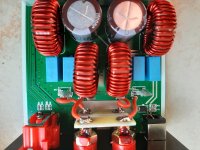
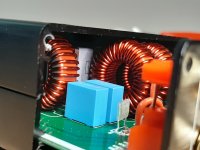
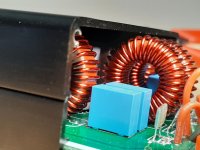
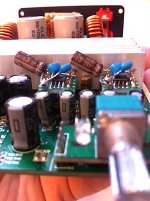
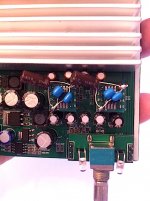
We hesitated a long time between the Wurth and Coilcraft coils, reading TI's spec sheet, and decided finaly to use the Coilcrafts used by TI (MA-5172, 10uH in OUR case) on its own evaluation board. Sure not a bad choice and it still fits in the unit. Just. See pix, quite bigger than what is used in the unit.
Output coils are Epcos, the blue one you can see on the pix. Are the ones inside the unit originals? They are defo smaller and with different writing...
Anyway, to the sound. Some benefits are possibly due to the filter calculation, that should release the treble somewhat. Some gain is possibly due to better (and bigger) coils, perhaps even more so at higher levels (less distorsions).
But all this is quite academic. At the end we found that on our system, admittely high efficiency and requiring little from the amp, the benefits were small. Only between 0.5 and 1.5 depending on music. And that was on 1 amp only (so requiring DOUBLE the power of the final biamping configuration), comparing directly a modded and unmodded amp.
The sound was more mature, somewhat less distorted/cleaner on heavy music in the mids and higher frequencies, overall it sounded more real, with somewhat truer timbres. Things were more stable and differentiated, more easy going, on complicated operas à la Wagner / Gounod / Verdi. On average pop and rock the difference was very small.
No negative though, apart if you like it more distorted (read louder and dirtier) on heavy metal. But a small gain at the end. Being kind, we give it 1.5 points on our scale, barely.
Do I recommend it? Certainly not the first tweak I would do, and it was 10x the cost and 1/3 the efficiency of a simple plug and play SMPS filter we used "while at it" on a DAC. Perhaps super hyper coils would bring more benefits, but what then? 20% better, I doubt... so up to 1.8 instead of 1.5? Hmm... OK, perhaps you need a lot of power to drive your LS to insane levels, but then why this amp... Hmmm...
Until now we had great VFM with 1$ bringing 1 point or so. Here we have 30$ per point and a lot of hassle and risk to do that mod. OK, I reckon most people would spend probably 200$ on RCA cables to have that kind of improvement, that's about re findings and magnitude. Yes, at the end, we are only speaking of 45$ per amp for output coils and caps, and it is all just for fun, so no drama. But then for the same cost you can have a second amp and go biamping, and again it revealed that 2 amps brought double as much sonic benefits to our ears then this coil+caps mod, so...
At the end I am not sure that coil hype is justified as long as you don't need a lot of power or listen to complex music (something most LS under 6k can't deliver anyway)... Or like us, you like tweaking. The standard coils and caps do in fact suprisingly an acceptable job in this unit and they are other things to address. Nevertheless we have tweaked the second amp so we have a small plus overall and identical amps again.
To our ears, tweaked as it was, the units sounded great and that mod only brought a small benefit, not in line with the time and money spent. I won't do it in my mother's unit.
Let's move on...
Claude and Gilles
PS : oh, the coils really fit tight to close the top, you need to incline them slightly, but "they do fit under the bonnet"
So it was PITA to say the least, because of the caps removal. DEFO not for beginners.
I won't share the values I used as these are specific to Gilles LS and some might stupidely just try the same parts whereas all is calculated for 10R above 10kHz and fits in a double casing so emissions are not a prob.
We hesitated a long time between the Wurth and Coilcraft coils, reading TI's spec sheet, and decided finaly to use the Coilcrafts used by TI (MA-5172, 10uH in OUR case) on its own evaluation board. Sure not a bad choice and it still fits in the unit. Just. See pix, quite bigger than what is used in the unit.
Output coils are Epcos, the blue one you can see on the pix. Are the ones inside the unit originals? They are defo smaller and with different writing...
Anyway, to the sound. Some benefits are possibly due to the filter calculation, that should release the treble somewhat. Some gain is possibly due to better (and bigger) coils, perhaps even more so at higher levels (less distorsions).
But all this is quite academic. At the end we found that on our system, admittely high efficiency and requiring little from the amp, the benefits were small. Only between 0.5 and 1.5 depending on music. And that was on 1 amp only (so requiring DOUBLE the power of the final biamping configuration), comparing directly a modded and unmodded amp.
The sound was more mature, somewhat less distorted/cleaner on heavy music in the mids and higher frequencies, overall it sounded more real, with somewhat truer timbres. Things were more stable and differentiated, more easy going, on complicated operas à la Wagner / Gounod / Verdi. On average pop and rock the difference was very small.
No negative though, apart if you like it more distorted (read louder and dirtier) on heavy metal. But a small gain at the end. Being kind, we give it 1.5 points on our scale, barely.
Do I recommend it? Certainly not the first tweak I would do, and it was 10x the cost and 1/3 the efficiency of a simple plug and play SMPS filter we used "while at it" on a DAC. Perhaps super hyper coils would bring more benefits, but what then? 20% better, I doubt... so up to 1.8 instead of 1.5? Hmm... OK, perhaps you need a lot of power to drive your LS to insane levels, but then why this amp... Hmmm...
Until now we had great VFM with 1$ bringing 1 point or so. Here we have 30$ per point and a lot of hassle and risk to do that mod. OK, I reckon most people would spend probably 200$ on RCA cables to have that kind of improvement, that's about re findings and magnitude. Yes, at the end, we are only speaking of 45$ per amp for output coils and caps, and it is all just for fun, so no drama. But then for the same cost you can have a second amp and go biamping, and again it revealed that 2 amps brought double as much sonic benefits to our ears then this coil+caps mod, so...
At the end I am not sure that coil hype is justified as long as you don't need a lot of power or listen to complex music (something most LS under 6k can't deliver anyway)... Or like us, you like tweaking. The standard coils and caps do in fact suprisingly an acceptable job in this unit and they are other things to address. Nevertheless we have tweaked the second amp so we have a small plus overall and identical amps again.
To our ears, tweaked as it was, the units sounded great and that mod only brought a small benefit, not in line with the time and money spent. I won't do it in my mother's unit.
Let's move on...
Claude and Gilles
PS : oh, the coils really fit tight to close the top, you need to incline them slightly, but "they do fit under the bonnet"
Attachments
Last edited:
Hi Strongbow60,
PFFB to Aiyima, of course all is doable, but not staright forward and space might be an issue. We won't try that as we have calculated the output filter to adapt to our LS, so no real need to push it that far... but let us know if you do so
Replacing the coils... we saw the point aswell and went for the coils TI chose and recommended, for sure not a bad starting point. We have no clue on the coil's quality Aiyima fitted first place, an unknown, but based on size and wire diameter, for sure it has some limitations, at least on the paper.
However, it's all about sound and I am not interested on driving low distorsion figures for the sake of it. Lower is not always better, there is more to it than just a figure, but that's another discussion best pursued in the Pass section.
Whatever, at the end in our set up the original coils are doing a good job and swapping coils for recommended ones... didn't change a lot of things. Waste of time and money if you haven't done all the other mods IMHO.
Having said that, if you want to change coils only, then it is pretty easy to unsolder the existing ones and quite fail safe to fit new ones.
My view is that the original coils are doing an OK job and not the priority. I have been there, learned the hard way and can compare with other tweaks. Of course if you need more power than the picture will shift more and more in favour of better coils. Need twice the output power? Well, you are still better off with purchasing 2 Aiyima amps than replacing the coils in 1 unit. You need far more power? Look for another amp then, probably best...
All IMHO
Claude
Last edited:
Ok, the last mod is to come... removing/replacing the volume pot.
Why the last? Well, we have moved to a point where it is clearly diminishing returns and details. Plus it sounds great as it is, escpecialy in bi amping mode.
What is outstanding anyway on our TODO list?
1- Optional additional Wima on OPA PS. Well, we have already 3 bypass caps, I don't expect a massive step from this MKS on top of a C0G. I prefer to enjoy my WE
2- Replace the big 3000uF PS caps with supposed better ones. Well, we do have already 3 bypass caps that doped clearly the performance of the existing Elnas. I don't expect much improvement from the spec only given we enhenced the existing good cap. Plus I have already have one of the super caps I want to put in place... in parallel to the Elna. Didn't change the world. So my guess is once you bypassed correctly the existing PS caps, you have gained most of what is to be gained whatever. Glad to be proven wrong if someone wants to try. For now I will keep the PS caps for another project.
3- Add another 3000uF PS caps to the existing ones to increase the overall capacity. Well, we already have some of the 3000uF quality caps at the output of our SMPS filter, moving from 6000uF to 9000uF per unit. That change was 1.5 points and was mainly due to the filtering performed by the filter, so adding capacity is not really the point IMHO. Ok, could be worth on 2200uF units, but I doubt it, they should be enough given spec sheet and sound OK... provided you bypass them the way we did it. Still cheaper, easy and fool proof.
Yes, that means that I will have some high quality 3000uF lying around, and some unused MKS Wima, but that's life. Time is better spent listening to music then spending hours for a very hypothetical +1.
We have done all what we could resonably do to this amp, except the last mod to come on the volume pot. It is done and I will post on this.
Bottom line is we have a very enjoyable amp now, that could probably compete in the 1500$ or even in the 2000$ bracket (we might do a comparo at some stage in a shop) and stand acceptably in bi amp modus next to any LS up to the 6000$ range - provided they are not too complicated to drive and you are not allergic to Class D. It is quite a move from the initial unit that couldn't really do any better than the latest 600$ amps as we found out in our direct comparo.
Time to listen to music me says, job done!
Have fun
Claude and Gilles
For me: Wurth (flat wire) wins over Coilcraft.OUTPUT FILTER MOD
...We hesitated a long time between the Wurth and Coilcraft coils
...No negative though, apart if you like it more distorted (read louder and dirtier) on heavy metal. But a small gain at the end. Being kind, we give it 1.5 points on our scale, barely.
Do I recommend it? Certainly not the first tweak I would do, and it was 10x the cost and 1/3 the efficiency of a simple plug and play SMPS filter we used "while at it" on a DAC. Perhaps super hyper coils would bring more benefits, but what then? 20% better, I doubt... so up to 1.8 instead of 1.5? Hmm... OK, perhaps you need a lot of power to drive your LS to insane levels, but then why this amp... Hmmm...
...Yes, at the end, we are only speaking of 45$ per amp for output coils and caps...But then for the same cost you can have a second amp and go biamping, and again it revealed that 2 amps brought double as much sonic benefits to our ears then this coil+caps mod, so...
...The standard coils and caps do in fact suprisingly an acceptable job in this unit and they are other things to address.
...To our ears, tweaked as it was, the units sounded great and that mod only brought a small benefit, not in line with the time and money spent. I won't do it in my mother's unit.
I agree that changing coils brings a benefit which justifies the time and money spent only in the search for absolute, and generally otherwise not worth it (except when it is obvious that the coil/wire is too small).
De-soldering is much easier done withWe are still spending most of the WE tweaking and comparing the 2 amps, so more to come, but as a warning to ALL.
It is easy to unsolder the existing coils and solder new ones.
It is real PITA to take out the existing output filter caps. Defo not for beginners.
We didn't succeeded removing the volume board! We will dremel it out, possibly the best solution!
There are 2 of us, we are equiped with proper temp regulated soldering irons, hand sucking pumps (3 of them) and now on top a proper professional heating soldering vacuum pump (10 times bigger than the amps) with variable heat and permanent vacuum on trigger.
On the first amp it took us 4h to remove the output filters, with the 2 of us pushing / pulling through the holes. We were on the verge of giving up, but decided to carry on, worst case wrecking the boards and we nearly did so on several occasions. The second amp was a 2h job, because we knew already how far to push / what effective process to use, and also because 3 of the caps came quite easily and only 1 with a lot of difficulties. On the first amp all caps were solid and the solder used of the problematic kind (stuck in the holes like glue).
Aiyima is using different solders and assembly processes, quite clearly, and even adding our solder of flux didn't work as nothing seemed to be compatible to the 2 or 3 stuff they used. Some parts though are very easy to remove. The volume board... is either glued and soldered, or mecanicaly forced and soldered... or again soldered with whatever very low quality solder that won't come off even with professional tools. At least not on our units, admittely we have only 2 of them.
These mods... I really hope they do bring sonic benefits, as they are not easy to perform, and cost time and money.
Defo not for beginners... I would be surprised to read how many did really replace "more than the output coils" and "Dc coupling caps" - read "output caps" and "volume board", and of course how it went.
Claude and Gilles, enjoying family and HIFI
-pre-heating the pcb with a hot air gun - from its bottom side
-instead of vacuum pumps I use solder wick
Now to the last mod: volume pot.
Don't bother desoldering the board, it won't go. Dremel is your friend, but be careful with dust and caps in front of the board.
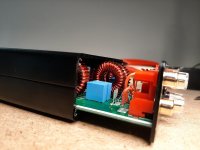
We always felt the pot was a bottleneck, and I am quite experienced with pots. We fitted a motorised Blue Alps, mainly for convenience and cost reasons, and removed the existing pot. Board out, connect the channels as per pix, connecting mass is not even needed as already done on the bottom board. You basicaly just need to add 2 wires. And some possibly some Blu tack to make sure there is no contact with the casing's corner
Soundwise, I expected the Alps to be right in the middle of the existing avreage pot and a top pot. Top pot being step attenuators, resistors networks, Alps Black or Tocos or TDK or MUSES. These are quite the ultimate, with some different flavours.
And so it turned out to be. Removing the pot gave us a gain of +1 to +2 depending on music material, make that a strong +1.5 overal. Quite as much in quantity (and in most findings!) than the coils, still far behind the OP amp swap.
Gains are:
- more background information
- more flow, notes ending much better
- less distorsion, tones more natural
- more dynamic
- better bass definition
- better high frequencies, less strident
Very enjoyable, still small in amplitude so not a must do, but again you could fit a real external top pot if you wish. We tried to be consistant and wanted a remote, but have a look at my previous post re DACT-21 types or, if only digital sources, why not using the DACs volume control down to say -20dB (where nothing audible is lost) and fit a 2 or 3 position rotative switch inside the Aiyima with a voltage divider giving you 3 fixed volume ranges, so you only play with your DAC from full volume to -20dB? That would be the ultimate and possibly squeeze another 2 points while being dead cheap.
All done now re mods and Aiyima, ending on a positive note. We will now enjoy music and I will tune my mother's unit as that little amp, once tweaked, is a jem in its class. As for me, Class D has become now great VFM and has reeached an acceptable level. It might well do the trick one day in a second system for easy listening... while I will though admittely still go on enjoying "hotter amps" in my very own listening room.
Enjoy music and thanks for reading us
Claude and Gilles
Don't bother desoldering the board, it won't go. Dremel is your friend, but be careful with dust and caps in front of the board.
We always felt the pot was a bottleneck, and I am quite experienced with pots. We fitted a motorised Blue Alps, mainly for convenience and cost reasons, and removed the existing pot. Board out, connect the channels as per pix, connecting mass is not even needed as already done on the bottom board. You basicaly just need to add 2 wires. And some possibly some Blu tack to make sure there is no contact with the casing's corner
Soundwise, I expected the Alps to be right in the middle of the existing avreage pot and a top pot. Top pot being step attenuators, resistors networks, Alps Black or Tocos or TDK or MUSES. These are quite the ultimate, with some different flavours.
And so it turned out to be. Removing the pot gave us a gain of +1 to +2 depending on music material, make that a strong +1.5 overal. Quite as much in quantity (and in most findings!) than the coils, still far behind the OP amp swap.
Gains are:
- more background information
- more flow, notes ending much better
- less distorsion, tones more natural
- more dynamic
- better bass definition
- better high frequencies, less strident
Very enjoyable, still small in amplitude so not a must do, but again you could fit a real external top pot if you wish. We tried to be consistant and wanted a remote, but have a look at my previous post re DACT-21 types or, if only digital sources, why not using the DACs volume control down to say -20dB (where nothing audible is lost) and fit a 2 or 3 position rotative switch inside the Aiyima with a voltage divider giving you 3 fixed volume ranges, so you only play with your DAC from full volume to -20dB? That would be the ultimate and possibly squeeze another 2 points while being dead cheap.
All done now re mods and Aiyima, ending on a positive note. We will now enjoy music and I will tune my mother's unit as that little amp, once tweaked, is a jem in its class. As for me, Class D has become now great VFM and has reeached an acceptable level. It might well do the trick one day in a second system for easy listening... while I will though admittely still go on enjoying "hotter amps" in my very own listening room.
Enjoy music and thanks for reading us
Claude and Gilles
Attachments
Hi Douede
Yes, Wurth would have been my first choice. But anyway, the benefits are small and I suspect the move from Coilcraft to Wurth even smaller... Not the best mod we did on THAT amp.
Hi Bucksbunny
Thanks, yep of course we tried all this. Should have make pictures of the legs once removed. The 2 face board has as expected a layer on the top, on the bottom and on the "connecting tunnel". That one hasn't the right size (too small for some legs) sometimes, the solder they used tends to aggregate. Bottom line: you have the feeling at some parts, once the leg painfully removed, that the tunnel collapsed and got full with a strange material that glues to it, inside, with blocks / rocks. Never had that with multilayer boards or Pass boards... But thanks
Last but not least, although ot a prob that far, in order to help the gap between casing and coils we decided to slightly play with the casing to give up to 1mm...
Have fun
Claude
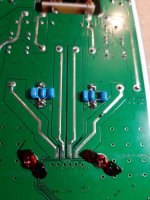
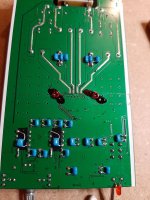
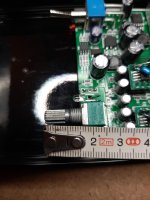
Finished the amp for my mother during Xmas.
What a great amp for less than 75E all inclusive.
As a reminder, she was never really happy with the amp in std form, the old amp I made for her (tuned 300E Class AB amp, gave the ghost after 25y) played better. Again, in its std form this amp to our ears doesn't stand a chance vs a modern 500E amp. Now, very simply and lightly tuned, the Aiyima plays better in every way and probably well into the 1000E class (I lack recent comparison in this price range). It is VG but could still improve in terms of 3D / stage depth, something that seems to affect a lot of Class D amps.
Anyway, 75E vs 1000E (if you consider sound only and not comfort, features, quality), and light work in one day (no desoldering at all), this is great VFM and good enough for her system now.
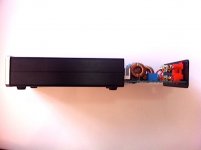
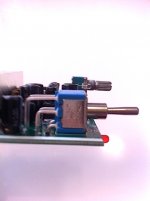
On the attached pix you can see how Gilles, master of all casings, hinted me to take the board off with a minimum of hassle. Just undo the 4 back screws, the front knob and screw holding the volume pot, and slide everything backwards!
Back in is the problem due to the power switch... just get it carefully in the middle position, a position that doesn't exist so it is not stable, and slide it back in. Works, cheers, Gilles!
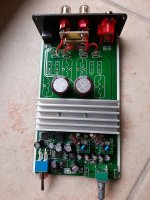
Mods are the light version mentioned before, as per pix.
Too leazy to do all that? Want to save a few Euros and a lot of time / hassle: skip 14 of the bypasses, that is most of the work!
By skipping the 8 bypasses for the caps in the signal path and the 6 bypasses for all the caps that are near the faceplate, on the left.
I didn't because I didn't care "while at it" but they don't make a huge sonic difference and if that's all what stops you to release the potential of this little amp...
Enjoy
Claude
What a great amp for less than 75E all inclusive.
As a reminder, she was never really happy with the amp in std form, the old amp I made for her (tuned 300E Class AB amp, gave the ghost after 25y) played better. Again, in its std form this amp to our ears doesn't stand a chance vs a modern 500E amp. Now, very simply and lightly tuned, the Aiyima plays better in every way and probably well into the 1000E class (I lack recent comparison in this price range). It is VG but could still improve in terms of 3D / stage depth, something that seems to affect a lot of Class D amps.
Anyway, 75E vs 1000E (if you consider sound only and not comfort, features, quality), and light work in one day (no desoldering at all), this is great VFM and good enough for her system now.
On the attached pix you can see how Gilles, master of all casings, hinted me to take the board off with a minimum of hassle. Just undo the 4 back screws, the front knob and screw holding the volume pot, and slide everything backwards!
Back in is the problem due to the power switch... just get it carefully in the middle position, a position that doesn't exist so it is not stable, and slide it back in. Works, cheers, Gilles!
Mods are the light version mentioned before, as per pix.
Too leazy to do all that? Want to save a few Euros and a lot of time / hassle: skip 14 of the bypasses, that is most of the work!
By skipping the 8 bypasses for the caps in the signal path and the 6 bypasses for all the caps that are near the faceplate, on the left.
I didn't because I didn't care "while at it" but they don't make a huge sonic difference and if that's all what stops you to release the potential of this little amp...
Enjoy
Claude
Attachments

Last edited:
- Home
- Amplifiers
- Class D
- Aiyima TPA3251 Modification Build Thread!