Hi,
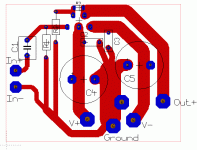
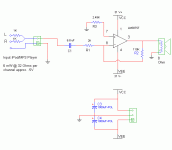
I'd be really glad if anybody would check my LM1875 PCB layout!
I tried to approach a "star ground", didn't realize exactly that, but my board shouldn't be much worse, is it?
The circuit is very basic, maybe I'll add an output filter for the high frequencies (small cap and 1R resistor across the output).
The low current part is on the left side, you recognise the high current part by the trace widths.
Especially, I wanted to ask if that layout should be ok in terms of stability.
Any other improvements (while keeping the circuit small and simple) are welcome!
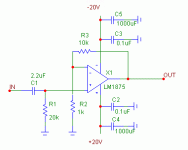
Here comes the schematic...
Cheers,
Dominique
PS. The circuit will probably be changed slightly, but I'd like to have a functioning base.
After building a tiny stereo amp with an attenuator and two of those pcbs, I'm planning to use several of these mono circuits to power active loudspeakers...
I'd be really glad if anybody would check my LM1875 PCB layout!
I tried to approach a "star ground", didn't realize exactly that, but my board shouldn't be much worse, is it?
The circuit is very basic, maybe I'll add an output filter for the high frequencies (small cap and 1R resistor across the output).
The low current part is on the left side, you recognise the high current part by the trace widths.
Especially, I wanted to ask if that layout should be ok in terms of stability.
Any other improvements (while keeping the circuit small and simple) are welcome!
Here comes the schematic...
Cheers,
Dominique
PS. The circuit will probably be changed slightly, but I'd like to have a functioning base.
After building a tiny stereo amp with an attenuator and two of those pcbs, I'm planning to use several of these mono circuits to power active loudspeakers...
Attachments
I would route the power traces such that the pads for the electrolytic caps are in the middle of the trace. Also be careful about the location of C4. Depending on its height you could have trouble fitting a screw driver or other tool in there to tighten the screw that will hold the chip to whatever heat sink you're using. Of course that's assuming you're going to use a screw instead of a clamp.
@pinkmouse
I'm glad you rated it not that bad!")
I also thought about soldering R3 directly to the pins, and if it can make a difference (Was there any report on stability improvement by someone who tried both?), I'll do so!
But I want the PCB also to have the R3 pads, for the "nicer looking" option.
@BWRX
Oh dear! Bad error! You've seen that well!
Thanks, I'll fix it somehow...
Big thanks, mates! CU later!
Dominique
I'm glad you rated it not that bad!
I also thought about soldering R3 directly to the pins, and if it can make a difference (Was there any report on stability improvement by someone who tried both?), I'll do so!
But I want the PCB also to have the R3 pads, for the "nicer looking" option.
@BWRX
Oh dear! Bad error! You've seen that well!
Thanks, I'll fix it somehow...
Big thanks, mates! CU later!
Dominique
compared to: http://www.national.com/images/pf/LM1875/00503002.pdf
Your voltage gain will be about 3 db down from the National design ... but that would be fine for a headphone amp ... changing the feedback resistor to >> 20K will bring it into almost exactly the National recommendation for small power amp =
Your voltage gain will be about 3 db down from the National design ... but that would be fine for a headphone amp ... changing the feedback resistor to >> 20K will bring it into almost exactly the National recommendation for small power amp =
@FastEddy
Yes, gain is quite low. I'm not sure for the gain yet, but 10 is sort of minimum (also from the datasheet specs).
At the moment, I'm running a point to point soldered chipamp with only a gain of 2.7 from a CD player...
Ok, that was because my old amp was broken and I wanted to listen to music, so I quickly soldered something together whiile didn't finding the right resistors, but that's really loud enough for my small room.
@everyone
1) How important do you rate that high frequency filter across the output?
(1 ohm and 0.22uF is recommended in the datasheet / look up FastEddy's link)
2) Except space requirements, does it make a difference if I place the 1000uF filter caps on the PS board and use sth. like 100uF on the amp's board, along with the 0.1uF?
Then, I wouldn't have to put the big caps left and right from the LM1875 in order to be able to reach the screw of the cooling pad...
Cheers,
Dominique
Yes, gain is quite low. I'm not sure for the gain yet, but 10 is sort of minimum (also from the datasheet specs).
At the moment, I'm running a point to point soldered chipamp with only a gain of 2.7 from a CD player...
Ok, that was because my old amp was broken and I wanted to listen to music, so I quickly soldered something together whiile didn't finding the right resistors
, but that's really loud enough for my small room.@everyone
1) How important do you rate that high frequency filter across the output?
(1 ohm and 0.22uF is recommended in the datasheet / look up FastEddy's link)
2) Except space requirements, does it make a difference if I place the 1000uF filter caps on the PS board and use sth. like 100uF on the amp's board, along with the 0.1uF?
Then, I wouldn't have to put the big caps left and right from the LM1875 in order to be able to reach the screw of the cooling pad...
Cheers,
Dominique
Very. It's not a filter, it makes the amp stable. So it won't oscillate.Dominique said:[B@everyone
1) How important do you rate that high frequency filter across the output?
(1 ohm and 0.22uF is recommended in the datasheet / look up FastEddy's link)
[/B]
" ... 1) How important do you rate that high frequency filter across the output? (1 ohm and 0.22uF is recommended in the datasheet / look up Nationals link) ..."
If they say it should be so, it must be true.
My Carapolla: This prevents high freqs from getting through to the load, the speaker. If your speaker is a voice coil type, you probably don't need it as "stray capacitance" of the speaker and leads is about 0.01 nF ... and voice coil speakers resist changes above about 25k Htz. Piezo electric types (ala some cheap headphones) and some electrostatic speakers would need it as they may respond to 50K Htz or more ... it all depends on the load. You could install these directly on your speaker terminals ... then cut 'em out of the loop at a later date if you think they are not worth the trouble. (I would still leave the solder pads available on the circuit board ... as some here will have alternate suggestions.) ... ignore this as it is mostly not applicable in this case.
" ... 2) Except space requirements, does it make a difference if I place the 1000uF filter caps on the PS board and use sth. like 100uF on the amp's board, along with the 0.1uF? ..."
Yes, leave the solder pads on the board, well placed and big and properly spaced so you can add more as needed / if needed. You may at some future point want to add some plastic "snubbing" caps here as well (extra solder pads in parallel with the big guys) = most here believe plastic caps result in better sounds. Also BWRX is right: " ... Depending on its height you could have trouble fitting a screw driver or other tool in there to tighten the screw ..." so, having the big caps off the board for tweaks is a good idea ... then final assembly might allow you to add them back ... or not. BWRX is also correct here: " ... You could easily shift the large caps over to the right side of the board to obtain easy access to the mounting screw. ..."
!! Ooops ... Paulb above is right = the small cap is to keep the op-amp from oscillatting ... best to leave it on the board !!
thanks again, everyone
@paulb
I called it filter 'cause it sort of filters the high frequencies. Ok, so maybe I should provide pads and in case it works without, I could still leave the... err... filter away. (What's the correct expression for this?)
@fasteddy
That "filter" - I think I read some time ago that it also prevents unwanted high frequency signals to enter the circuit that were picked up by the cable, so to put it on the loudspeaker terminals wouldn't work as well.
@all
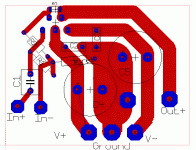
Now I shifted the filter caps so I could reach the cooling pad screw!
Also I slightly changed details, like combining the left side... "low current ground paths" and connecting it to the "true ground" via a wire. (Sorry for the strange expressions, hope you see what I mean).
Is Grounding like that still good?
Cheers,
Dominique
oups, forgot the image of the PCB, here it is...
@paulb
I called it filter 'cause it sort of filters the high frequencies. Ok, so maybe I should provide pads and in case it works without, I could still leave the... err... filter
away. (What's the correct expression for this?)@fasteddy
That "filter"
- I think I read some time ago that it also prevents unwanted high frequency signals to enter the circuit that were picked up by the cable, so to put it on the loudspeaker terminals wouldn't work as well.@all
Now I shifted the filter caps so I could reach the cooling pad screw!
Also I slightly changed details, like combining the left side... "low current ground paths" and connecting it to the "true ground"
via a wire. (Sorry for the strange expressions, hope you see what I mean).Is Grounding like that still good?
Cheers,
Dominique
oups, forgot the image of the PCB, here it is...
Attachments
ok, the small cap (0.22uF) and the resistor (1R) across the output:
If I understand it right, now I'd call it a high frequency damper (with regard to the op-amp's oscillating tendency)
But in case of short leads to the (loudspeaker-) driver, I probably could leave it away...? I mean, in an active loudspeaker with a cable lenght of maybe 30cm (12inches)...
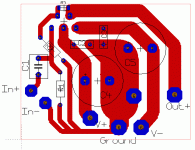
Does anyone have any remarks on my latest PCB layout?
Is grounding ok?
Cheers,
Dominique
If I understand it right, now I'd call it a high frequency damper (with regard to the op-amp's oscillating tendency)
But in case of short leads to the (loudspeaker-) driver, I probably could leave it away...? I mean, in an active loudspeaker with a cable lenght of maybe 30cm (12inches)...
Does anyone have any remarks on my latest PCB layout?
Is grounding ok?
Cheers,
Dominique
Hi,
so now I ordered 10 LM1875T on ebay
Could anybody criticize my latest PCB?
I'm not sure if grounding is ok. It is slightly different from the version above, but only in the way of connecting the... err... low current ground paths to the fat ground in the center.
I just read in a book that that stability thing in the output (resistor and cap) is most often not necessary and should only be installed in case of stability problems.
Now, I guess that some knowledgeable people would protest. And I imagine that sometimes slight stability problems can appear and possibly not even be discovered as such, because they only slightly worsen distortion in the audible range... ?
Cheers,
Dominique
Attachments
After first test runs, the amp seems to run fine.
I'll make some distortion measurements soon. As I don't own an oscilloscope, this way I'll see if there's any unwanted oscillation...
I didn't include that stability network at the output yet - maybe the design is good enough so it doesn't really need it?
Critics still welcome!
Cheers,
Dominique
I'll make some distortion measurements soon. As I don't own an oscilloscope, this way I'll see if there's any unwanted oscillation...
I didn't include that stability network at the output yet - maybe the design is good enough so it doesn't really need it?
Critics still welcome!
Cheers,
Dominique
I got some 25V + 25V trannies and some LM1875s sitting around and I was thinking about doing an old school P2P carbon comp resistor amp to power a little 4 ohm driver and was intrigued about your PCB.
I think that I understand the functions of all components except for R1. What does R1 do? I've seen similar layouts and heard folks talk about "setting the input impedance" but what does that mean? This R1 is not in any of the GC kits I've been using.
I think that I understand the functions of all components except for R1. What does R1 do? I've seen similar layouts and heard folks talk about "setting the input impedance" but what does that mean? This R1 is not in any of the GC kits I've been using.
Dominique: Without making a thorough examination of your board layout ( http://www.diyaudio.com/forums/attachment.php?s=&postid=1085737&stamp=1166558658 ) I do notice that the Vcc+ and Vdd- (V+ & V-) appear to be incorrectly marked on the board, referencing the National pages at http://www.national.com/pf/LM/LM1875.html
Also, without knowing any better, I assume you have some sort of voltage divider off board to solidify your ground plain at 1/2 Vcc+ or 0 VDC between V+ & V- ... No?
Also, without knowing any better, I assume you have some sort of voltage divider off board to solidify your ground plain at 1/2 Vcc+ or 0 VDC between V+ & V- ... No?
Thanks for reminding me, FastEddy!
I found that error, but forgot to mention it here. But yes, I have to, so that no one copies my layout and burns their LM1875 too!
Hmm, what do you mean with that voltage divider?
I use a dual voltage transformer and this gives me two rails and the center which I connected to the ground of the amp's pcb.
Cheers,
Dominique
Dominique said:Probably, Carlos, you didn't see R1 before, because your gainclones had attenuators at that place which already include R1.
Nope...not in my simpleton design. I'm playing some Al Green right now through my most recent test mule
Attachments
- Status
- This old topic is closed. If you want to reopen this topic, contact a moderator using the "Report Post" button.
- Home
- Amplifiers
- Chip Amps
- Please check my LM1875 PCB layout