grege said:Hi m0tion,
I think we are both hoping for the same outcome concerning this thread. I'm sorry if my comments implied something different.
Indeed, all problems with carlos will be handled offline. Lets move on. Anyone have suggestions for improving the layout?
For those with the current pcb set, the revised rectifier board with the 10000uF caps is exactly twice the size of the old one.
--
Brian
Dear Brian,
why ruin an already very good design of the PSU board? Like the one on the LM3875 kit.
Your existing chip board tightly close to the PS board is very ideal to use just a jumper between the boards.
Meanwhile, snubber parts can be implemented outside of the PS board. I don't think you could satisfy many variations of getting high capacitance. One could use 1 unit of 10,000uF cap but others may preffer to have 5 x 2200uF or even 10x 1000uF caps.
Besides, some other people with efficient speaker would already be pleased with 1500uF Panasonic FC caps (which IMO is very hard to beat in quality, I just hope to see it in bigger value like 6800uF or 10000uF)
Grege point is also valid. Resonant damper cap and voltage drain resistor ideally should be soldered directly to the cap leads.
Your existing board is easily adaptable to accept snubber parts on it.
I already post a way to adapt the board on other forum. Here I attach the copy of it.
Now if I can suggest something... :
1. maybe the hole for the V+, PG+, V- and PG-, on chip board and PS board can be made bigger to accept bigger wire...
2. the hole for the cap leads on the PS board can be made bigger to accept bigger cap leads or wire to external high-capacity cap banks... (i.e. computer grade caps usually has screw based terminals)
Regards,
---
David
Attachments
dw1narso said:Dear Brian,
why ruin an already very good design of the PSU board? Like the one on the LM3875 kit.
Your existing chip board tightly close to the PS board is very ideal to use just a jumper between the boards.
Meanwhile, snubber parts can be implemented outside of the PS board. I don't think you could satisfy many variations of getting high capacitance. One could use 1 unit of 10,000uF cap but others may preffer to have 5 x 2200uF or even 10x 1000uF caps.
Besides, some other people with efficient speaker would already be pleased with 1500uF Panasonic FC caps (which IMO is very hard to beat in quality, I just hope to see it in bigger value like 6800uF or 10000uF)
Grege point is also valid. Resonant damper cap and voltage drain resistor ideally should be soldered directly to the cap leads.
Your existing board is easily adaptable to accept snubber parts on it.
I already post a way to adapt the board on other forum. Here I attach the copy of it.
Now if I can suggest something... :
1. maybe the hole for the V+, PG+, V- and PG-, on chip board and PS board can be made bigger to accept bigger wire...
2. the hole for the cap leads on the PS board can be made bigger to accept bigger cap leads or wire to external high-capacity cap banks... (i.e. computer grade caps usually has screw based terminals)
Regards,
---
David
The whole idea here with the LM3886 board and rectifier board with the snubber/10000uF cap setup is to try something new. I feel that it is time to try something new, and having a pcb with room for adding these components makes it easier for people to experiment. I am not modifying the existing LM3875 rectifier board. I am looking at the LM3886 board as an exercise in trying something new. If someone wants to still use the old rectifier board, they are welcome to use the boards that come with the LM3875 pcb set, or just not stuff the extra components in the LM3886 rectifier board. I had considered making the snubber setup on another pcb, which would couple between the rectifier board and the main board, but this results in too many connections.
As for your suggestions, I could make the holes on the input terminals bigger, what sizes do you suggest? My assumption was that if people wanted to use larger gauge wire, then input terminals could be installed.
As for the screw based terminals on caps, this seems like it would work better for external wires to be connected to the caps, and I can add bigger holes for this if necessary. Usually the diameter of the screw based caps are larger than 1", which would make them too wide to be accommodated on the pcb. What size holes would work best for your application with respect to this?
Again, with regards to the new rectifier board is to allow more versatility in trying new things with the gainclone setup. This is not strictly limited to snubber setup that carlosfm defined, and should allow for easier experimentation for new ideas.
I will eventially put up a Wiki and take a survey of the interest for boards with the new layout, and try to see if people would prefer the existing layout.
I appreciate your input,
--
Brian
Dear Brian,
sorry that I may sound to offend the new ideas... That's not true...
Of course any new idea would be welcomed by people in the forum, including me.
Just that "jumpering" option that is easily done with current boards, IMO, is too precious to be taken out from the consideration.
Definitely... screw based cap should use additional wires to connect to the board... this is my point... for unecessary providing big space on the PS board for this kind of caps...
About the hole size... I vote for a bit bigger than 1mm diameter... to accept 18AWG to 16AWG wire... (18AWG is fine to carry 15Amp current)...
Thanks for your attention,
---
David
")
dw1narso said:Dear Brian,
sorry that I may sound to offend the new ideas... That's not true...
Of course any new idea would be welcomed by people in the forum, including me.
Just that "jumpering" option that is easily done with current boards, IMO, is too precious to be taken out from the consideration.
Definitely... screw based cap should use additional wires to connect to the board... this is my point... for unecessary providing big space on the PS board for this kind of caps...
About the hole size... I vote for a bit bigger than 1mm diameter... to accept 18AWG to 16AWG wire... (18AWG is fine to carry 15Amp current)...
Thanks for your attention,
---
David
The larger holes on the amp boards for the bigger (BG) caps will fit 18ga wire, as will the ones on the power supply board with the 10000uF caps on the power supply board (a little over 2 mm holes on power supply board) This should work perfectly with 18ga wire.
--
Brian
http://www.diyaudio.com/forums/showthread.php?s=&postid=521837#post521837
same principles of minimizing open area between +/- PS and P-Gnd always apply
same principles of minimizing open area between +/- PS and P-Gnd always apply
>>The larger holes on the amp boards for the bigger (BG) caps will fit 18ga wire, as will the ones on the power supply board with the 10000uF caps on the power supply board (a little over 2 mm holes on power supply board) This should work perfectly with 18ga wire.
Sorry Brian... I'm thinking about the holes in the existing (current) PS board... not the new one... The "older" PS board will easily adapt to the external cap banks if the cap hole on the PS board (the one that we insert 4.7uF cap) is big enough to insert bigger wire....
(I know..., when using dual mono PS, actually I can use the hole at the additional V+, PG+, V- and PG- for the cap banks.)
But nice also to see that you already put that into consideration on the new PS board scheme...
REgards,
---
David
dw1narso said:>>The larger holes on the amp boards for the bigger (BG) caps will fit 18ga wire, as will the ones on the power supply board with the 10000uF caps on the power supply board (a little over 2 mm holes on power supply board) This should work perfectly with 18ga wire.
Sorry Brian... I'm thinking about the holes in the existing (current) PS board... not the new one... The "older" PS board will easily adapt to the external cap banks if the cap hole on the PS board (the one that we insert 4.7uF cap) is big enough to insert bigger wire....
(I know..., when using dual mono PS, actually I can use the hole at the additional V+, PG+, V- and PG- for the cap banks.)
But nice also to see that you already put that into consideration on the new PS board scheme...
REgards,
---
David
Sounds like a good idea. I can modify the existing board for the rev.3 LM3875 boards.
--
Brian
edjosh23 said:I like the idea of the snubber, when are the boards going to be for sale?
whats the max voltage of the 3886? and max output?
Thanks,
Josh
If there is enough interest, I will do a smaller board run and put some kits together. Here is a Wiki for indicating interest in an order of LM3886 boards:
http://www.diyaudio.com/wiki/index.php?page=chipamp+lm3886+interest+survey
If you are interested, enter your name, and what you want, and if there are a decent number of people interested, I will order a small batch of boards.
As for the LM3886, here is some info from the datasheet:
voltage supply range (from V+ to V-): 20v to 94v
68w cont. avg. power output into 4 ohms at V = +/- 28v
38w cont. avg. power output into 8 ohms at V = +/- 28v
50w cont. avg. power output into 8 ohms at V = +/- 35v
There is also a chart of the output power.
I asked the National rep what the difference between the LM3875 and the LM3886, and they said that the LM3886 was a newer chip with higher current handling, making it better for lower impedence loads. The limitation for the device is the thermal interface for output power.
--
Brian
dw1narso said:Brian,
technical wise LM4780 is basically 2 units of LM3886 in one package... but have you listen to both? are they really sound the same?
REgards,
---
David
I haven't done any direct comparisons between the two, which will be much easier to do once I have some LM3886 boards in my hands.
The LM4780 sounded very similar to the LM3875 on my setup here at home.
--
Brian
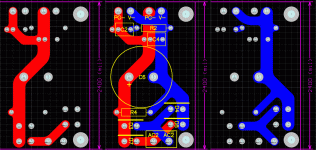
Here is another version, with the power supply board shrunk down a little bit:
--
Brian
An externally hosted image should be here but it was not working when we last tested it.
--
Brian
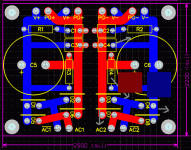
Hi Brian.
Here's some suggestions for the PSU board:
Avoid those "T"s and 90º angles, the traces should be as straight and thick as possible from the diodes to the output.
I made some "editing" with Paint, I hope it's not too messy...
I just edited the right side. I comment this side so that it's easier to explain and understand.
The changes are:
1. Re-arrange the diodes in a straight line and use the space available to the right (D4 and D8).
2. Now you've got some extra space, put R4 right next to the diodes, on a central position. Here, the PCB traces are already thick (as suggested by those squares).
3. C4 should be placed right next to the big cap, on a central position, right in the middle of the two thick PSU traces. I know, the PCB will have to be slighly bigger... Anyway, I recommend this cap right across the big cap's pins, so it doesn't need to have a dedicated place after it. Maby just an indication on the silkscreen, across the big cap.
4. The snubber should be centered so that the trace that joins the cap and the resistor falls between the two thick PCB traces.
Try to make the changes I suggest and post it.
Attachments
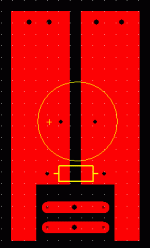
Carlos,
I'm glad someone else mentioned the t's as undesireable.
BrianGT,
I have a few suggestions as well.
1. Keeping with the amp pcb philosophy keep the power tracks fat and on one side and have the small tracks connecting miscellaneous components on the bottom side.
2. R4 is only a bleeder so it could go the the left or right of the caps, where ever there's space when the important components are placed.
3. Move AC1 and AC2 in the middle of the diodes. Saves space and avoids crossing tracks.
4. Place the two PG- together, so a spade or terminal block can be used as well as two wires.
5. Have solder pads on the reverse side on the caps, so the small caps and RC can be soldered without holes as close to the filter caps pins.
A "very rough" sketch is attached, not to scale.
Attachments
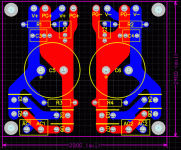
falcott said:Brian, what diameter caps have you allowed for on the power supply board?
Cheers.
25mm. The kits will come with Panasonic 10,000uF 50v caps for the power supply boards. The snap-in types, with 2mm holes spaced 10mm apart.
--
Brian
- Status
- This old topic is closed. If you want to reopen this topic, contact a moderator using the "Report Post" button.
- Home
- Amplifiers
- Chip Amps
- my first try at a LM3886 layout, any comments/suggestions?