Yes Loafimus.... go for it. You are worth it! I heard the result at Clog last Monday. OOOOOHHH unbelievable. But i am not going to spoil his party here. He will come with more info and listening impressions. Let us know how you are doing. Because i have to be honest, when the technical guys start about all these "measuring" points and readings....... I get scared again. But maybe I should just get over it and start the build and power it up at new year's eve.
The ± € 80,-- explosion will then nicely blend with the surroundings")
The ± € 80,-- explosion will then nicely blend with the surroundings
case work
Episode 7
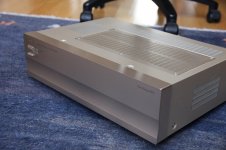
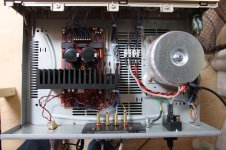
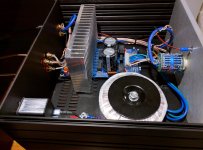
Okay, on a piece of chipboard the PA03 sounds wonderful. Time for some casework. I decided to look for a second hand power amp with plenty of room in the case. I checked the local thrift shops and websites and then I bought this old champagne colored Pioneer M10X power amp.
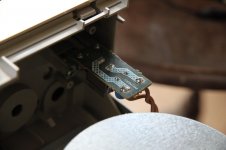
I removed the inside of the old amp. Whit the innards came out the RCA chassis sockets, the loudspeaker connectors and the IEC Connector. They were all integrated onto the old amp board.
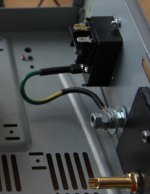
Originally the Pioneer was double insulated so it didn't require a safety connection to earth. Wikipedia tells me “This is usually achieved at least in part by having two layers of insulating material surrounding live parts or by using reinforced insulation”. Therefore I don't understand why Pioneer placed the solder joints of a live wire just centimeters away from the metal lid (see picture).
In the forums I have read again and again to go for safety first and have the chassis connected to electrical earth. So I put my Dremel to use and mounted a Schurter power entry with earth conductor contact, illuminated switch and fuse.(Protection Class 1).
For the earth connection I got valuable information from Rod Elliot's website Earthing (Grounding) Your Hi-Fi - Tricks and Techniques. He is demonstrating a safe method of connecting the earth lug. As you can see on my picture it's quite a contraption.
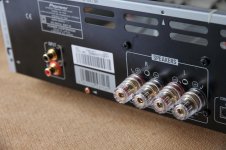
I installed new RCA sockets, insulated from the case and new loudspeaker connectors. As the loudspeaker connectors a very close together there is risk for a short. Therefore I chose connectors with an insulated outside.
Mounting the power transformer and the PA03 pcb was rather easy. I am not a believer in fancy cables so for the interconnections I used ordinary stranded copper cable. I was unsure of the needed wire diameter for power supply and loudspeaker. I doesn't sound very sophisticated but in the end I used the wires from an old washing machine, diameter of the copper 1,5 mm. I think this will clean up the electrons and therefore the sound.. I have to admit that all the brown and blue is a little bit boring. Besides, it's easy to make mistakes.
On the input connector of the PA03 module is a stabilized 12V DC available which can be used to energize auxiliary circuits. I used it to power the front led. I was very uncertain how to connect the RCA sockets to the PA03. Shielded or twisted. To tell the truth I am still unsure, but used twisted cable.
In a few weeks the PA03 the amp will be hooked up to my main audio system and I will tell you something about my listening impressions.
In the pictures:
the Pioneer case, earth connection a la Rod Elliot, Pioneer (tricky??) live wire, new speaker and RCA connectors, Schurter power entry, end result.
Episode 7
Okay, on a piece of chipboard the PA03 sounds wonderful. Time for some casework. I decided to look for a second hand power amp with plenty of room in the case. I checked the local thrift shops and websites and then I bought this old champagne colored Pioneer M10X power amp.
I removed the inside of the old amp. Whit the innards came out the RCA chassis sockets, the loudspeaker connectors and the IEC Connector. They were all integrated onto the old amp board.
Originally the Pioneer was double insulated so it didn't require a safety connection to earth. Wikipedia tells me “This is usually achieved at least in part by having two layers of insulating material surrounding live parts or by using reinforced insulation”. Therefore I don't understand why Pioneer placed the solder joints of a live wire just centimeters away from the metal lid (see picture).
In the forums I have read again and again to go for safety first and have the chassis connected to electrical earth. So I put my Dremel to use and mounted a Schurter power entry with earth conductor contact, illuminated switch and fuse.(Protection Class 1).
For the earth connection I got valuable information from Rod Elliot's website Earthing (Grounding) Your Hi-Fi - Tricks and Techniques. He is demonstrating a safe method of connecting the earth lug. As you can see on my picture it's quite a contraption.
I installed new RCA sockets, insulated from the case and new loudspeaker connectors. As the loudspeaker connectors a very close together there is risk for a short. Therefore I chose connectors with an insulated outside.
Mounting the power transformer and the PA03 pcb was rather easy. I am not a believer in fancy cables so for the interconnections I used ordinary stranded copper cable. I was unsure of the needed wire diameter for power supply and loudspeaker. I doesn't sound very sophisticated but in the end I used the wires from an old washing machine, diameter of the copper 1,5 mm. I think this will clean up the electrons and therefore the sound.
. I have to admit that all the brown and blue is a little bit boring. Besides, it's easy to make mistakes.On the input connector of the PA03 module is a stabilized 12V DC available which can be used to energize auxiliary circuits. I used it to power the front led. I was very uncertain how to connect the RCA sockets to the PA03. Shielded or twisted. To tell the truth I am still unsure, but used twisted cable.
In a few weeks the PA03 the amp will be hooked up to my main audio system and I will tell you something about my listening impressions.
In the pictures:
the Pioneer case, earth connection a la Rod Elliot, Pioneer (tricky??) live wire, new speaker and RCA connectors, Schurter power entry, end result.
Attachments

So I got mine all soldered up for the most part this weekend. I'm waiting on a wire-to-board terminal block as the one I got didn't fit correctly. So far so good though, I'm excited to give it a test here soon.
I think I may either build my own chassis or do a modushop one when the time comes.
I think I may either build my own chassis or do a modushop one when the time comes.
Attachments

Very good looking pcb construction so far. You won't be disappointed. Mine is the best sounding amp in the stable.So I got mine all soldered up for the most part this weekend. I'm waiting on a wire-to-board terminal block as the one I got didn't fit correctly. So far so good though, I'm excited to give it a test here soon.
I think I may either build my own chassis or do a modushop one when the time comes.
Rick
JammyBStard wrote
Problem is the wall sockets near my audio set have no earth connection. I have to fix that first. When that's done I think I need some time to do some serious listening and then to express my feelings in a language that's not my native one.
@loafimus
Thx for the pictures. I really like your attention to detail. For instance the way the color bands of the resistors are all lined out the same way. BTW I noticed you insulated the LM4780. Safety reasons ??
Well go on and keep us informed.
Why do we have to wait a fee weeks before you hok it up though?
Problem is the wall sockets near my audio set have no earth connection. I have to fix that first. When that's done I think I need some time to do some serious listening and then to express my feelings in a language that's not my native one.
@loafimus
Thx for the pictures. I really like your attention to detail. For instance the way the color bands of the resistors are all lined out the same way. BTW I noticed you insulated the LM4780. Safety reasons ??
Well go on and keep us informed.
Thanks. I don't know if I'd call it attention to detail or a bad case of OCD.
I insulated the LM4780 for really no good reason other than to just do it. Also because I bought a huge sheet of SILPAD800 and really wanted to use a tiny little square of it to justify the purchase.
I insulated the LM4780 for really no good reason other than to just do it. Also because I bought a huge sheet of SILPAD800 and really wanted to use a tiny little square of it to justify the purchase.
That's funky continental wiring for you! 😉Problem is the wall sockets near my audio set have no earth connection.
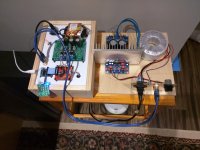
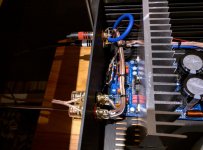
So finally. I had some time to get it all laid out on a test board and fire it up. All the initial tests came out spot on. I heard the relays click, and decided to see if she sings.
Sure enough, it sounds awesome. It's being fed from my DIYINHK AK4490EQ I built a couple months ago and sounds great. As you can tell from the picture, I'm in dire need of doing some casework.
Sure enough, it sounds awesome. It's being fed from my DIYINHK AK4490EQ I built a couple months ago and sounds great. As you can tell from the picture, I'm in dire need of doing some casework.
Attachments
Thanks. I don't know if I'd call it attention to detail or a bad case of OCD.
I suffer from the same affliction and it causes me to build/assemble followed by rebuilding if not up to my insanely high standards. I can relate to that case of OCD. Until the last few years I refrained from building anything for fear it would not live up to my building/performance standards.
Darren
Well I see I'm in good company.Thanks. I don't know if I'd call it attention to detail or a bad case of OCD.
I suffer from the same affliction and it causes me to build/assemble followed by rebuilding if not up to my insanely high standards. I can relate to that case of OCD. Until the last few years I refrained from building anything for fear it would not live up to my building/performance standards.
Darren
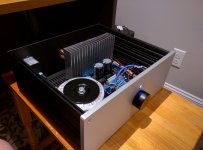
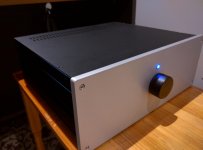
Finished!
It's been a fun couple weeks =)
Had a fun weekend drilling and cutting aluminum for my PA03 chassis. I ended up getting the big Galaxy Maggiorato 3U from modushop and it fit the bill perfectly. I learned quickly that 10mm of aluminum is a lot of aluminum.
All in all, I'm extremely happy. It sounds a heck of a lot better than an old Sony AVR did. I figure it's time for a speaker upgrade now. Gives me an excuse to start another project I guess.
Now it's time to case up the dac though...
Attachments
Thanks!
No, I didn't solder the pot. I found it on ebay:
Valab 23 Step Ladder Type Attenuator Potentiometer 50K Log Stereo
Have you gotten much listening time out of yours yet? I'm pretty impressed with it so far. I joined the last group buy for another one just in case I ever want to go crazy and bridge a couple of them together. I'm sure it'll never happen, but you never know!
Tomorrow I'll post my listening impressions. I have spent a lot of time with this amp and I like it very very much. Now I wonder myself if the Modulus-86 or the Parallel-86 Neurochrome Audio: Precision high performance audio circuits for the DIY market. would improve - soundwise - on the PA03. That would be a reason to heat up my soldering gun again.
- Home
- Amplifiers
- Chip Amps
- Newbee build: PA03 amp (LM4780)