DIY Schroeder "Clone"
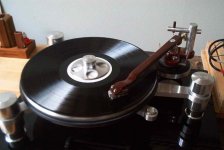
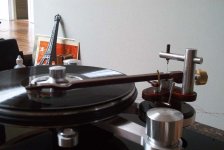
Just finished a new Schroeder "clone." I had to make a lot of changes to the design, to make it easier to build, and to work with the local machine shop, which didnt push the limits of fine craftsmanship. Arm is cocobolo, soaked in alcohol overnight to remove natural oils, then soaked in several oils and put under pressure to hopefully be absorbed deep inside. This does make a subtle difference to the character of the wood, but perhaps not what is done on the real thing. Magnets are also smaller than on the real thing, they were the best thing I could find locally.
I don't know that these changes are for the good or the bad, but the sound is very good, very natural. The highs can be slightly harsh with the brass counterweight, before the weight was finished I used a simple socket to test it, sound was magical, but tracking wasn't reliable. I want to thank everybody on the forum and Frank Schroeder who was generous enough to throw us hints about how his creation worked.
Attachments
Hello Capt Zach,
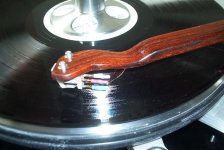
Congrats on your project, I like the organic look of the headshell section in particular. I saw that you seem to be using solid core wiring(laquer insulated?). A slight harshness might be attributable to an accidental kink or simply the break in process(especially after resoldering headshell clips or RCA jacks).
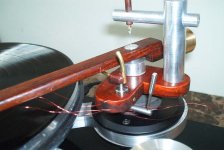
The nylon/teflon/delrin(?) bushing in your counterweight has too thick a wall and the whole assembly will sound even better if you could get the counterweight a little closer to the pivot point. Then again, this would reduce the eff. mass and you might just be right where you want to be with a Lyra cart.
Greetings from Berlin,
Frank Schröder
Congrats on your project, I like the organic look of the headshell section in particular. I saw that you seem to be using solid core wiring(laquer insulated?). A slight harshness might be attributable to an accidental kink or simply the break in process(especially after resoldering headshell clips or RCA jacks).
The nylon/teflon/delrin(?) bushing in your counterweight has too thick a wall and the whole assembly will sound even better if you could get the counterweight a little closer to the pivot point. Then again, this would reduce the eff. mass and you might just be right where you want to be with a Lyra cart.
Greetings from Berlin,
Frank Schröder
Frank,
Your kind words/suggestions mean a lot coming from the original designer. Your arms are truly great pieces of work. Part of the fun of DIY is experimenting and trying different ideas, so I'm still making changes and tweaking.
You're correct, the tonearm wire is simple solid core laquered copper wire I got from an old voice coil. I was going to replace it after I tested the arm with some fine Cardas wire, but the thought never crossed me about it possibly adding a bit of edge to the sound.
I have to admit, the counterweight design was one of the most challenging parts of this project. The final item came out a little lighter than I expected, so I'm planning on having the shop machine a new one. I've drilled out the nylon bushing and experimented with inserting some rubber in between the nylon and the stainless steel tube it slides on. I may make the next bushing out of hard rubber, maybe I can find some information about what's best.
Thanks,
Zach
Hi Capt Zach,
I'd avoid rubber as a sleeve. If you have problems drilling the hole to the perfectly fitting diameter, just take a slightly smaller drill and then use an adjustable reamer. A Teflon sleeve will allow for a slack free fit while stiil enabling you to slide the counterweight against a reasonably low friction(before tightening the setscrew).
Good luck and
have a great weekend,
Frank
Does anybody know of a English translated version of the patent? The only link I have seen is for a German version, and although the pictures and diagrams are informative, I think it would help to know what the patent says.
And, cool job on the tonearm.
Mind if I ask how much you ending up spending on it?
Randy
And, cool job on the tonearm.
Mind if I ask how much you ending up spending on it?
Randy
Sorry, I've been abroad for quite some time, and dont have access to my arm or turntable (sigh) right now.
The arm was not expensive. A block of hardwoood, cocobolo or otherwise was not very expensive. Provided you have the proper tools, much of this work can be done by hand carving, although its messy and time consuming, and I ensured final accuracy with power tools.
I had a local machine shop make my parts, one which was sympathetic to my purposes (turns out he was actually an adudiophile himself who had made a turntable before!) Quality of workmanship was not the highest, but the arm is functional, and it proved the concept works. I went through many trials before both my own carved parts and the machined parts worked sympathetically.
I would estimate the overall cost was ~$300 US when everything was done.
My design was considerably simpler than that of the original, and in some ways to a disadvantage. As said, most of the details of the mechanism are availble in the patent. Doing a search here will reveal some technical discussions of the design as well. There's quite a lot of variation as to what parts can be used, and how they interract. This is the fun of our hobby!
Great work Cap Zach
I am also working on the Schroeder "Clone" arm myself.
I have one question about the magnet. Currently, I got 2 magnets with 10mm diameter with 10mm high and I guess it is N35 type. Is it enough? What if I use magnet with different diameter; i.e., 12mm and 10mm. I am asking because I have another donut shape magnet which is 12mm diameter with 3mm high and 3mm hole N48.
RE: Magnets
Here's an excellent discussion on this very topic:
http://www.diyaudio.com/forums/show...rpage=10&highlight=diy+schroeder&pagenumber=7
I decided to forgo using donut shaped magnets, attatched with screws. I had my machinist cut me a special aluminum cylinder that normal cyllirical magnets could be they could be press fit into, along with epoxy. This has worked well so far. The disadvantage is that on the original arm, they can be adjusted, whereas on my arm, it must be right the first time. I had to have this piece redone a few times until everything was centered just correctly.
I went with small, 8 x 2mm magnets, and stacked 3 of them to increase the flux strength. Choosing the right size is a tradeoff. I was able to get these from a local electronics store cheaply, so I could buy a lot, and choose the better ones. Bigger wider magnets will be stronger, but are more likely to have surface irregularities. They will provide more damping, which may be good to an extent, but will also require stronger support structure, string, etc which may affect the sound. Mine works well enough, but the original design is close to optimum I imagine. Adjusting the distance between the magnets will vary attractive force and damping as well.
Yes, I go through that treat before I have courage to start the project.
I like the idea of stacking magnet together. Do you use any glue or just stack them together.
I change some design so I can adjust the magnet gap and not effect the twist string that do the antisketing.
I like the idea of stacking magnet together. Do you use any glue or just stack them together.
I change some design so I can adjust the magnet gap and not effect the twist string that do the antisketing.
Hi Capt. Zack
I have been a fan of wood tonearms for 25+ years. I currently have a Grace 714 - uses Teak.
About wire: I had a very simmilar experience with solid laquered wire. A friend told me about the benefits of fine-strand hi-pure copper for low level signals. Something about skin effects, etc. Anyway, in a fit of foolish experimentalism, I decided to try some of the finest flexible wire I know - computer mouse wire. Every corded mouse has 4 very fine, very flexible conductors inside the cable. There are so many old corded mice around, they can be had for free. Extract the 4 conductors from inside the cord and you have some of the best tonearm lead I have ever heard. It is quite easy to solder and fine enough to run thru the connecting path of almost any tonearm.
This is one cheap, easy upgrade that I think everyone will find worth the trip to the local compu-junk shop.
Your tonearm is very pretty and I bet it works as well as you say.
Jess Gordon
Alert bay, BC
You're correct, the tonearm wire is simple solid core laquered copper wire I got from an old voice coil. I was going to replace it after I tested the arm with some fine Cardas wire, but the thought never crossed me about it possibly adding a bit of edge to the sound.
I have been a fan of wood tonearms for 25+ years. I currently have a Grace 714 - uses Teak.
About wire: I had a very simmilar experience with solid laquered wire. A friend told me about the benefits of fine-strand hi-pure copper for low level signals. Something about skin effects, etc. Anyway, in a fit of foolish experimentalism, I decided to try some of the finest flexible wire I know - computer mouse wire. Every corded mouse has 4 very fine, very flexible conductors inside the cable. There are so many old corded mice around, they can be had for free. Extract the 4 conductors from inside the cord and you have some of the best tonearm lead I have ever heard. It is quite easy to solder and fine enough to run thru the connecting path of almost any tonearm.
This is one cheap, easy upgrade that I think everyone will find worth the trip to the local compu-junk shop.
Your tonearm is very pretty and I bet it works as well as you say.
Jess Gordon
Alert bay, BC
- Status
- This old topic is closed. If you want to reopen this topic, contact a moderator using the "Report Post" button.
- Home
- Source & Line
- Analogue Source
- DIY Schroeder "Clone"