I think the original Talbot #30 Thread is made up from three twisted strands, and this is where I got stuck when looking for a cheaper alternative, it didn't seem to give the information as to whether it was a single stranded thread or multiple strands per thread.
Well, this all gets very interesting—assuming anyone reading this is likewise obsessive about such things...
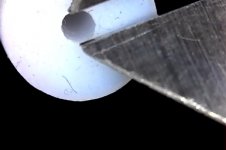
I broke out my USB microscope and carefully separated the Prowrap thread braid (attaching a picture here). It's a twisted braid of three nylon threads. So far, so good.
Back when i was researching threads I had some trouble figuring out the correspondence of a size "#30" compared to ProWrap's A, B, D etc designations. I finally just bought a few thread sizes and went with what seemed to work best. I'm guessing there is an optimal balance between nozzle orifice diameter, thread diameter, and height the nozzle is suspended above the surface.
The teflon tube I used for the nozzle came pre-drilled to a nominal 1/16" (1.5mm); however it was stated as "undersized for machining to spec". Time to put the USB micro back to work—this time with a micrometer. Ah—1.4mm!
And then to this chart. Scroll down to the chart for "Nylon Thread Specifications". I'm not absolutely sure Talbot's #30 corresponds to the number gauges here; but we can see in the column header #33, it lists a "Tex" (I assume for "Textile") number of 30 and a "Government" designation of AA.
As a layman to the arcane world of thread, I have no idea if I'm making the right connections; but let's go on faith and assume the #30 Talbot is designation "AA", with a spec thickness of .2 mm. ProWrap however only comes in A, B, and D. I have thread spools in all three sizes.
The one I chose to use, "A", is half the diameter of AA: .1mm, compared to the Talbot's .2mm! ProWrap B thread is much closer to AA: about .04mm larger, vs A's .1mm smaller diameter.
So have I been loading the less-optimal thread? Time to re-load the B, and see what kind of difference there is to be detected.
Later though, as I have other things to do today than sit indoors and obsess over threads...!
Attachments

I use 1ml of Ilfotrol to 1l of tank solution - so 1/5th of what the advice was, that you found.
My ratio was what I found somewhere - seems to work OK, in the sense of stopping beading.
Andy
Ah, It's all a mystery isn't it
")
Today, I added a further 4 drops of Ilfotol to the 90+ ml of mix I already had in the bottles, and hey presto Nice Pooling, not quite sure what that works out as in ml, but would be way less than the 5ml / Ltr I read about, so for arguments sake say 8 small drops in a 100ml mix, that has to be somewhere around the .1% I would have guessed. It also helped with the drying out issues I was having previously.
Regard's,
Gary.
Well, this all gets very interesting—assuming anyone reading this is likewise obsessive about such things...
I broke out my USB microscope and carefully separated the Prowrap thread braid (attaching a picture here). It's a twisted braid of three nylon threads. So far, so good.
Back when i was researching threads I had some trouble figuring out the correspondence of a size "#30" compared to ProWrap's A, B, D etc designations. I finally just bought a few thread sizes and went with what seemed to work best. I'm guessing there is an optimal balance between nozzle orifice diameter, thread diameter, and height the nozzle is suspended above the surface.
The teflon tube I used for the nozzle came pre-drilled to a nominal 1/16" (1.5mm); however it was stated as "undersized for machining to spec". Time to put the USB micro back to work—this time with a micrometer. Ah—1.4mm!
And then to this chart. Scroll down to the chart for "Nylon Thread Specifications". I'm not absolutely sure Talbot's #30 corresponds to the number gauges here; but we can see in the column header #33, it lists a "Tex" (I assume for "Textile") number of 30 and a "Government" designation of AA.
As a layman to the arcane world of thread, I have no idea if I'm making the right connections; but let's go on faith and assume the #30 Talbot is designation "AA", with a spec thickness of .2 mm. ProWrap however only comes in A, B, and D. I have thread spools in all three sizes.
The one I chose to use, "A", is half the diameter of AA: .1mm, compared to the Talbot's .2mm! ProWrap B thread is much closer to AA: about .04mm larger, vs A's .1mm smaller diameter.
So have I been loading the less-optimal thread? Time to re-load the B, and see what kind of difference there is to be detected.
Later though, as I have other things to do today than sit indoors and obsess over threads...!
Haha, Oh dear, I bet you won't sleep tonight
It's a minefield isn't it.
The Talbot #30 was the thread originally used by Keith Monks and we do have some information available stating that the nozzle diameter is / was 1.4mm, The Lorigraft uses an (unspecified) thread, although I did ask for more information on it, it wasn't answered, as for the nozzle diameter they said 1.4mm is a good starting point.
I think you have to ask yourself, Did Keith Monks test hundreds of different types of threads before they decided to use the #30, or did they just choose one that gave about the right clearance from the surface of the record, and was cheap and readily available.
I also think that if you are getting good results, the record is dry after vacuuming, and there's plenty of gunk on the jar It's doing the job.
I find that very rarely does the first clean yield the best results, I will often clean twice sometimes three times before I'm happy that its as good as its going to get e.g. the 46 year old "Argent" album I received from Ebay Today.
I have to commend your efforts in becoming a Thread Guru
I was getting confused half way through reading the post , as for the AA Vs A Thread Size, I guess testing is the only way to go, but will you really notice a difference? That's a tough one, but if you get perfect results in one pass instead of two, I guess that's proof that the thread size even by a tiny amount is critical, Look forward to seeing what kind of results you get.Regard's,
Gary.
Ok, so I swapped out the threads; and there is a difference with the thicker “B” thread. Seems the spread of suction area increased somewhat. No surprise I guess, given that the nozzle is riding higher now. The airflow doesn’t seem to have been adversely affected by the larger diameter thread. It’s still pulling everything in its path; just a bit more than before.
I would think that the wider spread means each groove width is getting more time under vacuum. Can’t be a bad thing.
Now I’m wondering why I thought the “A” thread was better. It’s been some time since I finished the project. Dunno, but I’m leaving the B thread on.
I would think that the wider spread means each groove width is getting more time under vacuum. Can’t be a bad thing.
Now I’m wondering why I thought the “A” thread was better. It’s been some time since I finished the project. Dunno, but I’m leaving the B thread on.
Ok, so I swapped out the threads; and there is a difference with the thicker “B” thread. Seems the spread of suction area increased somewhat. No surprise I guess, given that the nozzle is riding higher now. The airflow doesn’t seem to have been adversely affected by the larger diameter thread. It’s still pulling everything in its path; just a bit more than before.
I would think that the wider spread means each groove width is getting more time under vacuum. Can’t be a bad thing.
Now I’m wondering why I thought the “A” thread was better. It’s been some time since I finished the project. Dunno, but I’m leaving the B thread on.
That's interesting, seems there may have been some thought \ Testing that went on to give optimum results when the machines were first developed.
I guess you'll have a better idea if any sonic improvement or increase in performance has been gained once you have cleaned a few records.
As I mentioned in the previous post, I normally get the best results after the second pass, it's rare that I am happy with the results of the first pass / clean.. That said, I have been working mainly with the worst of my records, The ones that I treated way back in the early 80's with the "Permostat" but strangely, I think it may have done me a favour, the very worst distorted stylus gunking ones, once cleaned several times come out sounding absolutely stunning, so I'm thinking it may have actually protected the vinyl, and after some 30+ years of being stored has degraded to the sticky mess that I've been finding on the surface.
I'll be keen to hear if you get better results with the "B" thread
DIY RCM
I think you have done a fantastic job on this project. I'm curious about the thread mechanism. How quickly does the thread spool unravel and how much thread is used when cleaning a single LP? Have you experimented with altering the feed rate of the thread? It seems that there is precise control of platter speed and cleaning arm sweep speed but the thread feed speed is not. To my way of thinking, controlling this may take things to the next level.
I think you have done a fantastic job on this project. I'm curious about the thread mechanism. How quickly does the thread spool unravel and how much thread is used when cleaning a single LP? Have you experimented with altering the feed rate of the thread? It seems that there is precise control of platter speed and cleaning arm sweep speed but the thread feed speed is not. To my way of thinking, controlling this may take things to the next level.
I think you have done a fantastic job on this project. I'm curious about the thread mechanism. How quickly does the thread spool unravel and how much thread is used when cleaning a single LP? Have you experimented with altering the feed rate of the thread? It seems that there is precise control of platter speed and cleaning arm sweep speed but the thread feed speed is not. To my way of thinking, controlling this may take things to the next level.
My Machine does not feed the thread as it's cleaning, I manually pull a fresh length of about 1 cm for each cycle and that lasts the duration of one sweep of the arm, I'm not sure if Rewind67's machine actually feeds the thread as it goes.
I think only the Keith Monks machine feeds the thread as it goes, I don't think the loricaft does, but I may be wrong.
Regard's,
Gary.
I also manually advance the thread before each cycle. I believe Loricraft does the same, unless something’s changed since I researched my project.
I thought so, in all of the video's I've watched, and all of the research I've done on the Loricraft, there doesn't seem to be a drive mechanism for the Thread Reel, But as I mentioned above, I do believe the KM (Original) machine does auto advance the thread in a continuous feed, but the newer Discovery one does not as far as I can see, I've also just noticed that the Discovery One looks to have the same platter motor as I have used.
How are you getting on with the "B" size thread?
It’s working out well. As noted before the area under vacuum appears to have increased. It’s hard to make a quantitative judgement as I can’t re-clean the same record with different threads for a direct comparison. However, subjectively speaking, the surface seems to be drier after the arm passes over. Not that there was visible liquid left after the A thread; just that the B leaves less “sheen” behind. I take that as more effective pulling.
It’s working out well. As noted before the area under vacuum appears to have increased. It’s hard to make a quantitative judgement as I can’t re-clean the same record with different threads for a direct comparison. However, subjectively speaking, the surface seems to be drier after the arm passes over. Not that there was visible liquid left after the A thread; just that the B leaves less “sheen” behind. I take that as more effective pulling.
That sounds promising, Look forward to hearing if there's any sonic improvement.
BTW, My 2 12L/min Vacuum Pumps arrived today so looking forward to getting them plumbed in and see what results I get.
Regard's,
Gary.
Last edited:
That's great; will be interested to hear your experience with the pumps. They are a bit on the noisy side. I strapped mine to some anti-vibration pads, which at least keeps them from vibrating the entire box.
With the box closed up, the noise is low enough to talk over at normal speech levels.
With the box closed up, the noise is low enough to talk over at normal speech levels.
That's great; will be interested to hear your experience with the pumps. They are a bit on the noisy side. I strapped mine to some anti-vibration pads, which at least keeps them from vibrating the entire box.
With the box closed up, the noise is low enough to talk over at normal speech levels.
Yes, the pumps are a little on the noisy side, and they do vibrate A LOT.
I spent most of what time I had today addressing the issue of the vibration, and the solution I came up with was as follows.
The pumps I have come with a bracket that encapsulates the casing of the motor, and at the bottom the bracket flares out to form an Omega type shape (can't get the symbol) Alt 234 Û
anyway, you get my drift.The plates either side have holes drilled in for mounting, but because of the size of the motor it's difficult to get a screwdriver on properly, so I gave up with that and adopted my own approach.
I have a reel of flat rubber, about 2mm thick and 55mm wide, so cut a length and placed the pumps on top to get the spacing I needed, and cut it to size, I then cut a piece of 11mm ply and some sound deadening foam which is about 1" thick to the same size as the rubber.
I glued the foam to the bottom of the ply with some Impact Adhesive, let it set and then using some double sided car body trim tape, attached the rubber to the top of the ply, Using the body trim tape again I fixed the pumps on top of the rubber.
Sitting the now solid mounted pumps on the table, I found that the weight of the pump heads easily over balanced the now well and truly stuck together pump block, so cut another small piece of foam to sit underneath the heads.
I couldn't believe how well this actually worked, they just purr away now with little or no vibration being transmitted through the base, before the vibration was so bad I was chasing them all over the worktop
So now I just need to mount them in the unit and fit the new 12v supply, I did take a couple of pressure readings beforehand, Pulling free flow air through the nozzle I get 420 mbar and with the nozzle resting on a dry record I get 680 mbar, and around 840 ~ 850 if I hold my finger over the end of the nozzle, so looking promising so far.
I did notice that it takes a few seconds for the pressure / suction to build up, but I'm sure that's not going to be a problem.
One other little oddity I noticed was the with both pumps running freely they draw about 1 amp, and will quite happily slow down, speed up, stop, start when the voltage is varied and the current limit set to about 1.5A, However, If I stop them using the current limit, they won't start again until I wind the current limit up to around 6A, Strange .. But maybe the PSU just ignores the initial surge on normal running.
> current limit set to about 1.5A, However, If I stop them using the current limit, they won't start again until I wind the current limit up to around 6A, Strange ..
No, that's expected. Motors draw less current when they come up to speed (back-EMF), much more when starting. Especially with "friction" loads: static friction tends to be higher than running friction. Small pumps of any type tend to have relatively high friction.
If you are trying to control motor speed, on most small motors (particularly DC) motors it works better to control voltage.
> current limit set to about 1.5A, However, If I stop them using the current limit, they won't start again until I wind the current limit up to around 6A, Strange ..
No, that's expected. Motors draw less current when they come up to speed (back-EMF), much more when starting. Especially with "friction" loads: static friction tends to be higher than running friction. Small pumps of any type tend to have relatively high friction.
If you are trying to control motor speed, on most small motors (particularly DC) motors it works better to control voltage.
Aha, Thanks for clearing that up, I don't really have a need to adjust the speed, and they work just fine at the rated speed / voltage, it was something I noticed while playing around to see what the minimum current draw was.
Regard's,
Gary.
Yes, the pumps are a little on the noisy side, and they do vibrate A LOT.
I spent most of what time I had today addressing the issue of the vibration, and the solution I came up with was as follows.
The pumps I have come with a bracket that encapsulates the casing of the motor, and at the bottom the bracket flares out to form an Omega type shape (can't get the symbol) Alt 234 Û
The plates either side have holes drilled in for mounting, but because of the size of the motor it's difficult to get a screwdriver on properly, so I gave up with that and adopted my own approach.
I have a reel of flat rubber, about 2mm thick and 55mm wide, so cut a length and placed the pumps on top to get the spacing I needed, and cut it to size, I then cut a piece of 11mm ply and some sound deadening foam which is about 1" thick to the same size as the rubber.
I glued the foam to the bottom of the ply with some Impact Adhesive, let it set and then using some double sided car body trim tape, attached the rubber to the top of the ply, Using the body trim tape again I fixed the pumps on top of the rubber.
Sitting the now solid mounted pumps on the table, I found that the weight of the pump heads easily over balanced the now well and truly stuck together pump block, so cut another small piece of foam to sit underneath the heads.
I couldn't believe how well this actually worked, they just purr away now with little or no vibration being transmitted through the base, before the vibration was so bad I was chasing them all over the worktop
So now I just need to mount them in the unit and fit the new 12v supply, I did take a couple of pressure readings beforehand, Pulling free flow air through the nozzle I get 420 mbar and with the nozzle resting on a dry record I get 680 mbar, and around 840 ~ 850 if I hold my finger over the end of the nozzle, so looking promising so far.
I did notice that it takes a few seconds for the pressure / suction to build up, but I'm sure that's not going to be a problem.
One other little oddity I noticed was the with both pumps running freely they draw about 1 amp, and will quite happily slow down, speed up, stop, start when the voltage is varied and the current limit set to about 1.5A, However, If I stop them using the current limit, they won't start again until I wind the current limit up to around 6A, Strange .. But maybe the PSU just ignores the initial surge on normal running.
Well it seems I do have a major vibration issue
The reason everything seemed to work so well yesterday is because I had the pumps sitting on the table, and not in the box.
The vibration although very light, or at least appears to be very light is enough to cause the arm to "Break" suction on the platter and to bounce up and down continuously.
Two workarounds spring to mind, First, Mount the pumps with the pump heads facing down, and secondly move the pumps from the centre location and closer to the outer sides where the bracing should be better

So, I've had a change around, the pumps are now fitted so that the pump heads face Down (Motor pointing upwards) added an extra 1" layer of foam, and moved them to one corner, with the extra layer of foam they are almost floating, but it does appear that it might have solved the issue, I won't know until I have the chance to run a few cleaning cycles.
The arm no longer bounces up and down on the platter, and requires quite a sharp "knock" on the plinth to get the suction to break, so looking promising so far.
I also took a tee from the exhaust ports and fed the exhaust's to the outside world, My thoughts were that there is most likely a small amount of moisture in the exhaust which could build up inside the cabinet, and possibly flammable gas when using a Isopropyl Alcohol based cleaner, Gas + any arc's from the switches might =
Wouldn’t have expected the pumps to cause so much vibration. Sounds like you’ve got it under control now though. Do the pumps have a name or model marked anywhere? I believe mine are “Airpon D2028”.
Hmm, hadn’t considered any chance of disastrous ignition in the cabinet. I think I’m ok on that one. The cabinet is well ventilated under the platter. I’ve held my finger just above the motor exhausts and not noticed any vapor.
One thing I learned early on is to empty the collection jar before it fills past a certain level. That’s the only time I’ve had fluid make it’s way to the pumps.
...empty the collection jar before it fills past a certain level. That’s the only time I’ve had fluid make its way to the pumps.
"float switch"
There are many choices of mounting and contacts. A fair number are wired to "pump when full" (as for a drain sump); while you directly want a "stop pump when full". However a mere relay would invert the logic. If you have a master computer already then the float switch is just another logic input.
Wouldn’t have expected the pumps to cause so much vibration. Sounds like you’ve got it under control now though. Do the pumps have a name or model marked anywhere? I believe mine are “Airpon D2028”.
Hmm, hadn’t considered any chance of disastrous ignition in the cabinet. I think I’m ok on that one. The cabinet is well ventilated under the platter. I’ve held my finger just above the motor exhausts and not noticed any vapor.
One thing I learned early on is to empty the collection jar before it fills past a certain level. That’s the only time I’ve had fluid make it’s way to the pumps.
The Pumps came from Hong Kong or China via eBay, the model number is JH12-80.
I cleaned half a dozen or so LP's today, but haven't had chance to play any of them yet, they look very good, so hopefully I'll get a chance to listen to some of them tomorrow.
One thing I did notice is that if I run the platter CCW it tends to leave the thread a little slack, obviously not enough vacuum or airflow to keep it taught.
I also think I might need to cut down on the way I've been cleaning, I mean 3 passes per side take up an awful lot of time, but that method did really work wonders for some very stubborn records I have.
Apart from the IPA \ DW \ Tergitol wash you use, do you use a rinse afterwards or use anything like L'art Du Son? If I can do away with just one pass that would be a bonus.
The whole blowing up thing was just a thought, and venting the exhausts out of the back has helped reduce some of the noise, until you stand behind it, Sounds like a small motorbike
Regard's,
Gary.
- Status
- This old topic is closed. If you want to reopen this topic, contact a moderator using the "Report Post" button.
- Home
- Source & Line
- Analogue Source
- Diy Rcm