Hi everyone,
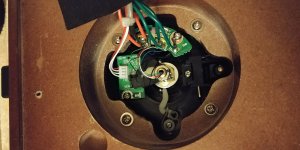
Not long ago, I bought a Fluance RT-81 turntable. Price is excellent and I said...can't be too bad, can it? The company offers a good return policy, so I went for it. I used it with its built in preamp, sounded decent, but not enough gain, it's very quiet (35dB of gain, Fluance told me) Then, I bought a Schiit Mani phono stage and the gain was excellent, but I noticed the high frequencies weren't ok, very recessed, sound was 'thick', if I could describe it like that. Did some research, and people experienced the same thing with Audio Technica tables with built in preamps. The onboard preamp is never truly bypassed. This Fluance exhibits the same thing. The signal seems to be passing through some capacitor on the main board no matter what. Another hint is the pop heard when powering the turntable on even on phono out.
I decided to mod it and somehow to make it reversible in case I'd wanna sell it one day.
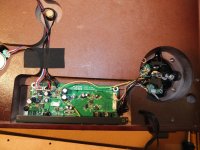
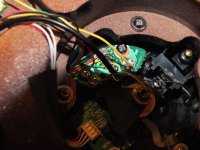
The tonearm wires are soldered into a small board (Technics style but damn small) and from there other wires go to the main board/preamp into a small connector.
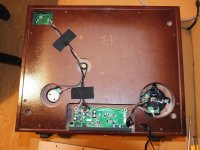
Removed that connector and the wires and kept it. Connected the RCA cables directly on that very small board (used some other small wires to bridge, found it hard to reliably solder RCA end onto that board) .Then connected an external ground wire to the tonearm base board and another wire to the ground post at the back of the table. I made an angled hole in the base and used silicone to secure the RCA cable in case of an accident.
See pictures!
I tested different things with the ground cables, and this worked best, so kept it. Now it sounds as it should. Happy I didn't blame the Schiit Mani and did not return it. It's very versatile and sounds great.
Maybe the work I did is not the greatest, I'm not that great with soldering, but it works.
Now I'm ok with the setup. Maybe a cartridge upgrade in the near future, I'm thinking AT440MLb. This Fluance turntable works great, has an auto-stop feature, which I find handy in case I leave suddenly or fall asleep to a record. I'm not one of those people who would spend thousands on a vinyl rig. One can get an excellent vinyl playback system for a few hundred dollars.
Not long ago, I bought a Fluance RT-81 turntable. Price is excellent and I said...can't be too bad, can it? The company offers a good return policy, so I went for it. I used it with its built in preamp, sounded decent, but not enough gain, it's very quiet (35dB of gain, Fluance told me) Then, I bought a Schiit Mani phono stage and the gain was excellent, but I noticed the high frequencies weren't ok, very recessed, sound was 'thick', if I could describe it like that. Did some research, and people experienced the same thing with Audio Technica tables with built in preamps. The onboard preamp is never truly bypassed. This Fluance exhibits the same thing. The signal seems to be passing through some capacitor on the main board no matter what. Another hint is the pop heard when powering the turntable on even on phono out.
I decided to mod it and somehow to make it reversible in case I'd wanna sell it one day.
The tonearm wires are soldered into a small board (Technics style but damn small) and from there other wires go to the main board/preamp into a small connector.
Removed that connector and the wires and kept it. Connected the RCA cables directly on that very small board (used some other small wires to bridge, found it hard to reliably solder RCA end onto that board) .Then connected an external ground wire to the tonearm base board and another wire to the ground post at the back of the table. I made an angled hole in the base and used silicone to secure the RCA cable in case of an accident.
See pictures!
I tested different things with the ground cables, and this worked best, so kept it. Now it sounds as it should. Happy I didn't blame the Schiit Mani and did not return it. It's very versatile and sounds great.
Maybe the work I did is not the greatest, I'm not that great with soldering, but it works.
Now I'm ok with the setup. Maybe a cartridge upgrade in the near future, I'm thinking AT440MLb. This Fluance turntable works great, has an auto-stop feature, which I find handy in case I leave suddenly or fall asleep to a record. I'm not one of those people who would spend thousands on a vinyl rig. One can get an excellent vinyl playback system for a few hundred dollars.
Attachments

Hey Odin,
have this same table, and when I complained about it on Amazon, customer service contacted me about it. I've not opened mine yet (was about to!), and I asked CS where the thing is grounded at, because my chassis ground from the table isn't grounded to anything I can find (btw, I'm using a Little Bear T10 phono stage) when in bypass mode.
Questions - did your re-wire fix the "power-on/off" pop?
Do you recall what the stock config was for the chassis ground? I have read continuity between the ground and the signal ground on the back of the unit, but it reads open to the headshell ground, which lead me to believe there was some component in the path (which you seem to have found).
If I don't hear back from you in the next few days, I am going to open mine and do this same mod.
For a cheap deck, I'm quite happy with it. And it's damned fine looking to boot!
Mack
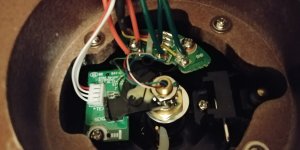
Well, since Odinthecat never responded, I decided to just go for it.
I found a couple of small problems, primarily, no continuity between the chassis gnd (at the binding post on the rear) and the tonearm post ground, nor the power gnd from the switch. The problem was caused by the paint they used on the metal board that the amp/circuit card mounts to - I sanded the mounting points at the binding post, and the two spots that screw to the board. Chassis ground issue gone.
I did similarly to Odin, installed a new tonearm post gdn to the chassis, but instead of wiring in a new RCA line, I used phone wiring copper leads to make short jumpers.. soldered new leads to one of the signal grounds (both common), and new leads to R+ and L+ on the board. Stripped 1/8 inch off each of the leads and inserted them into the connector from the tonearm. Worked like a champ.
Immediate improvement - that "muddiness" is gone from the midrange and up.
Unfortunately the "POP" when power is applied is still there, though slightly attenuated. I think some kind of RC addition would solve that problem, maybe slowing the initial current surge? Not too certain about that, but would love it if some of the experts here would offer a solution. This is a good shot of the underside of the switch board. This is a 3 position rotary switch (33, off, 45). I'm going to research the issue, because I know its common on a lot of DIY projects..
~Mack
I found a couple of small problems, primarily, no continuity between the chassis gnd (at the binding post on the rear) and the tonearm post ground, nor the power gnd from the switch. The problem was caused by the paint they used on the metal board that the amp/circuit card mounts to - I sanded the mounting points at the binding post, and the two spots that screw to the board. Chassis ground issue gone.
An externally hosted image should be here but it was not working when we last tested it.
I did similarly to Odin, installed a new tonearm post gdn to the chassis, but instead of wiring in a new RCA line, I used phone wiring copper leads to make short jumpers.. soldered new leads to one of the signal grounds (both common), and new leads to R+ and L+ on the board. Stripped 1/8 inch off each of the leads and inserted them into the connector from the tonearm. Worked like a champ.
Immediate improvement - that "muddiness" is gone from the midrange and up.
Unfortunately the "POP" when power is applied is still there, though slightly attenuated. I think some kind of RC addition would solve that problem, maybe slowing the initial current surge? Not too certain about that, but would love it if some of the experts here would offer a solution. This is a good shot of the underside of the switch board. This is a 3 position rotary switch (33, off, 45). I'm going to research the issue, because I know its common on a lot of DIY projects..
~Mack
An externally hosted image should be here but it was not working when we last tested it.
Hey Odin,
have this same table, and when I complained about it on Amazon, customer service contacted me about it. I've not opened mine yet (was about to!), and I asked CS where the thing is grounded at, because my chassis ground from the table isn't grounded to anything I can find (btw, I'm using a Little Bear T10 phono stage) when in bypass mode.
Questions - did your re-wire fix the "power-on/off" pop?
Do you recall what the stock config was for the chassis ground? I have read continuity between the ground and the signal ground on the back of the unit, but it reads open to the headshell ground, which lead me to believe there was some component in the path (which you seem to have found).
If I don't hear back from you in the next few days, I am going to open mine and do this same mod.
For a cheap deck, I'm quite happy with it. And it's damned fine looking to boot!
Mack
Hi and sorry for the late reply!
Yes, the power on/off pop is gone, because the signal bypasses completely the the board at the back. If the signal keeps passing through that board in any way, you will hear a pop, it's the circuit turning on.
The ground at the back isn;'t connected to anything apparently, but I think somehow it is connected through the board to other parts, like the spindle. Follow the wires from the board. Hope this helps
Last edited:
I realized that I'm still getting the "pop" when power is applied/disconnected because I didn't completely remove the signal wires from the board, but instead added jumpers to the signal wires FROM the board. SO I am still having some induced noise, although I have bypassed the internal phono stage.
I am going to open her up again and completely remove the RCAs from the CCB and that will definitely eliminate the power surge noise as well as ensuring complete signal isolation from any sand in between the signal wires and my phono stage.
Mack
I am going to open her up again and completely remove the RCAs from the CCB and that will definitely eliminate the power surge noise as well as ensuring complete signal isolation from any sand in between the signal wires and my phono stage.
Mack
I realized that I'm still getting the "pop" when power is applied/disconnected because I didn't completely remove the signal wires from the board, but instead added jumpers to the signal wires FROM the board. SO I am still having some induced noise, although I have bypassed the internal phono stage.
I am going to open her up again and completely remove the RCAs from the CCB and that will definitely eliminate the power surge noise as well as ensuring complete signal isolation from any sand in between the signal wires and my phono stage.
Mack
What you need is that signal to get out to the preamp directly from the cartridge and connect all grounds (tonearm and chassis) to preamp. The board serves now only as a control board for the table functions and nothing more.
Im glad I found this topic, I also wondered if bypassing the onboard preamp like people are doing with other preamped turntables would help.
I have a Fluance RT80. Im very happy with it, and more so after tonight.
Tonight I opened it up and disconected the clip connecting tone arm PCB to the main PCB, I took a set of RCA's with ground and soldered them to a header that matched the clip and connected it to the clip coming from the tonearm PCB. Completely bypassed the main PCB now.
I hooked it all up and found I had a bit of noise, so I took a seperate ground wire and went from the turn table chassis ground to the amp ground, it was instantly gone, so I grounded it that way as well.
The sound quality is much better, a lot crisper from mid to high and a cleaner sounding bass. The loud pop when turning it on is gone too.
My next venture will be to find a way to reduce the resonance cuased by the hollow plinth, the RT80 is not solid like the RT81. If you tap on the side of the plinth or the lid you get an echo through the speakers, this also causes a boomier sounding bass when at high volume.
Completed and more!
This post has also changed my turntable completely. For the quality and value, it is definitely an amazing choice. I didn't quite understand the "muddy" sound when I read this post, but after completing the modification it is quite obvious. It's like I had a limit on the mids and highs and I was missing a lot of details. I think if you have an external pre-amp, you should definitely do this mod. I have a Yaqin MS-23B modified to the "Les Box" design. It has been a game changer for me. I also use an Ortofon 2m Red with my Fluance Turntable.
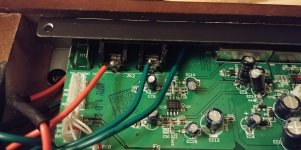
First things first, I only had two color wires in my stock. Red is for right, Green is for left and ground. I connected my wires directly to the tone arm wires on the PCB, bypassing the connections that lead to the wire that connects to the main PCB/pre-amp. In this picture, that cable is still soldered on the board, but I decided to remove this as well, just to make sure there is no interference with the connections. I think you can use either connections, it will work either way.
Especially after reading this post, most people use those secondary connections on the tone arm PCB.
I also did something a little different, I wanted to use the RCA connections on the board and not wire in RCA cables into the turntable. Mostly because I did not want to drill a hole in the solid plinth and I wanted to have that clean look. Drilling a hole in the hallow RT-80 plinth might be okay if you have that model. Both methods work. This just allows cable replacements with ease. So the main thing to note is that the negative connection for the on-board RCA is on the other side/bottom of the PCB. Remove the main PCB/pre-amp board from the back panel and you will find the "front" connector of the RCA jack is the negative. Like I stated, you can only see this connector once you remove the board from the back panel. You'll see the connector is connected to the outer shell of the RCA jack. The positive connection available from the top of the PCB board. When you are looking at the back of the RCA jack, you will see two connections that go into the board, the positive is the one on the left. You can follow this connection and it leads to the middle of the RCA jack. So basically, if you're looking from the back, it's the top tier connection. I soldered my positive wire here.
Just like jdmcquerry, I decided to sand the back panel around the ground wire, and screw posts to ensure that grounding is completed for my tonearm and preamp connection.
Note: In the pictures of the RCA jack, you might notice that I have too much solder that connects the top tier to the bottom tier. Mainly because I thought the negative was the bottom connection, this was before finding out that the negative was on the bottom front of the PCB. This resulted in too much solder and I had to remove the solder and re-solder my positives to the top tier. Before the re-solder with the two connected, there was a pretty big hum.
I say, take your time, do it right the first time and you will be amazed at this turntable's abilities. If you are questioning if you should do this mod and buy a preamp, I say, do it! The space is a bit small and takes a lot of patience, but it is all worth it.
My last mod will be to replace the feet to get rid of more vibration. Good luck and have fun!
Note: This will VOID your warranty.
This post has also changed my turntable completely. For the quality and value, it is definitely an amazing choice. I didn't quite understand the "muddy" sound when I read this post, but after completing the modification it is quite obvious. It's like I had a limit on the mids and highs and I was missing a lot of details. I think if you have an external pre-amp, you should definitely do this mod. I have a Yaqin MS-23B modified to the "Les Box" design. It has been a game changer for me. I also use an Ortofon 2m Red with my Fluance Turntable.
First things first, I only had two color wires in my stock. Red is for right, Green is for left and ground. I connected my wires directly to the tone arm wires on the PCB, bypassing the connections that lead to the wire that connects to the main PCB/pre-amp. In this picture, that cable is still soldered on the board, but I decided to remove this as well, just to make sure there is no interference with the connections. I think you can use either connections, it will work either way.
Especially after reading this post, most people use those secondary connections on the tone arm PCB.
I also did something a little different, I wanted to use the RCA connections on the board and not wire in RCA cables into the turntable. Mostly because I did not want to drill a hole in the solid plinth and I wanted to have that clean look. Drilling a hole in the hallow RT-80 plinth might be okay if you have that model. Both methods work. This just allows cable replacements with ease. So the main thing to note is that the negative connection for the on-board RCA is on the other side/bottom of the PCB. Remove the main PCB/pre-amp board from the back panel and you will find the "front" connector of the RCA jack is the negative. Like I stated, you can only see this connector once you remove the board from the back panel. You'll see the connector is connected to the outer shell of the RCA jack. The positive connection available from the top of the PCB board. When you are looking at the back of the RCA jack, you will see two connections that go into the board, the positive is the one on the left. You can follow this connection and it leads to the middle of the RCA jack. So basically, if you're looking from the back, it's the top tier connection. I soldered my positive wire here.
Just like jdmcquerry, I decided to sand the back panel around the ground wire, and screw posts to ensure that grounding is completed for my tonearm and preamp connection.
Note: In the pictures of the RCA jack, you might notice that I have too much solder that connects the top tier to the bottom tier. Mainly because I thought the negative was the bottom connection, this was before finding out that the negative was on the bottom front of the PCB. This resulted in too much solder and I had to remove the solder and re-solder my positives to the top tier. Before the re-solder with the two connected, there was a pretty big hum.
I say, take your time, do it right the first time and you will be amazed at this turntable's abilities. If you are questioning if you should do this mod and buy a preamp, I say, do it! The space is a bit small and takes a lot of patience, but it is all worth it.
My last mod will be to replace the feet to get rid of more vibration. Good luck and have fun!
Note: This will VOID your warranty.
Attachments
Every owner should do this
I did this same mod to my RT 81 and it made a huge difference. I have been using a Muffsy Preamp and I was shocked at how muddled/veiled the sound from the RT 81 was, even with the internal preamp "bypassed".
Anyways, this is an easy mod and it makes a huge difference if you have a decent pre-amp.
I did this same mod to my RT 81 and it made a huge difference. I have been using a Muffsy Preamp and I was shocked at how muddled/veiled the sound from the RT 81 was, even with the internal preamp "bypassed".
Anyways, this is an easy mod and it makes a huge difference if you have a decent pre-amp.
Looking at the circuit board the built in preamp uses an OPA1602 which is good, but
dodgy looking ceramic caps in the RIAA section (certainly look like X7R or something
for one of them).
It may be a great amp completely spoiled by the PCB factory substituting cheap caps (a known problem in the industry, ask for C0G and get rubbish instead because the fab
only understand "ceramic")
dodgy looking ceramic caps in the RIAA section (certainly look like X7R or something
for one of them).
It may be a great amp completely spoiled by the PCB factory substituting cheap caps (a known problem in the industry, ask for C0G and get rubbish instead because the fab
only understand "ceramic")
I have a Fluance RT81 and bypass the internal preamp as I use a Pioneer SA6500 II amp and it sounds great. However, I notice that I get a lot of hum whenever I turn the volume high (it goes to 10, I start hearing it real loud at 3) and I also notice I have a TON of static. So much that the leather slip mat sticks to the lp when I take it off and has to be peeled off like a band aid. The needle also seems to be very sensitive at times. Where it sounds like dragging. So doing some research it looks like my best bet is to remove the built in preamp, or at least properly bypass it for optimal sound. I have a buddy who is going to attempt this for me (im not electrically sound) so thanks to all for pictures and advice. I was hoping to find a YouTube video or something of someone doing this to a Fluance but no luck.
Question - Is rewiring for the ground necessary? If the preamp is bypassed do you have to have a second ground wire or will whats in the TT suffice?
Any tips and details someone thinks can be added will be a huge help!
Question - Is rewiring for the ground necessary? If the preamp is bypassed do you have to have a second ground wire or will whats in the TT suffice?
Any tips and details someone thinks can be added will be a huge help!
Hey everyone.
Since I recently unearthed my RT81, I've been making a few upgrades (e.g. cartridge, preamp, etc..). I recently ordered a Schiit Mani and interested in this bypass as well.
That said, I have no electrical/soldering experience, so a few questions:
1. Can this be done by someone with no soldering/electrical experience (but willing to learn)?
2. If so, is someone willing to provide step-by-step instructions on how to do so?
3. If not, how else can this be done? (Can I take it to some type of repair store?)
Thanks in advanced, yall.
Have really enjoyed these forums.
Hi all,
Just recently finished up a video showing this exact preamp bypass modification along with a few other adjustment/tweaks you can do with these Fluance turntables.
Let me know what you think!
Fluance Turntable PREAMP BYPASS & UPGRADES -Adam John- - YouTube
Adam
Just recently finished up a video showing this exact preamp bypass modification along with a few other adjustment/tweaks you can do with these Fluance turntables.
Let me know what you think!
Fluance Turntable PREAMP BYPASS & UPGRADES -Adam John- - YouTube
Adam
- Home
- Source & Line
- Analogue Source
- Fluance RT81 Turntable built in preamp true bypass