Back together and looks good. Cleaned the bearing and replaced the thrust cap and ball with Silicon Nitride. But still not working correctly.
Replaced the bad TR129 and we now have the sawtooth wave at S. There is still an issue I have not found yet. I cannot adjust the period.
Pulse at T is unstable. Wave at TR105 B&E is correct (except for the dc offset) but there is no wave at base of TR121. I don't think the problem is in the Sample Hold I think either the Period or Differential is pulling it down. I'll have more time next weekend to get into it.
Attachments

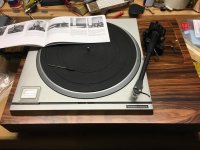
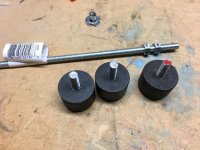
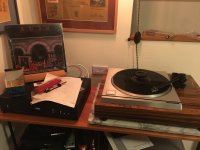
I got my SP-10 Mk2 a little while back, turns out PS was recapped couple of years ago. I got a rosewood veneer plinth from the eBay seller in Moldova. He drilled the SME V big hole in the arm board according to spec. I put some leveling feet into the plinth from my SOTA. The SOTA now has spikes, so I needed to drill, install T-Nuts, and cut down some threaded rod.
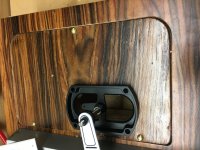
Now it’s time to move the SME V over from my SOTA. As I suspected, it will not rest parallel to the SP-10. The geometry doesn’t seem to work out. Does anyone have pics of their SME V (or similar) arm on their rig?
I’m wondering if I should just live with it looking cocked, or see if I can use the blank arm board to move things around a bit. Thoughts?
Attachments
...The original Technics arms had their stops further apart. I never liked SME (after 3009) for the reason that all movements are rather restricted...especially vertical lift - which makes cartridge changing a rather fiddly task! BUT, generally, they do sound very good.

I am Lucky to have LAB-500 with Direct Quartz drive and fully automatic features.
I also own the LAB-500, have the SP10 MKII and many others but the LAB-500 is simply special.
Now it’s time to move the SME V over from my SOTA. As I suspected, it will not rest parallel to the SP-10. The geometry doesn’t seem to work out. Does anyone have pics of their SME V (or similar) arm on their rig?
only the Sme 312 (not 310) or the IV and V at 12 "remain parallel, all the 9" tonearms arms it is necessary to accept that the tonearm is not perpendicular, several 10 "tonearms vintage remain parallel.
Epa 100 and Epa 500 are 10"
Last edited:
Why not make a seal - similar to a speaker driver interface to the speaker cabinet? The practical use of this is that if you use paper of the type children draw on with crayons you will damp some of the motor vibrations from reaching the top-plate. Such paper has been used very successfully as interleaf layers in stacked sheet stacked + bronze plinths.
This is a common mod for an LP12 between the platter and sub-platter.
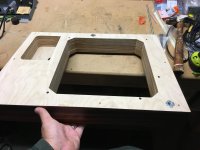
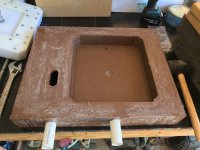
I am in the process of building a bentonite ISO resin plinth. I've already made the mold and hopefully will start poring resin today depending on weather. With the motor coupled to the TT frame this should in theory transmit the vibrations to the plinth, where they will damped.
This is a common mod for an LP12 between the platter and sub-platter.
I am in the process of building a bentonite ISO resin plinth. I've already made the mold and hopefully will start poring resin today depending on weather. With the motor coupled to the TT frame this should in theory transmit the vibrations to the plinth, where they will damped.
It is good for most metal to metal interfaces. I am still looking out for some good alloy plate in the 'used' yards! I found one piece of the right dimensions by 5mm. I also have a bronze large circular plate - just right to use as a motor to plinth mount. [My SP10 has the boards off motor & connected by umbilical; no top-plate] But - having an itch to get it going I will probably have to use something different. Like to hear how your resin plinth sounds when finished. Ideally I would like to use fine grain carbon sheet with alloy and copper interfaces...but at the price of carbon I am more likely to use flying pig skin sandwiched in platinum sheet!!! I suspect I will use slate.
I have been making plinths for SP10 mkII for 20 years. I have used mdf, Corian, engineered stone, resin-fibreglass and for the past 5 years, resin-bentonite. The final resin-bentonite composition took a bit of fine-tuning by trial and error, but the results are excellent IMO. The casting process needed a few wrinkles ironed out. Many samples were tested to destruction (sledge-hammer) to refine the mould/inserts construction, bentonite-resin-hardener mixing ratios, pouring strategy, curing regime, mould-insert extraction, surface prep and painting, etc. I invested in a SP10R a year ago but I won't post comments here since there is a companion SP10R thread to this one, where I may post if there is any interest.Finished sub platter.
I was thinking of a resin bentonite plinth, I've heard good things, any body have one?
Attachments


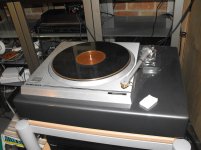
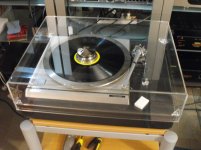
*******It lives********
Finally got the thing working, almost. PLL locked and speed stable on all speeds, except for a slight glitch on the speed, you can see the strobe blink for a couple of mS, this maybe the 5V as my power supply is maxed out at 4.8V.
5 faults including 2 modifications repaired so far..
Bon.
I cast my bentonite/resin plinth yesterday. I used 2% catylist which was way too much for the 50mm think pour. I should have used 0.5% for that thickness. I used 50/50 ratio but could have used 40/60 resin/bentonite, I have about 5mm of clear resin at the top of the mold.
Yep it cracked on the thick part where the tonearm would be. I am going to mill that away and just re-cast the repair.
Some info that you may find helpful. Firstly, it is a learning process, don't expect to get it right the first time (or even the second ... ). I use a 45/55 % ratio of resin/bentonite by volume, but my mold is 90mm in height. Catalyst/hardener is 1% of the resin by volume. One frustration is that the total mixed volume is always about 20% less than the measured un-mixed volume. This is because the bentonite contains considerable volume of air, which bubbles out during the mixing. In fact, the mixing must be done very slow and steady to minimise introducing air which gets trapped as the mixture cures, giving rise to an aero/malteser effect. (I found out the hard way using a drill mounted tile cement mixer.) The mix should be left for about 15 minutes before pouring to allow air bubbles escape. Too much hardener leads to rapid curing and heat generation that can crack the plinth. On a hot day, I have even had to fan cool the mold. Best to avoid hot days. The bentonite will settle. I aim for less than 5mm of resin in a 90mm plinth. The pour is crucial to promote a slow steady flow into the tight areas that could trap air bubbles. I leave the plinth in the mold for at least 7 days. I have bolts imbedded in the mold inserts to allow extraction by a bolt extractor style frame. Even though I remove the plinth from the mold after 1 week, it is usually best to leave it alone for up to 4 weeks before it is ready to be handled. 1% hardener takes a while for it to becomes non-sticky and be warned, it can distort if not kept face down on a flat surface, under pressure. I am not sure if your mold is base up or top up. Mine is base up which means the top in flat at the bottom of the pour. If yours is top up, the top (resin layer) will not be perfectly flat and will need dressing.*******It lives********
Bon.
I used 2% catylist which was way too much for the 50mm think pour. I should have used 0.5% for that thickness. I used 50/50 ratio but could have used 40/60 resin/bentonite, I have about 5mm of clear resin at the top of the mold.
Yep it cracked on the thick part where the tonearm would be. I am going to mill that away and just re-cast the repair.
You will need to putty it up and prep it properly if you want a nice painted finish.
Hope some of this helps.
Last edited:
The resin is commonly labelled casting resin and is a isopthalic polyester resin with associated hardener/catalyst. It should be available from a normal fibreglass fabrication supplier. The bentonite is granular (not powder!) and is often sold as Fines or Cattle Feed Supplement. I am not sure if this is the same as kitty litter.Interesting. do you have make / p/n for the resin and hardener? Is bentonite the cat litter used by some folks or something else? Also, what is your definition of 'hot day' as my desert cold days could possibly be what you consider a hot day.
For suitable pour conditions, I prefer temperatures below 25 centigrade (77 fahrenheit). Today in Sydney, it will reach 29 C (84 F), possible but hotter than I like. Of course if you are in a controlled temperature, you can pour at any time. The fumes are unpleasant though, so I always set up in the workshop without air-con. Unfortunately, temps are climbing here and there will be relatively few days below 25 C for the next 4-5 months (2 in the next 10 days by forecast)
Last edited:
- Home
- Source & Line
- Analogue Source
- The Incredible Technics SP-10 Thread