Thank you, Brianco and 6L6
Thank you both for your response. I found some great deals on eBay for previously sold listings and have a solid idea of what I would like to acquire. I have settled on the SP-10 Mk.IIa with PSU for a ground-up, chassis-off (so to speak) restorationa nd upgrade/modification.
I have seen prices vary from $500 for non-functional to $1k for a solid, working platform with PSU. Several complete units were had with plinth (Technics) for under $1700 with tonearms and cartridges. One looked great but it sold. I will set up an alert for any new units that pop-up for sale and snag one.
I really like the Rega RP-40 and fully upgraded Linn LP-12 with Ekos tonearm and Benz Micro Glider SL but I remember (vaguely) my Denon DP-60L with great results so I am certain I will enjoy a table even better in performance and technology. Of all the tables I have owned, built and upgraded I found the DP-60L to be my favorite for sound, ease of use and sheer aesthetics.
Thank you again for your help and I look forward to adding my contributions once I find the right unit to purchase and restore/upgrade.
Darren
Ebay is where you are going to find them...
An audio sales page will have the possible advantage of one that's at least tested or has been operating recently. These things are tanks and quite easy to work on, so if you are reasonably handy, you should have an easy time of it.
Variants - there are essentially 4; The SP-10, The MkII, The MkIIa, and the MkIII.
The SP-10 is non-quartz. Still a fantastic motor and built beautifully, but a generation previous in motor control.
The MkII and MkIIa are the Quartz versions, and the most common. The difference between the two is changing the motor control from mostly discrete to mostly IC. The MkIIa needs a bit more current in the logic supply, and therefore has a slightly different PSU, the SH-10E. The important bits of the -II and -IIa are essentially identical.
The MkIII is very different, with a different motor and PSU. They are considered to be the pinnacle of Japanese Turntable art and are priced accordingly. Complete units trade for $10,000-16,000USD. Inoperative, incomplete ones cost more than a good MkII.
Thank you both for your response. I found some great deals on eBay for previously sold listings and have a solid idea of what I would like to acquire. I have settled on the SP-10 Mk.IIa with PSU for a ground-up, chassis-off (so to speak) restorationa nd upgrade/modification.
I have seen prices vary from $500 for non-functional to $1k for a solid, working platform with PSU. Several complete units were had with plinth (Technics) for under $1700 with tonearms and cartridges. One looked great but it sold. I will set up an alert for any new units that pop-up for sale and snag one.
I really like the Rega RP-40 and fully upgraded Linn LP-12 with Ekos tonearm and Benz Micro Glider SL but I remember (vaguely) my Denon DP-60L with great results so I am certain I will enjoy a table even better in performance and technology. Of all the tables I have owned, built and upgraded I found the DP-60L to be my favorite for sound, ease of use and sheer aesthetics.
Thank you again for your help and I look forward to adding my contributions once I find the right unit to purchase and restore/upgrade.
Darren
Personally, given a choice, I'd go for a MKII over MK2A. The primary reason is the MKII uses TTL ICs which can be replaced with 7400 series ICs along with simple tweaks here and there and be repaired.
The MK2A uses proprietary ICs - if you can't source a replacement you've a very difficult modification/repair where possible, or a brick.
The MK2A uses proprietary ICs - if you can't source a replacement you've a very difficult modification/repair where possible, or a brick.
Since you mention preferring the Denon over the other tables you mention, I'm sure you are going to be really, really happy with the Technics. ")
And it will just destroy the Rega and Linn, IMO.
I agree with JP - put the MkII on the top of the list (says me with two -IIa... ) If for no other reason than there are a significant quantity more of them available.
Don't shy way from a -IIa -- just don't think there's much difference in performance to exclude/choose one over the other.
And it will just destroy the Rega and Linn, IMO.
I agree with JP - put the MkII on the top of the list (says me with two -IIa...
) If for no other reason than there are a significant quantity more of them available. Don't shy way from a -IIa -- just don't think there's much difference in performance to exclude/choose one over the other.
Where's our weekly update from Coasttocoast? I'm going through withdrawal here.
I didn't want to bore everyone with unfinished final pics. This week I've been super busy at work and haven't had time to work on it. I did spend some time sanding and polishing the stainless steel paint. But a couple places I sanded through. Beginner issues. Need to refine how I spray this material. After I respray, and successful, I'll post what worked. But here is a shot of what it looks like after some sanding. Started with 220 grit, then 400, and this is 600 grit followed by some steel wool. Only the right front corner is this far in this pic. Since I sanded through I'll hit it all with 400 and spray again.

Pretty cool material though. You actually think working with real metal, including the mess! Hands black after just a couple mins. After I get this recoated and sanded the way I like I'm going to add some black to the clear coat and go for a Chromium Black color.
I didn't want to bore everyone with unfinished final pics.
I don't believe that's possible. At all.
That material looks really nice - far better than I thought it would from the earlier pics. I can't wait to see how this turns out.
If you want to build another...
I'm trying desperately to finish this turntable project! Yesterday I finished sanding it back down with 320 grit in prep for another coat. Tonight I was able to spray another coat. I really should be practicing on a plain piece of wood instead of $800 block of Panzerholz with many hours of machining and buildup!
When sanding the first coat I noticed some micro air pockets and I didn't lay down enough material at first pass, but sprayed like typical paint by building up. Typical automotive paint will "melt" together coat to coat. This material dries to quick and does not really build.
Tonight I lowered the pressure at the gun down to about 20-30 psi, tightened up the fan, and tried to spray the maximum about of material on each pass without a run.
I started on the rear side, pushed the envelope and got some runs on the first pass. Lightened up slightly and completed without any more runs. I can be satisfied I laid down the maximum material. BTW, the runs are no issue as it all has to be sanded anyway, but it is extra effort!
Before
After
Then drove over to my friends HiFi store to listen to a new delivery of Rockport Atria's (and beer!) Absolutely one of the best speakers I've ever heard!
When sanding the first coat I noticed some micro air pockets and I didn't lay down enough material at first pass, but sprayed like typical paint by building up. Typical automotive paint will "melt" together coat to coat. This material dries to quick and does not really build.
Tonight I lowered the pressure at the gun down to about 20-30 psi, tightened up the fan, and tried to spray the maximum about of material on each pass without a run.
I started on the rear side, pushed the envelope and got some runs on the first pass. Lightened up slightly and completed without any more runs. I can be satisfied I laid down the maximum material. BTW, the runs are no issue as it all has to be sanded anyway, but it is extra effort!
Before
An externally hosted image should be here but it was not working when we last tested it.
After
An externally hosted image should be here but it was not working when we last tested it.
Then drove over to my friends HiFi store to listen to a new delivery of Rockport Atria's (and beer!) Absolutely one of the best speakers I've ever heard!
An externally hosted image should be here but it was not working when we last tested it.
So the second try didn't work either! No matter what I tried there were small pockets that looked void of metal, streaks, etc
So I gave up and went with paint. I am used to spraying DuPont Chroma series, so I used their basecoat, clearcoat system. The base is Audi silver.
I sanded the metal paint with 320 grit dry, then 600 grit wet.
3 coats of silver with a final mist coat to bring out the metallic.
Then in the clear I added about 1/3 oz of black with 12 oz of clear for my version of a chromium black.
And sprayed 2 heavy coats. My method of spraying clear is to open up the fan, open up the material flow, and open up the pressure, all to about max of the gun and spray like no tomorrow! If you control your pass speed you can keep from getting runs.
I got a real nice flat (smooth) finish.
Monday I'll start the process of wet sanding and polishing.
Hopefully next weekend I can assemble!
An externally hosted image should be here but it was not working when we last tested it.
So I gave up and went with paint. I am used to spraying DuPont Chroma series, so I used their basecoat, clearcoat system. The base is Audi silver.
I sanded the metal paint with 320 grit dry, then 600 grit wet.
3 coats of silver with a final mist coat to bring out the metallic.
An externally hosted image should be here but it was not working when we last tested it.
Then in the clear I added about 1/3 oz of black with 12 oz of clear for my version of a chromium black.
And sprayed 2 heavy coats. My method of spraying clear is to open up the fan, open up the material flow, and open up the pressure, all to about max of the gun and spray like no tomorrow! If you control your pass speed you can keep from getting runs.
I got a real nice flat (smooth) finish.
An externally hosted image should be here but it was not working when we last tested it.
An externally hosted image should be here but it was not working when we last tested it.
Monday I'll start the process of wet sanding and polishing.
Hopefully next weekend I can assemble!
How do you keep dust out during dry?
Looks like a proper spray booth.
jeff
Thanks for the comments guys!
Yes, painted in a paint booth. The painting process for basecoat is, spray 1st coat, wait 7 mins, spray coat 2, wait 7 mins, spray coat 3, wait 1 min, spray all over mist coat.
Clear, wait 30 mins from mist coat, spray coat 1, wait 10 mins, spray coat 2. Dust free in 40 mins. Wet sand and polish after 24 hours.
As far as making copies, need to see if this one works first! Then???
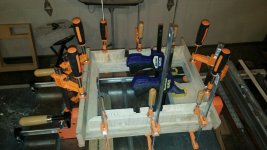
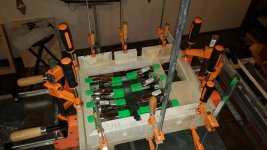
Plinth Progress
I'm building a couple of plinths from laminated BB Plywood for these TT's.
Here are some progress photos.
LOTS of clamps are used, I totaled up about 9,000 pounds of force that is distributed around the perimeter of the plinths.
My son enjoys helping me spread the glue for each layer, an extra hand really helps even out the glue with my limited open time for the glue.
When I laminated the 3 solid bottom layers for the tall one I figured an extra 40 pounds in the middle couldn't hurt and I had an old bench supply that fit just perfectly.
The 3" plinth weighs 9 pounds and the 4.5" one weighs in at 20 pounds.
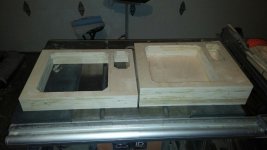
I need to finish the cutout on the bottom of the armboard hole for the big one and that will probably shave a pound or so.
Next I need to even out the vertical edges and flatten the top layer.
Then I can seal and fill and seal all of the surfaces prior to veneering.
I'm building a couple of plinths from laminated BB Plywood for these TT's.
Here are some progress photos.
LOTS of clamps are used, I totaled up about 9,000 pounds of force that is distributed around the perimeter of the plinths.
My son enjoys helping me spread the glue for each layer, an extra hand really helps even out the glue with my limited open time for the glue.
When I laminated the 3 solid bottom layers for the tall one I figured an extra 40 pounds in the middle couldn't hurt and I had an old bench supply that fit just perfectly.
The 3" plinth weighs 9 pounds and the 4.5" one weighs in at 20 pounds.
I need to finish the cutout on the bottom of the armboard hole for the big one and that will probably shave a pound or so.
Next I need to even out the vertical edges and flatten the top layer.
Then I can seal and fill and seal all of the surfaces prior to veneering.
Attachments

This afternoon I was able to wet sand and polish the paint, install the feet, and take it home! Yea!
I started off by wet sanding the flat areas of the top and sides. The clear came out so flat (smooth) that I didn't need to sand the corners. I did have a couple specs of dust on the top and front that needed attention. I only had to use 2000 grit paper. For those that have never wet sanded clear before, it is a little nerve racking. You need to sand the clear till all shiny surface is gone and your left with a clear flat (not shiny) consistent surface. But if you sand through the clear into the paint it's all over and back to the booth. I back up my sandpaper with a 3M flexible sanding block that is about 1/4" thick.
In this pic you can see the sanded surface compared to the untouched radius surface
Looks like it's ruined?
But a couple quick passes with the mini buffer and compound and it looks better than new
I use the 3M 3 part polishing system, each compound has a corresponding pad.
So after the polishing I flipped it over, on protection of course, and installed the Stillpoints. I didn't paint the bottom. Left the stainless steel paint.
Then at home I removed the motor and arm from the test plinth and for a quick photo placed the platter in the opening and the arm in place. I need to get some small metric tap and drill to bolt everything to the panzer. Hopefully before the weekend I can finally play it!
Crappy pic. It was already dark and the flash didn't do it justice. But you can get the idea.
I started off by wet sanding the flat areas of the top and sides. The clear came out so flat (smooth) that I didn't need to sand the corners. I did have a couple specs of dust on the top and front that needed attention. I only had to use 2000 grit paper. For those that have never wet sanded clear before, it is a little nerve racking. You need to sand the clear till all shiny surface is gone and your left with a clear flat (not shiny) consistent surface. But if you sand through the clear into the paint it's all over and back to the booth. I back up my sandpaper with a 3M flexible sanding block that is about 1/4" thick.
In this pic you can see the sanded surface compared to the untouched radius surface
An externally hosted image should be here but it was not working when we last tested it.
Looks like it's ruined?
But a couple quick passes with the mini buffer and compound and it looks better than new
An externally hosted image should be here but it was not working when we last tested it.
I use the 3M 3 part polishing system, each compound has a corresponding pad.
So after the polishing I flipped it over, on protection of course, and installed the Stillpoints. I didn't paint the bottom. Left the stainless steel paint.
An externally hosted image should be here but it was not working when we last tested it.
Then at home I removed the motor and arm from the test plinth and for a quick photo placed the platter in the opening and the arm in place. I need to get some small metric tap and drill to bolt everything to the panzer. Hopefully before the weekend I can finally play it!
Crappy pic. It was already dark and the flash didn't do it justice. But you can get the idea.
An externally hosted image should be here but it was not working when we last tested it.
- Home
- Source & Line
- Analogue Source
- The Incredible Technics SP-10 Thread