The power and ground for the IO board are in the ribbon cable that runs between the main and IO boards. Zooming in on your PICs those ribbon cables look a bit 'dodgy' to me.which ground connections? from the ps to the main board?
Harold,
Screw head, shoulder washer, voltage regulator, thermal pad, heat sink, nut would be the Normal way to do it.")
Thanks, Rick. I got your reply while I was on vacation, hence my slow reply. Appreciated nonetheless.
Sadly, my PCBs are still sitting in their packaging. One day i will get around to this project. Have now caught up on the thread and it's great to see some of peoples preamps getting some nice cases.
Part of the reason I haven't built this yet is I have need for less (0 to 1) balanced inputs and more need for RCA inputs (3-5) so I didn't order the enhanced IO board. Anyone else in the same boat?
Part of the reason I haven't built this yet is I have need for less (0 to 1) balanced inputs and more need for RCA inputs (3-5) so I didn't order the enhanced IO board. Anyone else in the same boat?
Last edited:
I have noted that the amplification is considerable. With normal connection (tape out from a Linn DS or Meridian Explorer2 as an input) I can only use the volume between closed and maybe 09:00. Power amp is CJ Premier 11A. It sounds great, but I'm obviously not having a lot of (volume) control. Have others got the same experience? Thanks, Rene
Any kits left? I am looking to get on board, albeit a bit late
David
David,
You have a private message
Hi all,
I’ve created SVG and PDF files for the front and back panel of my DSelf preamp. I’m using a reclaimed enclosure (roughly 44cm wide by 4.4cm high) that probably won't match what you’re using. However, the location of the holes on the back and front panels are largely determined by the PCBs, so these might be of interest to other builders. (I haven’t indicated the location of the mounting holes or the IEC yet.)
You can get the files here, in the subfolder labelled Panel Drawings:
https://drive.google.com/folderview?id=0B_svLQu7hxPtTUcxZ1hma2RwR0k&usp=sharing
To make sure these will work for you, I’d suggest printing them out on paper and testing them with your build, to double check I didn’t botch anything up. Please let me know if I did.
(In the same folder, I’ve got another subfolder that contains revised BOMs. I found that the original BOMs had some spare parts. These BOMs are reconciled to just the parts I used to make my preamp.)
EDIT: A point of clarification. I haven't used the panel files to create the panels yet. But once I fine-tune them to my build (mounting holes, IEC) I'll have them cut locally by someone with a CNC machine. In the meantime, I'd appreciate feedback.
Last edited:
Hi,
I am really looking forward to getting my panels cut professionally. I will send feedback as soon as I can this all set up. Thanks for the contribution
Thanks, George. I'd appreciate any input you can offer.
I'm relatively confident in the front panel. It was an easy lift; I just scaled Carl's original bitmap version and traced over it in a vector drawing program.
The back panel (for the Enhanced I/O board) involved a lot of back and forth, tweaking to get the drawing to match the reality of the board.
I'm planning on using 3mm thick aluminum plate. Hopefully, that'll do the trick.
Did you find your rear panel layout much different from the one I posted in post #444?
Still, I'll check this this weekend. Sorry for the slow response. I didn't realize you'd posted templates already!
Front Panel Printing
Anyone wanting to make a DIY front panel might be interested in a product called Lazertran. It allows you to print onto a transparent layer (reversed mode) and then to bake the toner images onto a metal surface.
See Waterslide Decal Paper, Image, Transfer Paper, Iron On, Decals and https://www.muffwiggler.com/forum/viewtopic.php?p=280200&sid=ec511be2c3369f54d6543feb691e8ff9 for excellent examples.
This should give me something like the quality that I want.. especially the baking aspect.
One warning. This print material does not take kindly to modern high-speed laser printers. They use high levels of heat (for faster printing). Lazertran lists laser printers that are acceptable on their website and there are companies which will provide a printing service at reasonable rates. It seems to be worth the effort as the results do look very good indeed.
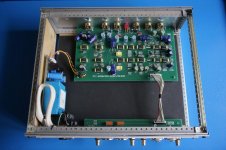
Almost finished, already working all right from the point of view of measures.
The case comes from my junk box, the front face, full of holes, needs cosmetic surgery.
Checking that everything was OK was a good opportunity to familiarize myself with Clio Pocket I purchased some time ago.
Self preamplifier,
'A low-noise preamplifier with variable frequency tone controls'
Linear Audio, volume 5, 2013-04
PCB by Carl Huff, built and measured by Forr
2016-06-07
--------------------------------------------------------------------------------
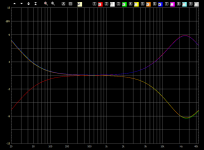
input signal 1 Vrms
R = Right, L = Left
TONE CONTROL
============
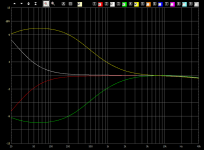
01. extreme frequencies and gains
¨¨¨¨¨¨¨¨¨¨¨¨¨¨¨¨¨¨¨¨¨¨¨¨¨¨¨¨¨¨¨¨¨
bass lowest frequency, -10 dB -> red
bass lowest frequency, +10 dB -> white
bass central frequency, -10 dB -> green
bass central frequency, +10 dB -> yellow
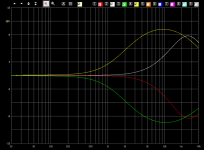
02. central frequencies, extreme gains
¨¨¨¨¨¨¨¨¨¨¨¨¨¨¨¨¨¨¨¨¨¨¨¨¨¨¨¨¨¨¨¨¨¨¨¨¨¨
treble highest frequency, -10 dB gain -> red
treble highest frequency, +10 dB -> white
treble central frequency, -10 dB -> green
treble central frequency, +10 dB -> yellow
03. central and extreme frequencies, extreme gains
¨¨¨¨¨¨¨¨¨¨¨¨¨¨¨¨¨¨¨¨¨¨¨¨¨¨¨¨¨¨¨¨¨¨¨¨¨¨¨¨¨¨¨¨¨¨¨¨¨¨
bass lowest frequency, -10 dB +
treble highest frequency, -10 dB -> red
bass lowest frequency, +10 dB +
treble highest frequency, +10 dB -> orange
bass central frequency, -10 dB +
treble central frequency, -10 dB -> green
bass central frequency, +10 dB +
treble central frequency, +10 dB -> blue
04. comparison between channels, central frequencies, extreme gains
¨¨¨¨¨¨¨¨¨¨¨¨¨¨¨¨¨¨¨¨¨¨¨¨¨¨¨¨¨¨¨¨¨¨¨¨¨¨¨¨¨¨¨¨¨¨¨¨¨¨¨¨¨¨¨¨¨¨¨¨¨¨¨¨¨¨¨
bass central frequency, -10 dB +
treble central frequency, +10 dB R -> red
bass central frequency, -10 dB +
treble central frequency, +10 dB L -> blue
bass highest frequency, +10 dB +
treble lowest frequency, -10 dB R -> green
bass highest frequency, +10 dB +
treble lowest frequency, -10 dB L -> orange
05. comparison between channels, extreme frequencies, extreme gains
¨¨¨¨¨¨¨¨¨¨¨¨¨¨¨¨¨¨¨¨¨¨¨¨¨¨¨¨¨¨¨¨¨¨¨¨¨¨¨¨¨¨¨¨¨¨¨¨¨¨¨¨¨¨¨¨¨¨¨¨¨¨¨¨¨¨¨¨
bass lowest frequency, -10 dB +
treble highest frequency, +10 dB R -> red
bass lowest frequency, -10 dB +
treble highest frequency, -10 dB L -> blue
bass lowest frequency, +10 dB +
treble highest frequency, -10 dB R -> green
bass lowest frequency, +10 dB +
treble highest frequency, -10 dB L -> orange
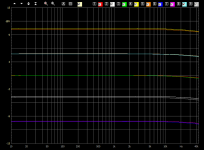
VOLUME CONTROL
==============
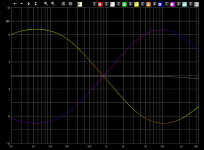
06. level differences between channels at various volume settings
¨¨¨¨¨¨¨¨¨¨¨¨¨¨¨¨¨¨¨¨¨¨¨¨¨¨¨¨¨¨¨¨¨¨¨¨¨¨¨¨¨¨¨¨¨¨¨¨¨¨¨¨¨¨¨¨¨¨¨¨¨¨¨¨¨
tone controls off
+10.2 R -> orange
L -> yellow
+4.8 dB R -> white
L -> sky blue
0.0 dB R -> red
L -> green
-4.8 db R -> white
L -> grey
-10.2 dB R -> purple
L -> blue
Tone control : when the pots are set to get a flat response, there was no significant level difference(about 0.01 dB or less) when on or off.
The case comes from my junk box, the front face, full of holes, needs cosmetic surgery.
Checking that everything was OK was a good opportunity to familiarize myself with Clio Pocket I purchased some time ago.
Self preamplifier,
'A low-noise preamplifier with variable frequency tone controls'
Linear Audio, volume 5, 2013-04
PCB by Carl Huff, built and measured by Forr
2016-06-07
--------------------------------------------------------------------------------
input signal 1 Vrms
R = Right, L = Left
TONE CONTROL
============
01. extreme frequencies and gains
¨¨¨¨¨¨¨¨¨¨¨¨¨¨¨¨¨¨¨¨¨¨¨¨¨¨¨¨¨¨¨¨¨
bass lowest frequency, -10 dB -> red
bass lowest frequency, +10 dB -> white
bass central frequency, -10 dB -> green
bass central frequency, +10 dB -> yellow
02. central frequencies, extreme gains
¨¨¨¨¨¨¨¨¨¨¨¨¨¨¨¨¨¨¨¨¨¨¨¨¨¨¨¨¨¨¨¨¨¨¨¨¨¨
treble highest frequency, -10 dB gain -> red
treble highest frequency, +10 dB -> white
treble central frequency, -10 dB -> green
treble central frequency, +10 dB -> yellow
03. central and extreme frequencies, extreme gains
¨¨¨¨¨¨¨¨¨¨¨¨¨¨¨¨¨¨¨¨¨¨¨¨¨¨¨¨¨¨¨¨¨¨¨¨¨¨¨¨¨¨¨¨¨¨¨¨¨¨
bass lowest frequency, -10 dB +
treble highest frequency, -10 dB -> red
bass lowest frequency, +10 dB +
treble highest frequency, +10 dB -> orange
bass central frequency, -10 dB +
treble central frequency, -10 dB -> green
bass central frequency, +10 dB +
treble central frequency, +10 dB -> blue
04. comparison between channels, central frequencies, extreme gains
¨¨¨¨¨¨¨¨¨¨¨¨¨¨¨¨¨¨¨¨¨¨¨¨¨¨¨¨¨¨¨¨¨¨¨¨¨¨¨¨¨¨¨¨¨¨¨¨¨¨¨¨¨¨¨¨¨¨¨¨¨¨¨¨¨¨¨
bass central frequency, -10 dB +
treble central frequency, +10 dB R -> red
bass central frequency, -10 dB +
treble central frequency, +10 dB L -> blue
bass highest frequency, +10 dB +
treble lowest frequency, -10 dB R -> green
bass highest frequency, +10 dB +
treble lowest frequency, -10 dB L -> orange
05. comparison between channels, extreme frequencies, extreme gains
¨¨¨¨¨¨¨¨¨¨¨¨¨¨¨¨¨¨¨¨¨¨¨¨¨¨¨¨¨¨¨¨¨¨¨¨¨¨¨¨¨¨¨¨¨¨¨¨¨¨¨¨¨¨¨¨¨¨¨¨¨¨¨¨¨¨¨¨
bass lowest frequency, -10 dB +
treble highest frequency, +10 dB R -> red
bass lowest frequency, -10 dB +
treble highest frequency, -10 dB L -> blue
bass lowest frequency, +10 dB +
treble highest frequency, -10 dB R -> green
bass lowest frequency, +10 dB +
treble highest frequency, -10 dB L -> orange
VOLUME CONTROL
==============
06. level differences between channels at various volume settings
¨¨¨¨¨¨¨¨¨¨¨¨¨¨¨¨¨¨¨¨¨¨¨¨¨¨¨¨¨¨¨¨¨¨¨¨¨¨¨¨¨¨¨¨¨¨¨¨¨¨¨¨¨¨¨¨¨¨¨¨¨¨¨¨¨
tone controls off
+10.2 R -> orange
L -> yellow
+4.8 dB R -> white
L -> sky blue
0.0 dB R -> red
L -> green
-4.8 db R -> white
L -> grey
-10.2 dB R -> purple
L -> blue
Tone control : when the pots are set to get a flat response, there was no significant level difference(about 0.01 dB or less) when on or off.
Attachments
-
 pre_Self 00_DSC4114.JPG123.2 KB · Views: 904
 -
 pre_Self 01 fcen basminmax fext treminmax.png65.4 KB · Views: 898
 -
 pre_Self 02 fcen treminmax fext treminmax.png65.8 KB · Views: 862
 -
 pre_Self 03 fcen basmintremin basmaxtremax fext basmintremin basmaxtremax.png26.2 KB · Views: 856
 -
 pre_Self 04 fcen basmintremax basmaxtremin LR.png68.2 KB · Views: 858
 -
 pre_Self 05 fext basmintremax basmaxtremin LR.png62.6 KB · Views: 192
 -
 pre_Self 06 lin diff levels LR.png61.6 KB · Views: 209
Last edited:
- Home
- Source & Line
- Analog Line Level
- Doug Self Preamp from Linear Audio #5