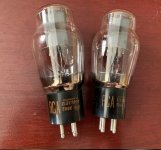
Cossor/Linlai WE2A3
 https://flic.kr/p/2mmgBypCossor/LinLai WE2A3 https://www.flickr.com/photos/64593884@N08/
 Cossor/LinLai 2A3 deluxe metal base https://www.flickr.com/photos/64593884@N08/
https://flic.kr/p/2mmgBypCossor/LinLai WE2A3 https://www.flickr.com/photos/64593884@N08/
Cossor/LinLai 2A3 deluxe metal base https://www.flickr.com/photos/64593884@N08/I have read in other forums that the JJ 2A3 is pretty good but I dont know if its as "delicate" in the midrange as my Cossor/Linlai. I know I would have to try it in my 8900 BUT I have limited budget - I cannot get new tubes to test plus Lundahl. I am aiming for Lundahl but curious as to this other 2A3.
I am a neophyte to this kind of stuff, but was does the hanging element do ?
ps. I am not wanting to engage in a "better than this or that etc"") just trying to educate myself and also others might have the same question.
just trying to educate myself and also others might have the same question.
I am a neophyte to this kind of stuff, but was does the hanging element do ?
ps. I am not wanting to engage in a "better than this or that etc"
just trying to educate myself and also others might have the same question.I received both the 2A3 and 300B cossor tubes and the Sylvania 12BH7 from Victor today. Haven't tried the 300B yet, the 2A3 is... eerie. Sounds are popping up from everywhere in space, etched precisely and delicately. I have full range coaxial speakers in open baffle, so I am used to beautiful imaging, but the 2A3 on the 8900 is shocking. The sound projects forward quite a bit than I am used to with other tubes/amps, I am still getting used to this part (I would prefer it to fall back, honestly, right now the soundstage is very deep, contributing to the 'popping everywhere in space' sensation. Maybe it will relax with burn in). I had the Sovtek 2a3 + Electro-Harmonix 12AU7 before, the cossor + Sylvania combo kicks it *** thoroughly.
Not sure I understand, you mentioned it projects forward and you prefer it falling back but right now soundstage is deep?
My 8900 presents soundstage beyond the width of my speakers but most voice and instruments appear between my speakers and are not forward but rather presented behind the speakers creating a non fatiguing sound.
My 8900 presents soundstage beyond the width of my speakers but most voice and instruments appear between my speakers and are not forward but rather presented behind the speakers creating a non fatiguing sound.
The soundstage is deeper and more layered than I am used to, so some of the sounds appear closer to me than I am accustomed to hearing. It might be something I get used to. Most of the soundstage is indeed behind the plane of the speakers. I think a lot of this effect is due to the very clean background and a lack of 'bloom' on the notes - sounds appear more clearly defined.
I think the depth of soundstage and resolution is coming from the Cossor tube. If I use the Sovtek 2A3 the soundstage falls back and collapses substantially. It may be a matter of getting used to the sound, I think. Pretty immersive and sweet with her Cossor 2A3. Great recommendation, Victor.
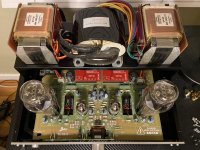
Translated from SUNvalley - TU-8900
ELEKIT's new product "TU-8900" has arrived. It's a model that everyone is interested in, so I made one.
 1 https://www.flickr.com/photos/64593884@N08/
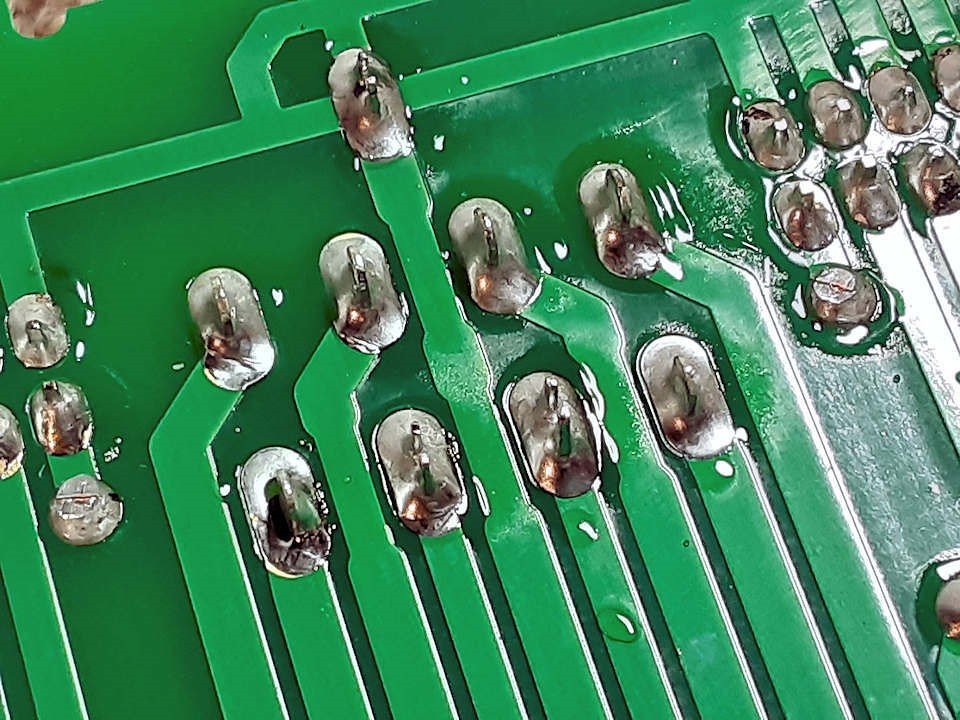
First of all, from the end product, I confirmed that this is a product that can be assembled with no problems if you have basic soldering skills.
This is due to the extremely careful and rational manufacturing procedures that ELEKIT is known for.
It was completed in a day while I took pictures and recorded the assembly.
Note: I think that even the inexperienced beginner can complete it if they spend two days on the weekend.
The difficulty level is ★★ ☆☆☆.
 2 https://www.flickr.com/photos/64593884@N08/
I think it's been about a year since I made an ELEKIT product, but I was impressed with this board.
As you can see from a closer look, there is a hairline in the copper folio (the part to be soldered),
which makes it easier for the solder to bite and makes it less likely that solder defects will occur.
 3 https://www.flickr.com/photos/64593884@N08/
After soldering, use the camera function of the smartphone to magnify the soldered part and check that there is no cold solder.
Since the TU-8900 prioritizes easy assembly, the insertion clearance of mechanical parts is particularly large, so be sure to pour
solder firmly on the parts that should be flush.
I would like to inform you that there were some points that you should be careful about during assembly. This is not limited to the
TU-8900, but can be said to be the general "method".
 4 https://www.flickr.com/photos/64593884@N08/
 5 https://www.flickr.com/photos/64593884@N08/
The switches must be kept horizontal. (We all have the experience of turning over the board after soldering to check.)
Note that the single-lead type bridge diode also tends to be slanted.
 6 https://www.flickr.com/photos/64593884@N08/
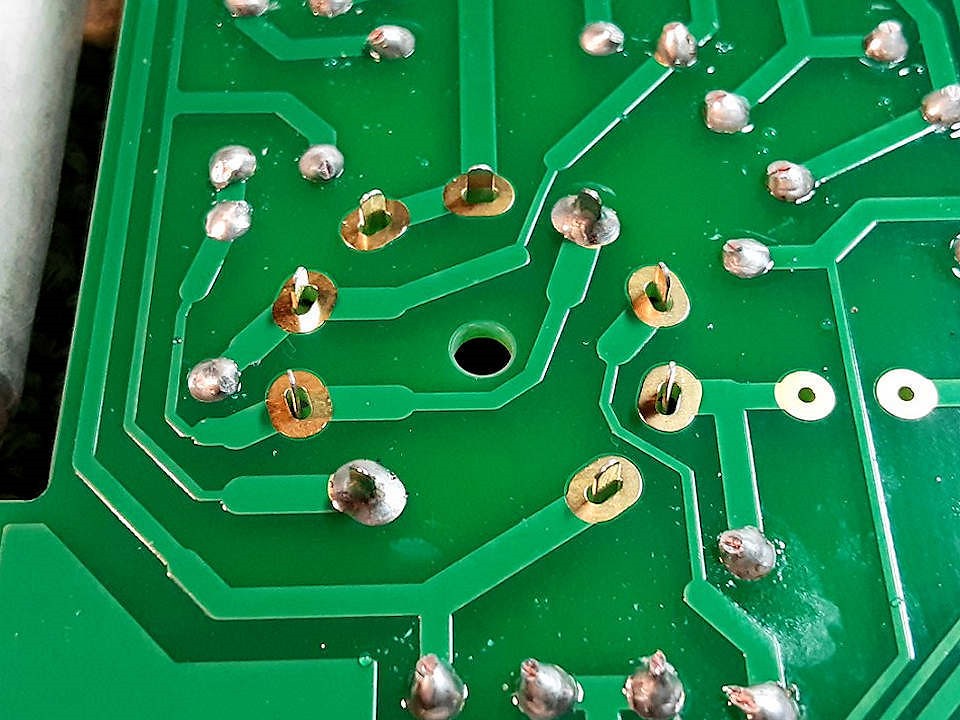
MT9 pin socket directly attaches to the board. This is also one of the parts that needs to be kept horizontal. After soldering in one place,
I turn the board over to check the leveling, and then soldered it to the PCB board. It is difficult to modify parts that require soldering in
three or more places, so work with caution.
 7 https://www.flickr.com/photos/64593884@N08/
This is the fixed part of the speaker terminal, but I often see cases where large parts of this type are not sufficiently fixed.
From an analysis of factors for the amplifier to be returned to us for repair, about 70% are simple solder defects
(where half of them are not sufficiently fastened with the mechanical system). Accurate soldering and secure fixing of mechanical parts
are fundamental, the basics of the basics. The necessary tools are described in the manual, so if you do not have them, you should obtain them in advance.
By the way, in the photo above, the blue coating on the nut is the "screw locking agent ".
It is especially effective for speaker terminals that tend to loosen due to the accumulation of daily operations.
 8 https://www.flickr.com/photos/64593884@N08/
It is only an auxiliary item and is useless in cases where the fastening is incomplete,
but if used appropriately, the quality will be significantly improved. A small amount is sufficient.
 9 https://www.flickr.com/photos/64593884@N08/
UX 4-pin socket orientation. Pay attention to the direction of the arrow.
 10 https://www.flickr.com/photos/64593884@N08/
Diode direction. Check the anode / cathode with the wire on the component body.
The one with the line is the cathode. Pay attention to the positive and negative polarities of the bridge.
 11 https://www.flickr.com/photos/64593884@N08/,
Many people have upgraded their coupling capacitors even with the TU-8900. All you need is Arizona 0.1uF (2 pcs).
The TU-8900 has instructions to raise the base pin, so I think it's a good idea to tie it tightly and solder it.
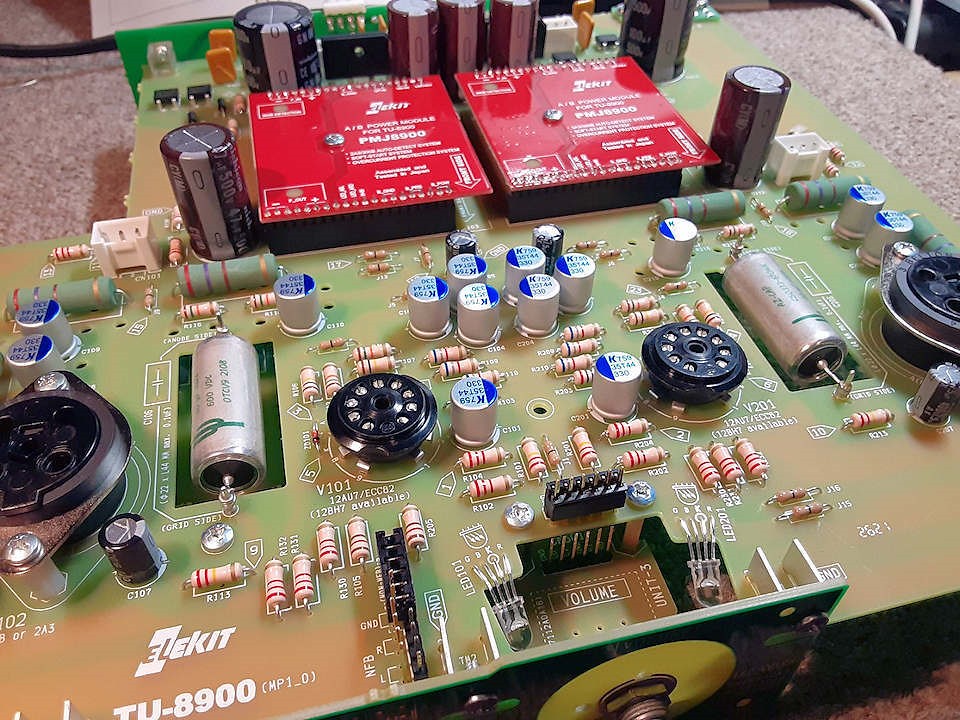
The point is that the cactus mark faces the grid side . Please also see the previous photo.
 12 https://www.flickr.com/photos/64593884@N08/
Soldering of board connection parts. Pour a lot of solder to prevent cracks afterwards.
 13 https://www.flickr.com/photos/64593884@N08/
Check polarity. In the latter half of the work, my concentration dropped and I reverse it without knowing...
So please take appropriate breaks and proceed with assembly by prioritizing the following: "first accuracy, second aesthetics, third efficiency".
Everyone wants to hear the sound as soon as possible, but it takes more time to start over than to make it from scratch, so please do not rush—proceed with patience.
 14 https://www.flickr.com/photos/64593884@N08/
Make sure to fix heavy transformers as well.
Do not mistake the orientation of the primary side and the secondary side.
 15 https://www.flickr.com/photos/64593884@N08/
Connection between the secondary side of the transformer and the connector.
It may be difficult to find the mounting position of CN105 / 205 in the manual, so please refer to the photo.
 16 https://www.flickr.com/photos/64593884@N08/
As I wrote in the entry the other day , the TU-8900 can be selected from non-feedback and with NF (nominal 8 dB).
It is not possible to decide which is better, but the gain with NF is quite low, so as a guide:
1. There is NF when using a pre with a gain of (about) 20 dB or more. Others select no feedback.
2. NF is available when using speakers with an efficiency of (about) 100 dB or higher. Others select no feedback.
 17 https://www.flickr.com/photos/64593884@N08/
Electrically, it is ready to go. Quickly cover the chassis and complete! I want to keep going, but beforehand, what I should do here is a voltage measurement.
It is very important not only to just make an amplifier, but also to confirm for yourself that the work you have done was accurate.
Prepare a digital tester with a withstand voltage of 500V (or more) (analog tester has low internal resistance and is not suitable for minute voltage measurements).
Pay attention to the insertion direction of the vacuum tube and wear gloves to protect from electric shock.
So the vacuum tube turned on is bright (and sunny), and the voltage measurement is OK.
After burning in the vacuum tube for about 10 hours, start listening to the sound. This time we put on the so-called “strongest version”,
but you can enjoy the delicate and neutral sound like 300B without residual noise even with Tannoy with efficiency of 96.5dB and JBL with 103dB.
It can be said that it is a relaxed expression with a slightly looser rein than the previous works of TU-8600S.
 18 https://www.flickr.com/photos/64593884@N08/
ELEKIT's new product "TU-8900" has arrived. It's a model that everyone is interested in, so I made one.
1 https://www.flickr.com/photos/64593884@N08/First of all, from the end product, I confirmed that this is a product that can be assembled with no problems if you have basic soldering skills.
This is due to the extremely careful and rational manufacturing procedures that ELEKIT is known for.
It was completed in a day while I took pictures and recorded the assembly.
Note: I think that even the inexperienced beginner can complete it if they spend two days on the weekend.
The difficulty level is ★★ ☆☆☆.
2 https://www.flickr.com/photos/64593884@N08/I think it's been about a year since I made an ELEKIT product, but I was impressed with this board.
As you can see from a closer look, there is a hairline in the copper folio (the part to be soldered),
which makes it easier for the solder to bite and makes it less likely that solder defects will occur.
3 https://www.flickr.com/photos/64593884@N08/After soldering, use the camera function of the smartphone to magnify the soldered part and check that there is no cold solder.
Since the TU-8900 prioritizes easy assembly, the insertion clearance of mechanical parts is particularly large, so be sure to pour
solder firmly on the parts that should be flush.
I would like to inform you that there were some points that you should be careful about during assembly. This is not limited to the
TU-8900, but can be said to be the general "method".
4 https://www.flickr.com/photos/64593884@N08/
5 https://www.flickr.com/photos/64593884@N08/The switches must be kept horizontal. (We all have the experience of turning over the board after soldering to check.)
Note that the single-lead type bridge diode also tends to be slanted.
6 https://www.flickr.com/photos/64593884@N08/MT9 pin socket directly attaches to the board. This is also one of the parts that needs to be kept horizontal. After soldering in one place,
I turn the board over to check the leveling, and then soldered it to the PCB board. It is difficult to modify parts that require soldering in
three or more places, so work with caution.
7 https://www.flickr.com/photos/64593884@N08/This is the fixed part of the speaker terminal, but I often see cases where large parts of this type are not sufficiently fixed.
From an analysis of factors for the amplifier to be returned to us for repair, about 70% are simple solder defects
(where half of them are not sufficiently fastened with the mechanical system). Accurate soldering and secure fixing of mechanical parts
are fundamental, the basics of the basics. The necessary tools are described in the manual, so if you do not have them, you should obtain them in advance.
By the way, in the photo above, the blue coating on the nut is the "screw locking agent ".
It is especially effective for speaker terminals that tend to loosen due to the accumulation of daily operations.
8 https://www.flickr.com/photos/64593884@N08/It is only an auxiliary item and is useless in cases where the fastening is incomplete,
but if used appropriately, the quality will be significantly improved. A small amount is sufficient.
9 https://www.flickr.com/photos/64593884@N08/UX 4-pin socket orientation. Pay attention to the direction of the arrow.
10 https://www.flickr.com/photos/64593884@N08/Diode direction. Check the anode / cathode with the wire on the component body.
The one with the line is the cathode. Pay attention to the positive and negative polarities of the bridge.
11 https://www.flickr.com/photos/64593884@N08/, Many people have upgraded their coupling capacitors even with the TU-8900. All you need is Arizona 0.1uF (2 pcs).
The TU-8900 has instructions to raise the base pin, so I think it's a good idea to tie it tightly and solder it.
The point is that the cactus mark faces the grid side . Please also see the previous photo.
12 https://www.flickr.com/photos/64593884@N08/Soldering of board connection parts. Pour a lot of solder to prevent cracks afterwards.
13 https://www.flickr.com/photos/64593884@N08/Check polarity. In the latter half of the work, my concentration dropped and I reverse it without knowing...
So please take appropriate breaks and proceed with assembly by prioritizing the following: "first accuracy, second aesthetics, third efficiency".
Everyone wants to hear the sound as soon as possible, but it takes more time to start over than to make it from scratch, so please do not rush—proceed with patience.
14 https://www.flickr.com/photos/64593884@N08/Make sure to fix heavy transformers as well.
Do not mistake the orientation of the primary side and the secondary side.
15 https://www.flickr.com/photos/64593884@N08/Connection between the secondary side of the transformer and the connector.
It may be difficult to find the mounting position of CN105 / 205 in the manual, so please refer to the photo.
16 https://www.flickr.com/photos/64593884@N08/As I wrote in the entry the other day , the TU-8900 can be selected from non-feedback and with NF (nominal 8 dB).
It is not possible to decide which is better, but the gain with NF is quite low, so as a guide:
1. There is NF when using a pre with a gain of (about) 20 dB or more. Others select no feedback.
2. NF is available when using speakers with an efficiency of (about) 100 dB or higher. Others select no feedback.
17 https://www.flickr.com/photos/64593884@N08/Electrically, it is ready to go. Quickly cover the chassis and complete! I want to keep going, but beforehand, what I should do here is a voltage measurement.
It is very important not only to just make an amplifier, but also to confirm for yourself that the work you have done was accurate.
Prepare a digital tester with a withstand voltage of 500V (or more) (analog tester has low internal resistance and is not suitable for minute voltage measurements).
Pay attention to the insertion direction of the vacuum tube and wear gloves to protect from electric shock.
So the vacuum tube turned on is bright (and sunny), and the voltage measurement is OK.
After burning in the vacuum tube for about 10 hours, start listening to the sound. This time we put on the so-called “strongest version”,
but you can enjoy the delicate and neutral sound like 300B without residual noise even with Tannoy with efficiency of 96.5dB and JBL with 103dB.
It can be said that it is a relaxed expression with a slightly looser rein than the previous works of TU-8600S.
18 https://www.flickr.com/photos/64593884@N08/
Last edited:
I completed my TU-8900/Lundahl LL2785C AM and have been listing for a few days. This kit was such a joy to build! I‘ve been on the 8600 list but the 8900 really got my attention because of the 2A3 option and my plans to wire headphones directly to the speaker terminals. The 8900 gives me so much flexibility. I wanted to wait for the Lundahl amorphous core option, so I called Victor and he said that he had just received a few from Lundahl and he has the green light to sell a few kits.
Boy did I get lucky! I called Victor on Tuesday. He ships Wednesday. I receive it Thursday (holy cow)! I am listening to sweet music by dinner time on Friday. I tend to work fast but I think this kit is very easy, exactly as Victor described in his last post.
I actually don’t have high efficiency speakers yet, so my impressions are from connecting the HEDDphone and HD800 directly to the speaker terminals. I only have about 40 hours on the transformers and 15 hours on the Cossor WE2A3. And I don’t have the Sylvania 12BH7As yet. I pulled some cheap Tung Sol 12AU7s out and have been using those.
I’m blown away as this has exceeded all expectations. The sound with the 2A3 is juicy, smooth, muscular, and ethereal all at the same time.