I have got a pair of Fostex fe167, not fe167E!
would they match into chili as well? Or do I have to change the cabinet? I have almost finished my Olivias. Changs are very easy to build and look great.
TSPs:FE167
Impedance : 8 ohm
Minimum Frequency Response: 50Hz
Reproduction Frequency Response: fo - 22kHz
S.P.L. : 95dB/W (m)
Rated Input : 33W
Music Power : 65W
Fs : 50Hz
Re : 7.2 ohm
Qts : 0.33
Qms : 4.53
Qes : 0.36
Vas : 30.2 L
Xmax : 0.6mm (0.024 in)
The TSPs are not too different to these of the Fe167e, I think.
Is a double horn recommended, or woult a TQWT design a la Kings No2 or Metronome suite better?
thanks in advance
undecided
there are too many enclosures for the fe167.
double horns: Iris, chili
Martin King's Project2 (which was my first intention)
Demetri
Metronome
I am sure the results will be compleely different.
My fullrange experience is limited to fe168ez rec, Martin King No.5, and untuned olivias.
I liked the mid-bas and midrange of the fe168ez very much. Hf extension was too limited, deep bass below 45hz not existent. Tey were able to reproduce details I never heard, neither with my sennheiser headphones. the soundstage was so three dimensional, that every detail could be well defined.
Kings No.5 was totally different. They played with much authority. Bass was very! deep, but not so accurate. Don't get me wrong, the bass was very clean, but not as exact as of the 168s. Voices were knife-sharp defined, Hf with well extension. The olivias are very delicate. They build a very three dimensional sound stage. though they are not broken in fully.
I like the authority of kings No.5, the detailed mid bass and mids of the 168ez recs, the reproduction of voices of Kings No.5, the detached sound of olivia that let You forget, that there are actually speakers in front of You.
So what will be the right solution for my FE167?
one thing is for sure, that only a single driver solution is to be considered.
I know, these are three wishes at once.
nothing to be left desired.
thanks in advance for your opinions.
KimChi, at last
So,
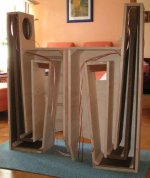
here they are.
The first pair of kimChi, I think.
The cutted curves look pretty good.
everything in the right angle
the inner corners sealed with much glue
damn, I cutted the angle at the wrong side
I glued the cutted piece and made the angle at the right side.
first run.
I lined left, back and bottom of the chamber with some velt.
They are not completely sealed so far. But they sound very promising. the mids and hights are incredible. sound is a bit thin at the lower end. Will be better, when the sides are glued. I did not, because I have to buy sand for the caves first.
What about bsc? I think thy have to be correctet only at the very lower end beneath 300 hz ? . May be bs is not so dramatic because the 'front horn' beams the lf?
any opinions?
thanks in advance.
So,
here they are.
The first pair of kimChi, I think.
The cutted curves look pretty good.
An externally hosted image should be here but it was not working when we last tested it.
An externally hosted image should be here but it was not working when we last tested it.
everything in the right angle
An externally hosted image should be here but it was not working when we last tested it.
the inner corners sealed with much glue
An externally hosted image should be here but it was not working when we last tested it.
damn, I cutted the angle at the wrong side
I glued the cutted piece and made the angle at the right side.
An externally hosted image should be here but it was not working when we last tested it.
first run.
I lined left, back and bottom of the chamber with some velt.
They are not completely sealed so far. But they sound very promising. the mids and hights are incredible. sound is a bit thin at the lower end. Will be better, when the sides are glued. I did not, because I have to buy sand for the caves first.
An externally hosted image should be here but it was not working when we last tested it.
What about bsc? I think thy have to be correctet only at the very lower end beneath 300 hz ? . May be bs is not so dramatic because the 'front horn' beams the lf?
any opinions?
thanks in advance.
Oooh! Looking good there!
BSC? None needed. The radiation from both sides of the driver is focused so it's not an issue.
I'd give them a pair of terminal panels though, rather than running the wire out of the mouth. It doesn't do the looks any favours at all, & it interferes with the vent / horn / waveguide (bit of all three) action.
No bsc at all,
then I have to wait until the sides are glued on and they are sealed.
Of course they will get binding posts.
I am thinking of putting wallpaper on them. I have seen some 'needles' that look great.
It's called 'Rauhfaser', coloured and finished with clear coat.
other suggestions?
then I have to wait until the sides are glued on and they are sealed.
Of course they will get binding posts.
I am thinking of putting wallpaper on them. I have seen some 'needles' that look great.
An externally hosted image should be here but it was not working when we last tested it.
An externally hosted image should be here but it was not working when we last tested it.
It's called 'Rauhfaser', coloured and finished with clear coat.
other suggestions?
I didn't mean fake wood. Veneer was one option. Vinyl was another. Comes in lots of different colours -black, orange, blue, red, white, even carbon fiber effect & so on. This sort of thing: http://stickers.signprint.co.uk/index.php?main_page=index&cPath=197_269
Alternatively, you could paint them. There are lots of threads here with best information. The real key is that you must seal the MDF with an MDF sealer first before priming & use multiple coats at each stage.
Alternatively, you could paint them. There are lots of threads here with best information. The real key is that you must seal the MDF with an MDF sealer first before priming & use multiple coats at each stage.
It's not that bad, but it does take practice & time. I've had decent results on pre-bought furniture (I'm the worlds worst cabinet builder -design? Yes. Build? No.).
The real trick is making sure you seal the material before any paint goes on. Basic stages are:
1) sand it back. With a mask on, of course.
2) Seal with a proper MDF sealant (follow the guide on the tin -they vary), paying particular attention to the ends, which suck the stuff up like a vampire.
3) Prime, sand back with ~600g, and repeat a few times. The more effort you put in at this stage, the better.
4) Apply top-coat, sand back with 600gr & getting finer with each successive coat, repeating as many times as necessary for the finish you're after. A cheap spray setup would cost less than trying to do this with cans, which in the UK at least cost an absolute fortune.
Alternatively, you could ask around the local local car painters & see if any of them would be willing to do it. Best if you seal & prime the cabinets yourself beforehand of course.
Final wild-card: come over all Victorian & indulge in a spot of découpage. Seal all the panels, cut up some attractive magazines, some reproduction newspapers or whatever, and stick them to the box. Then apply a couple of light layers of varnish.
Scottmoose said:The real key is that you must seal the MDF with an MDF sealer first before priming & use multiple coats at each stage.
Shellac!
Bob
almost finished
here some new pictures.
fighting reflections inside the 'box'
I followed my own suggestion and wallpapered them.
then two coats of hi gloss black colour.
damn, the colour takes too long to dry. They will have to stay outsides over night cant handel them before tomorrow.
greets
vom Spassgeneral
here some new pictures.
fighting reflections inside the 'box'
An externally hosted image should be here but it was not working when we last tested it.
I followed my own suggestion and wallpapered them.
An externally hosted image should be here but it was not working when we last tested it.
then two coats of hi gloss black colour.
An externally hosted image should be here but it was not working when we last tested it.
damn, the colour takes too long to dry. They will have to stay outsides over night
cant handel them before tomorrow.greets
vom Spassgeneral
Re: almost finished
Any comments on that reflections tweak? I like it. Put some kind of mitten or something over the frame. What I didn't like was
lining the inside of the BIB on the divider panel up behind the driver.
Bib is on the operating table right now.

Spassgeneral said:here some new pictures.
fighting reflections inside the 'box'
An externally hosted image should be here but it was not working when we last tested it.
Any comments on that reflections tweak? I like it. Put some kind of mitten or something over the frame. What I didn't like was
lining the inside of the BIB on the divider panel up behind the driver.
Bib is on the operating table right now.
- Status
- This old topic is closed. If you want to reopen this topic, contact a moderator using the "Report Post" button.
- Home
- Loudspeakers
- Full Range
- double Horn for FE167