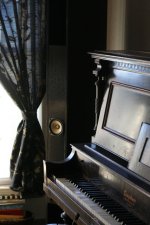
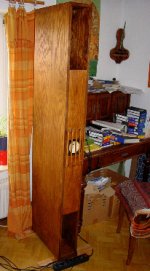
Well, I just finished off the Saburos I'm building and they sound great! Thanks to Scott for putting a design out there that someone like me can use to build some great sounding speakers. Also thanks to Dave for the moded drivers, they sound great, and the care and craftsmanship put into them is outstanding.
Below are some pictures and comments about the build. I'm a complete newbie to building speakers, so this project took me a long time -- about 7 months of working a few hours here and a few there. The total hours spent though was still a lot. Before starting these I thought that anyone who sold them for $3500+ was out of their head. Now I see that that number is perfectly in line with the time and resources these speakers require. Also, when you think about how much high quality living room furniture costs these days, you can see that several thousand dollars is quite reasonable -- plus they sound sweet.
Anyway, here are the details.
I started with some wood that I picked up from a local cabinet shop. The wood has 12 or 13 plys like Baltic birch, but it is defiantly a lower quality wood. It has some small voids and the sheets were not laid up very well. Also, some portions were damaged and there are problems with the surface veneer layer in some places. The wood was only $20 a sheet and unfortunately I got what I paid for. If I were going to do it again, I would either use Baltic birch, or if I were still on a tight budget, go with the plywood at Lowes.
When I picked up the wood I noticed that the cabinet shop had a huge table saw with about 12' of out feed area. After some quick negotiations, I got them to rip the panels into boards. Price was an additional $20 a sheet, but worth every penny. It did only take them about 15 minutes for the work, which included a blade change before starting, but it saved me many hours. I don't have a table saw, so I was very worried about getting all of the internal boards a uniform width.
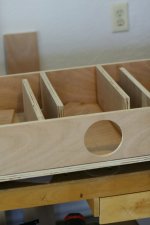
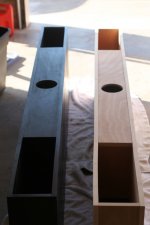
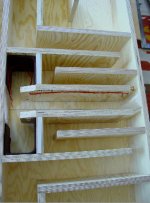
One of the nice things about building the saburos is that the internal boards are only about 5" wide. that allowed me to easily cut them on my miter saw. Unfortunantly this led to a bit of a measure once and cut twice process of working. About half way through I realized that I was short at least one 8' length because it was now just a pile of sawdust in the garage. I ended up having to rip a couple of boards with my circular saw, but they turned out OK.
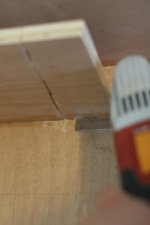
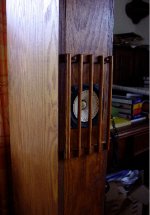
I don't have a router, so I used a hole saw from Harbor Freight to cut the opening for the driver. The kit of hole saws only cost about $14 and it was very easy to use.
One thing I wasn't prepared for was all the extras you have to buy to finish the speakers. I spent $40 on edge banding, about $60 on clamps, and about $60 on finish and glue. Add in the $120 for the cut wood and $125 for the drivers (used), and you can figure out what the build cost.
Here are some photos. I'll post more too.
Below are some pictures and comments about the build. I'm a complete newbie to building speakers, so this project took me a long time -- about 7 months of working a few hours here and a few there. The total hours spent though was still a lot. Before starting these I thought that anyone who sold them for $3500+ was out of their head. Now I see that that number is perfectly in line with the time and resources these speakers require. Also, when you think about how much high quality living room furniture costs these days, you can see that several thousand dollars is quite reasonable -- plus they sound sweet.
Anyway, here are the details.
I started with some wood that I picked up from a local cabinet shop. The wood has 12 or 13 plys like Baltic birch, but it is defiantly a lower quality wood. It has some small voids and the sheets were not laid up very well. Also, some portions were damaged and there are problems with the surface veneer layer in some places. The wood was only $20 a sheet and unfortunately I got what I paid for. If I were going to do it again, I would either use Baltic birch, or if I were still on a tight budget, go with the plywood at Lowes.
When I picked up the wood I noticed that the cabinet shop had a huge table saw with about 12' of out feed area. After some quick negotiations, I got them to rip the panels into boards. Price was an additional $20 a sheet, but worth every penny. It did only take them about 15 minutes for the work, which included a blade change before starting, but it saved me many hours. I don't have a table saw, so I was very worried about getting all of the internal boards a uniform width.
One of the nice things about building the saburos is that the internal boards are only about 5" wide. that allowed me to easily cut them on my miter saw. Unfortunantly this led to a bit of a measure once and cut twice process of working. About half way through I realized that I was short at least one 8' length because it was now just a pile of sawdust in the garage. I ended up having to rip a couple of boards with my circular saw, but they turned out OK.
I don't have a router, so I used a hole saw from Harbor Freight to cut the opening for the driver. The kit of hole saws only cost about $14 and it was very easy to use.
One thing I wasn't prepared for was all the extras you have to buy to finish the speakers. I spent $40 on edge banding, about $60 on clamps, and about $60 on finish and glue. Add in the $120 for the cut wood and $125 for the drivers (used), and you can figure out what the build cost.
Here are some photos. I'll post more too.
Attachments

More photos of the saburos
Here are some more photos of the build.
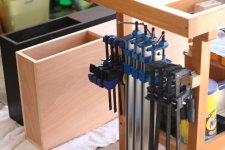
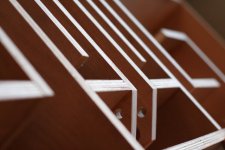
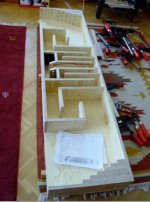
One of the most tedious things was that I usually only glued one or two boards at a time. I used a lot of spacers to get the proper spacing.
I ended up buying 12 new clamps for a total of 14.
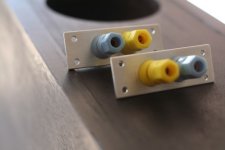
The binding posts came from Apexjr
Here are some more photos of the build.
One of the most tedious things was that I usually only glued one or two boards at a time. I used a lot of spacers to get the proper spacing.
I ended up buying 12 new clamps for a total of 14.
The binding posts came from Apexjr
Attachments
Staining the Saburos
After talking to my wife, we decided that the speakers should be dark. I actually felt guilty covering the nice wood grain with something opaque, but I really like how they turned out.
I tried using a foam brush and a t-shirt to apply the stain but the results were awful. In desperation I grabbed a piece of left over wool felt that I used to line the chamber. I thought it would shed fuzz, but instead it worked perfectly. The results were perfectly smooth and it was very easy to use.
The wool came from sweaters I picked up at the thrift store. I felted them in the washer and dryer, and then spray glued up three layers. I ended up with a pad that was about 1/2" thick.
Attachments

")
Finishing them
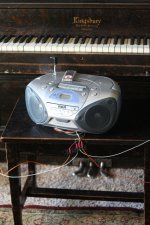
Once I got a couple of coats of polyurethane on the speakers I couldn't wait any longer to hear them. The problem was that my amp was still just a pile of parts in my closet. In desperation I searched the house for anything that could make sound. I found my wives cheap boom box and with a little help from some wire cutters and a soldering iron, I added some speaker connections. The boom box was no stranger to to modifications having previously received an ipod input.
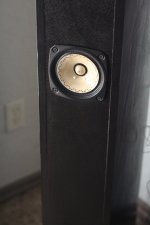
So how do they sound? I think they are awesome. I only have limited experience in the world of hi-fi, but to me they sound outstanding. The very first time I listened to music with them I noticed things that I've never heard before -- and these are songs I've listened to for years. I would describe them as having great clarity and depth.
Next project is the Simple SE
Once I got a couple of coats of polyurethane on the speakers I couldn't wait any longer to hear them. The problem was that my amp was still just a pile of parts in my closet. In desperation I searched the house for anything that could make sound. I found my wives cheap boom box and with a little help from some wire cutters and a soldering iron, I added some speaker connections. The boom box was no stranger to to modifications having previously received an ipod input.
So how do they sound? I think they are awesome. I only have limited experience in the world of hi-fi, but to me they sound outstanding. The very first time I listened to music with them I noticed things that I've never heard before -- and these are songs I've listened to for years. I would describe them as having great clarity and depth.
Next project is the Simple SE
Attachments
Hi bamph, nice work... I have also finished some saburos...I took pinetree plywood 18mm and glued it also with clamps on the livingroom floor...
A carpenter did the cutting...
It was great fun!!!
Two years ago I made sachikos...
Tweaked the banana fiber in simple DIY acryl paint and between magnet and frame some playdough...
I think they are a great sonic performance at a cheap price ...
I payed all together 300€ for both speakers... here are some photos
Attachments
Two years ago I made sachikos...
Tweaked the banana fiber in simple DIY acryl paint and between magnet and frame some playdough...
I think they are a great sonic performance at a cheap price ...
I payed all together 300€ for both speakers... here are some photos
The speakers look great. How did the Saburos compare with the Sachikos?
The speakers look great. How did the Saburos compare with the Sachikos?
I think the Sachikos are more natural sounding with breath taking dynamics...
But I heard each speaker with different amps.
The sachikos I heard with bottlehead 2A3 monos. No very good combination I think.You will need a little more watts to unleash the power.
But you always learn...
Also phase plugs that smoothed out the shout...
If they werent so big I would build them again...
I now have a different amp:Aaron No.1a
Next I will try the Jericho Horn with some Beyma 8AGN I still have...Half size of the sachikos...
Greets,Christoph
- Status
- This old topic is closed. If you want to reopen this topic, contact a moderator using the "Report Post" button.
- Home
- Loudspeakers
- Full Range
- Another pair of Saburos finished