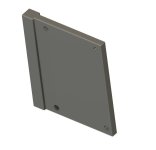
This thread is intended to be dedicated to 3D print designs that can be used with various Modushop HiFi2000 chassis. The intent here is to create a single location where people can share all sorts of 3D CAD designs that can be printed on a hobby 3D printer which interface in some way to a chassis, particularly those which are provided by Modushop. I will start this thread off with one simple design and we shall see where it goes. This is my first every thread I've created, so any advice to maximize it's value is greatly appreciated.
I'll edit this first post and put the latest versions (assuming there is a revision) here to help keep everything you may want to download in a single location.
Here's a link to a vertical mount for both 300VA and 400VA Antek (or other similar sized) transformers. Total cost for this is under $5 if you can get access to the 3D print file. Reach out to me via PM if you need a print made and you're willing to pay for shipping.
https://www.diyaudio.com/community/...ing-of-antek-300-400va-3d-print-files.410476/
Here's a link to a horizontal mount for both 300VA and 400VA transformers that lifts the transformer up enough to fit over a lip up orientation on a Modushop 4U/300 chassis. It just moves the transformer a little closer to the front plate when using the lip up orientation of the perforated plate.
https://www.diyaudio.com/community/...on-over-chassis-plate-lip-up-3d-print.410708/
Last edited:

First post is a very simple wire post that mounts onto a chassis wall and allows zip tie connection of wiring. Inspired by wiring structural support posts in Aerospace industry. Until *.3MF and *.STL files are allowed for file attachments I'll be using ZIP files to convert the files to something sharable on the site.
This part slides into the slot on the Modushop extruded chassis sides and is a nice tight fit. After sliding into the slot and finding optimal location, simply use zip ties to hold the wire to the post. The main mount holes can accept 5mm wide zip ties. The additional inner mount holes in that are centered on the part can accept 4mm wide zip ties.
This part slides into the slot on the Modushop extruded chassis sides and is a nice tight fit. After sliding into the slot and finding optimal location, simply use zip ties to hold the wire to the post. The main mount holes can accept 5mm wide zip ties. The additional inner mount holes in that are centered on the part can accept 4mm wide zip ties.
Attachments


Last edited:
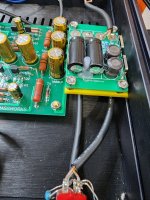
Here's a simple mount for the SMPS filter kit available through the store. It allows the kit to be mounted to a "beam" that slides into the side slot on the standard Modushop chassis extruded aluminum sides. You just need to be sure to mount the extruded side in the proper orientation so the inside slot that the mount slides into works for your purpose. The 3D printed part is yellow in the picture. M3 bolts "thread" into the plastic PLA and hold tight as mounting points.
Attachments
Last edited:
My only qualm about this would be the heat deflection and glass temperatures of the printed materials. PLA has low values for both that put it well within the running temps for class A heatsinks 55-65c. So choice of material and application is important.
Yes StevenCrook, you are pointing out a very important line of demarcation, that using 3D printed materials are susceptible to high heat. Very important point to clarify that, so thank you for making that point clear!
However, for preamplifiers like Korg and Iron Pre, we're not dealing with heat dissipation of class A, so thermal deformation is a non-issue in this case. For example, I have been using the SMPS filter board mount in my Korg B1 for many months with zero issue. Heat is not a concern in this case.
So lets be clear here,... Do not use 3D printing for high heat environments such as Class A amplifier heat sinks.
Let's press on here with the intent of sharing 3D printable designs for practical use.
Last edited:
To be clear, I think this is is a really good idea. Even if we can't get the parts done at home, having open source designs means a GB to a commercial company would be viable in the same way we do PCBs.
Here's the crux of this 3D print design sharing idea. These sort of designs are so simple to create, and so cheap to make, that it's nearly "free' if you can find a buddy with a 3D printer. Since an "Ender 3" printer (or similar cheap hobby printer) can be bought for under $200, I suspect a lot of us can find someone willing to hit the "print" button if someone else has validated the design works. Heck, I'll print either of the two designs I've posted above for free if someone is willing to pay shipping for the parts. The machine does all the work, so it's just matter of material cost, which is pretty darn low. I hope this thread is a way for those with the means to 3D print to share with others who don't have that means. That's the intent anyway.
- Home
- Design & Build
- Parts
- Modushop Chassis - 3D Printer Accessory Part Designs