Since the Madisound A26 kit with cabinet doesn’t have instructions, just a list, I thought I’d help would-be assemblers with pictures and some things I learned. This is more suited for beginners. Note: I deviated from their preferences two ways. First, I soldered rather than using the crimping spades and tubes supplied. It should be possible to assemble this solderlessly given what came with the kit. Second, I put the resistors internally. The directions call for attaching them to the upper binding posts. That would have the advantage of trying different value resistors (there are three possibilities, 6 resistors supplied), without opening the cabinet up, so you can change the tweeter level to taste and room.
There are 5 major tasks:
First, while it says to cut 4x 8.25”x18” pieces and 4x 8.25” x 9.5” pieces, the supplied foam sheet doesn’t correspond to those sizes. So my 18” pieces were 6.25” wide.

I used a glue gun, $18 from Michaels, Fine tip. The long pieces went in the sides, the shorter for the top and bottom. I cut one side one to leave an area for mounting the crossover.

Then I cut the leftover piece to fit exposed areas, completely covering the rear wall except for the cutout for the posts, thinking that damping the woofer rear radiation would be the most important.

Again, the directions say to use the resistors across the tweeter binding posts so you can try the three supplied sets. This would allow you to increase or decrease tweeter output to compensate for a lively or damped room. The pair I built was a gift, so I opted to use the middle value resistor thinking the recipient wouldn’t want to fiddle with it. And, I made the choice permanent by assembling the capacitor with the resistor for internal mounting. The boards were not supplied. Parts express has them. Description: White Perforated Large Hole Crossover Board Pair 3.5" x 5", Part #260-182 URL: https://www.parts-express.com/White-Perforated-Large-Hole-Crossover-Board-Pair-3.5-x-5-260-182

The kit includes crimps for solderless assembly but since these will be shipped, I wanted to make sure nothing got loose so I soldered them. The components can be glued or wired down.
I used 4x3/4" wood screws to attach it the crossover board. I made guide holes ¼” deep in the inside of the speaker. It would be best to lay the crossover board flat, before adding components to drill the holes. Placing tape on the drill bit to make sure you don’t go too deep may be a good idea. Fortunately, the woofer opening is large enough for access of a hand with a small rechargeable drill.

I used the glue gun to secure the components to the board. I passed the other wire under the board, just snipping the red wire to make the circuit through the components, first capacitor then resistor, as the schematic says. I used ¼” number 6 nylon spacers to lift the board from the mdf. Gluing the spacers help them from moving during the inside installation.
I left a space without sound insulation on the upper left side for mounting the crossover board

Wire the crossover to the binding posts and the tweeter. I used red tape to not get confused about polarity.
Gasketing the speaker hole is best done right before drilling. And the material should not be stretched, or the joint will pull away and leave a gap. Just push it against the edge. Note: the pan head screws are for the dual binding posts in the back. Both woofer and tweeter take the allen screws.

First the tweeter. The woofer comes last, after everything else: stuffing the vent the polyfill.

A couple of tips on stuffing the vent. The kit comes with two bars of material for it, but they’re too big and will crease if stuffed. So, just carefully cut them to be a little oversized, maybe an inch too long and ¾” too wide. It also helps to snip a tiny amount to correspond to the rounded corners of the slot.
The hot glue hardens too fast to do the whole thing at once. I did the corners and the short sides, running glue along the mdf. Then I made sure with a hand inside and out that the foam edge is flush with the veneer and all the way to the end. Once the ends are done and you’ve waited for it to harden, say 15 minutes, pull the foam back slightly and inject glue point by point along the long sides, again using two hands to keep it flush.
Tease the polyfill into the enclosure and gasket the opening before soldering the woofer. After soldering, make sure the gasket hasn’t pulled up and drop it in.
Tip: I’ve found that measuring the two bottom screw holes to the vent line was a good way to make sure the woofer was correctly oriented. When the two distances equaled I had it straight and I was ready to drill.
I made guide holes about half the screw width and vacuumed out the mdf the drill pulled up before switching bits to screw down the drivers.
Be sure to tighten the screws a little all around, then at opposite ends. That way you won’t bend the basket. Done!

There are 5 major tasks:
- Line the cabinets with foam insulation.
- Assemble the crossover,
- Wire and install the tweeter.
- Vent stuffing & cabinet stuffing,
- Wire and install the woofer
First, while it says to cut 4x 8.25”x18” pieces and 4x 8.25” x 9.5” pieces, the supplied foam sheet doesn’t correspond to those sizes. So my 18” pieces were 6.25” wide.
I used a glue gun, $18 from Michaels, Fine tip. The long pieces went in the sides, the shorter for the top and bottom. I cut one side one to leave an area for mounting the crossover.
Then I cut the leftover piece to fit exposed areas, completely covering the rear wall except for the cutout for the posts, thinking that damping the woofer rear radiation would be the most important.
Again, the directions say to use the resistors across the tweeter binding posts so you can try the three supplied sets. This would allow you to increase or decrease tweeter output to compensate for a lively or damped room. The pair I built was a gift, so I opted to use the middle value resistor thinking the recipient wouldn’t want to fiddle with it. And, I made the choice permanent by assembling the capacitor with the resistor for internal mounting. The boards were not supplied. Parts express has them. Description: White Perforated Large Hole Crossover Board Pair 3.5" x 5", Part #260-182 URL: https://www.parts-express.com/White-Perforated-Large-Hole-Crossover-Board-Pair-3.5-x-5-260-182
The kit includes crimps for solderless assembly but since these will be shipped, I wanted to make sure nothing got loose so I soldered them. The components can be glued or wired down.
I used 4x3/4" wood screws to attach it the crossover board. I made guide holes ¼” deep in the inside of the speaker. It would be best to lay the crossover board flat, before adding components to drill the holes. Placing tape on the drill bit to make sure you don’t go too deep may be a good idea. Fortunately, the woofer opening is large enough for access of a hand with a small rechargeable drill.
I used the glue gun to secure the components to the board. I passed the other wire under the board, just snipping the red wire to make the circuit through the components, first capacitor then resistor, as the schematic says. I used ¼” number 6 nylon spacers to lift the board from the mdf. Gluing the spacers help them from moving during the inside installation.
I left a space without sound insulation on the upper left side for mounting the crossover board
Wire the crossover to the binding posts and the tweeter. I used red tape to not get confused about polarity.
Gasketing the speaker hole is best done right before drilling. And the material should not be stretched, or the joint will pull away and leave a gap. Just push it against the edge. Note: the pan head screws are for the dual binding posts in the back. Both woofer and tweeter take the allen screws.
First the tweeter. The woofer comes last, after everything else: stuffing the vent the polyfill.
A couple of tips on stuffing the vent. The kit comes with two bars of material for it, but they’re too big and will crease if stuffed. So, just carefully cut them to be a little oversized, maybe an inch too long and ¾” too wide. It also helps to snip a tiny amount to correspond to the rounded corners of the slot.
The hot glue hardens too fast to do the whole thing at once. I did the corners and the short sides, running glue along the mdf. Then I made sure with a hand inside and out that the foam edge is flush with the veneer and all the way to the end. Once the ends are done and you’ve waited for it to harden, say 15 minutes, pull the foam back slightly and inject glue point by point along the long sides, again using two hands to keep it flush.
Tease the polyfill into the enclosure and gasket the opening before soldering the woofer. After soldering, make sure the gasket hasn’t pulled up and drop it in.
Tip: I’ve found that measuring the two bottom screw holes to the vent line was a good way to make sure the woofer was correctly oriented. When the two distances equaled I had it straight and I was ready to drill.
I made guide holes about half the screw width and vacuumed out the mdf the drill pulled up before switching bits to screw down the drivers.
Be sure to tighten the screws a little all around, then at opposite ends. That way you won’t bend the basket. Done!
Last edited by a moderator:

FWIW, this is what they sound like. Remember that they're new, and the electronics used aren't high end, though the CD player/amp is Yamaha and they don't make junk. Overall, they are pleasant. They sound nice. They invite you to listen and enjoy for a while. Completely non-fatiguing. Instrument timbre is excellent. Musical bass is rendered well. They aren't for home theater, but a kick drum punches through nicely. Surprising shimmer for a cloth tweeter; I'm used to metal ones, but a brushed cymbal is sparkly as it should be with these. The bass doesn't disappear at low volume. It's still there which keeps the sound from becoming thin. Female vocals are fine. Lower male vocals like Jim Morrison gets a little lost in the mix; maybe there is an amplitude drop, not completely smooth at those frequencies. Complex passages with bass lack some inner detail such as Sade's Sweetest Taboo, but then I'm used to systems with a dedicated midrange. I'm sure they'd benefit from better electronics and a break-in, but even now they're really all a music lover could want, even if an audiophile would quibble with this or that.
Yes. No bargain. Most 2-ways are light on the low end compared with this one though. I bet this zaph would have clearer midrange, though with less bass (so factor in a sub) and if you had the enclosure built, more money. It's all a tradeoff. http://www.zaphaudio.com/ZD5.html
Last edited by a moderator:
Thanx for that. For those that want to spend a bit more for better flatpaks, Bob Berner (Big Wood Studio) is making at least the default enclosure that is in the set linked here: https://www.diyaudio.com/community/threads/seas-a26-devore-style-build.369124/post-6591165
The thread has lots of background on the A26.
I note that this kit has the walls lined with foam. That is going to do next to nothing. The original was filled to the brim with rockwool. You may well be able to improve the bottom with more appropriate damping.
Do you have a picture of what the aperidodic vent looks like?
There is a mod (non-reversible) that you can do that will improve the midrange detail/DDR. And a few with more subtle benefits.
dave
that grey foam is killing me too.
https://www.madisoundspeakerstore.com/acoustic-damping/dampers-foam-sheet-27-x-42-x-5/8/
to be fair, there is similar (not the densest in my opinion to do much) 1/2" sonic barrier at parts express, better than nothing I suppose.
https://www.parts-express.com/Sonic-Barrier-1-2-Acoustic-Foam-w-PSA-18-x-24-260-520
Maybe some of the 3 layer sonic barrier, comes with adhesive.
"A 1/4" foam layer covered with 1/2 lb. limp copolymer vinyl barrier separates the absorptive layer from the cabinet walls. A very aggressive pressure sensitive adhesive provides easy and permanent installation onto any surface."
https://www.parts-express.com/Sonic-Barrier-3-4-3-Layer-Damping-Material-w-PSA-18-x-24-260-530
I too like a box to be "filled to the brim".
I'm not slamming your project.
Actually, I'm a little jealous even.
nice woof, gorgeous minimally crossed tweet.
Probably the best compromise for a 10" 2-way cone and dome.
But more acouta-stuf will help it be even better.
https://www.parts-express.com/Acousta-Stuf-Polyfill-1-lb.-Bag-260-317
Helped with my revel also.
Less humming in Alison Kraus voice.................
I swear she is humming with her mouth open instead of singing !!!!!!!!!!!!!
Last edited by a moderator:
Interesting most people have an issue with the lining. I'd say take it up with the kit supplier. I just used what he supplied. The vent material is the same, I think, though thicker. It makes for a neater installation; no need for chicken wire or whatever was used on the original to keep loose fill in. You can feel the vent "breathing" by the hairs of the back of your hand when playing loud bassy music. All the pictures I have of the vent are above. It's a gift, not something I'm going to tinker with. I'll leave that for the recipient if so inclined.
I just finished the Madisound kit and I used all the damping material they sent (foam, felt and polyfill)- does the impedance curve look right, or is it over-damped (if that is possible)?

You've got a little double hump forming at the primary resonance. Could be not enough flow restriction at the vent. It should be a single hump, but like a very lossy sealed box.
Thanks for the feedback I hadn't thought about the vent, just to make sure I understand the impedance plot correctly:

Yes, not enuff vent resistance… ideally it will get flat (but rarely will you hit that).
The things labeles enclosure "resonance?” are kinda a strange shape, likely more complex than that.
Looks like about 250 & 500 Hz so they are related.
dave
The things labeles enclosure "resonance?” are kinda a strange shape, likely more complex than that.
Looks like about 250 & 500 Hz so they are related.
dave
I played around with the vent damping and the impedance is flat but it is elevated, is that ok? Also I pulled the woofer and swept it in free air and the wiggles at ~250 and 500 Hz are still present so it's something in the driver itself.

The flatter the better. It is a small box so perfectly apeirodic is likely not within reach.
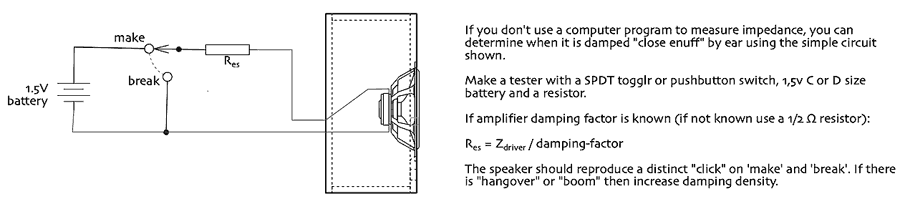
GM’s click-test might be useful.
In the end, what does it sound like...
dave
GM’s click-test might be useful.
In the end, what does it sound like...
dave
GM's click test is a good idea. I may have gotten over zealous with the felt on the rear panel, there was enough to do 3 layers so it's probably 1.5" or more of heavy felt. I didn't glue it so I can take one or two sheets out and see if that improves things. They sound very good to me, I have them sitting on a pair of SB-3000 subs so there is no lack of bass.
- Home
- Loudspeakers
- Multi-Way
- Madisound SEAS A26 Assembly