Hello all
Our partner developed a high quality low cost 6P3P SE kit for DIYers,
Features and spec:
5Z4P tube rectifier
6N1 preamplifier
6P3P power amplifier
Output Power 7Wx2
Load: 4Ohm or 8Ohm
Silkscreen stainless steel + wood enclosure
Part List
[FONT=宋]Power supply transformer 260v*2 6.3v 5v 3.15v*2[/FONT]
[FONT=宋]Output transformer 3.5k: 4 8 *2[/FONT]
Power supply choke coil 5H*1
[FONT=宋]Enclosure *1[/FONT]
Enclosure foot *4
RCA connector for input *2
Output connector *6
Power jack *1
Power cable *1
[FONT=宋]Power switch *1[/FONT]
[FONT=宋]Potentiometer 100K*1[/FONT]
Voice knob *1
Shuguang 5z4p new in stock *1
Shuguang 6n1 new in stock *1
Shuguang 6p3p new in stock *2
[FONT=宋]8Pin tube socket *3[/FONT]
[FONT=宋]9pin tube socket *1[/FONT]
47uf/400v *1
330uf/450v *1
22uf/400v *1
470uf/50v *2
0.22uf/160 *2
1k *2
47k *2
330 *2
470k *2
22k *1
220k *1
Shielded cable 30cm
Cannula 15cm
Soldering cable 3m
3mm 4mm screw 16set each
Schematic 1
Instruction Manual 1
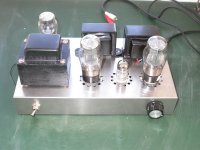
Photos:
Price: $136 for retail. PM for multiple orders or group buy. Package weight about 9-10kg, the more the order, the lower average shipping cost.
Our partner developed a high quality low cost 6P3P SE kit for DIYers,
Features and spec:
5Z4P tube rectifier
6N1 preamplifier
6P3P power amplifier
Output Power 7Wx2
Load: 4Ohm or 8Ohm
Silkscreen stainless steel + wood enclosure
Part List
[FONT=宋]Power supply transformer 260v*2 6.3v 5v 3.15v*2[/FONT]
[FONT=宋]Output transformer 3.5k: 4 8 *2[/FONT]
Power supply choke coil 5H*1
[FONT=宋]Enclosure *1[/FONT]
Enclosure foot *4
RCA connector for input *2
Output connector *6
Power jack *1
Power cable *1
[FONT=宋]Power switch *1[/FONT]
[FONT=宋]Potentiometer 100K*1[/FONT]
Voice knob *1
Shuguang 5z4p new in stock *1
Shuguang 6n1 new in stock *1
Shuguang 6p3p new in stock *2
[FONT=宋]8Pin tube socket *3[/FONT]
[FONT=宋]9pin tube socket *1[/FONT]
47uf/400v *1
330uf/450v *1
22uf/400v *1
470uf/50v *2
0.22uf/160 *2
1k *2
47k *2
330 *2
470k *2
22k *1
220k *1
Shielded cable 30cm
Cannula 15cm
Soldering cable 3m
3mm 4mm screw 16set each
Schematic 1
Instruction Manual 1
Photos:
An externally hosted image should be here but it was not working when we last tested it.
An externally hosted image should be here but it was not working when we last tested it.
An externally hosted image should be here but it was not working when we last tested it.
An externally hosted image should be here but it was not working when we last tested it.
An externally hosted image should be here but it was not working when we last tested it.
An externally hosted image should be here but it was not working when we last tested it.
Price: $136 for retail. PM for multiple orders or group buy. Package weight about 9-10kg, the more the order, the lower average shipping cost.
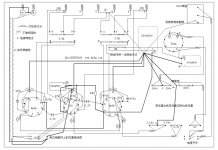
Schematic:
An externally hosted image should be here but it was not working when we last tested it.
Assembly instruction
1. Assemble valve socket, audio input socket, audio output socket, power socket and power switch.
2. Install power transformer and output transformer.
3. Check assorted resistor and capacitor .Test whether audio input socket, audio output socket, power socket, power switch, power transformer and output transformer are shorted with chassis.
4. Connect valve filament line of power transformer and output transformer with relevant sockets.
5. Install resistor and capacitor of power-amplifier after installation of resistor and capacitor of preamplifier.
6. After soldering, check whether each solder point and connection of circuit is the same with graphic expression in electrical schematic diagram.
7. Test whether the voltage of power output and valve filament is right. (It is normal that no-load voltage is higher.)
8. Plug in rectifying tube, and then check whether power is the same with graphic expression in electrical schematic diagram. (It is normal that no-load voltage is higher.)
9. Check whether complete machine connects with valve socket. (It is normal that no-load voltage is higher.)
10. Plug in power amplifier when voltage of valve filament is right. Check whether cathode voltage is the same with graphic expression in electrical schematic diagram.
11. Then plug in preamplifier valve, and test whether working point is familiar with graphic expression in electrical schematic diagram. If it is ok, signal can be inputted to test the sound.
my tube amplifier
I finished the assembly today. It's not easy work for a newbie like me. But finally I manage to get it work. The sound is great, but the only thing I dislike is stainless steel chasis is too sharp and it scratched my finger.
I finished the assembly today. It's not easy work for a newbie like me. But finally I manage to get it work. The sound is great, but the only thing I dislike is stainless steel chasis is too sharp and it scratched my finger.
Attachments
Hi Jeffrey,
Is that a volume control on the front of the amplifier? how are the instructions for this kit? Are the instructions and diagram on this thread all that is included with this amp? I've never done a project like this before. I would definitely need a little more detail.
Is that a volume control on the front of the amplifier? how are the instructions for this kit? Are the instructions and diagram on this thread all that is included with this amp? I've never done a project like this before. I would definitely need a little more detail.
Hi bbowes,
Sorry that we are lack of instruction for these kits. It's not an easy work for us to write an manual in English. In my own opinion, a manual can only tell you how to wiring it, but can't tell you how to make it sounds good. It's depends largly on experiences with grounding, shielding and so on. Anyway you are encouged to begin with 6P3P SE, it's not too difficult for beginners. Many customers get the instructing throug email or even online chatting. We are happy to help you in building your first amp.
Sorry that we are lack of instruction for these kits. It's not an easy work for us to write an manual in English. In my own opinion, a manual can only tell you how to wiring it, but can't tell you how to make it sounds good. It's depends largly on experiences with grounding, shielding and so on. Anyway you are encouged to begin with 6P3P SE, it's not too difficult for beginners. Many customers get the instructing throug email or even online chatting. We are happy to help you in building your first amp.
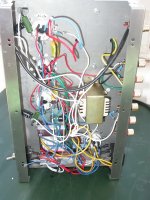
Ray, if you took a detailed photo, or two, of the underside of the project, and posted for us, do-it-yourselfers would have something more to go with. That would go a long way toward making a successful 'build'. In turn, you would sell more products, with more happy builders.
As the saying goes, a picture is worth a thousand words.
As the saying goes, a picture is worth a thousand words.
Ok, you have me sold on this one as a good starter for me. I think this is the one I want.
I have a question. Do you have any of those nice little transformer covers, like the FU-10, that are good fits for this amplifier? If you do, I will be glad to pay you for them along with the kit.
I'll wait on you to get back to me.
Thanks for your patience Ray.
I have a question. Do you have any of those nice little transformer covers, like the FU-10, that are good fits for this amplifier? If you do, I will be glad to pay you for them along with the kit.
I'll wait on you to get back to me.
Thanks for your patience Ray.
- Status
- This old topic is closed. If you want to reopen this topic, contact a moderator using the "Report Post" button.
- Home
- Vendor's Bazaar
- Cheap 6P3P SE Kit (with case)