Thanks. They're the driver b+ bypass cap. The 10uF
Yes, that's what I meant to say, 10uF. Can you tell a difference? There wasn't any B+ ripple to speak of with the originals.
I think I may also see Russian teflon coupling caps?
Also, did you end up staying with the 4V for the LED bias?
Last edited:
Not much of a change, mainly put them in to keep with the pio theme. If there was any ripple there definitely isn't any now.The coupling caps are vitamin Q's, I really enjoy their sound, warmer tone. I kept the LEDs at 4 volt drop and changed rp1 to 30k(couldn't find a 27k). I really dig the clarity the LEDs added.
Based on posts that I have read, no personal experience, standard diode types such as 1N4007 tend to be noisier than LEDs. I believe I remember someone using a 1N4148 and commented that it was less noisy than others.
I installed LED bias in my test bench amp. I also installed a DPDT switch so I can switch between the LED and the original RC bias. (You must power-down for a few seconds before switching to avoid a pop that could damage some tweeters.) I used 2 green LEDs, in series, for 3.9V.
Initial impressions are a little more clarity (as if there wasn't already clarity) in instruments such as cymbals, snare, brass, woodwinds. For me it does seem subtle, but it is there. My loudspeakers are 97-98dB 1W/1m, with pro sound woofer and horn tweeter, so they are already very live sounding.
I've only had this mod installed for a couple of days, so more listening is in order.
Yes, and the floor standing version is shown in post 2021 here:
System Pictures & Description
System Pictures & Description
Hello!
I am now a happy owner of one of this kits, and already have assembled it. First to say is that Scott is a great dealer, he always paid great attention during the delivering of the parcels from USA to Spain and customs procedure.
Due to the uncareful hands of the spanish postal service, the 6N1P tube came broken, despite the fact that it was properly packaged. Package of all items was explendid in fact (even my girlfriend asked me "where can I buy those little air bags and this brown paper? they looks awesome!" ha ha).
Scott kindly offered to send me a replacement tube without any additional charge, kudos!
Components quality is undoubtfully top notch, bypass capacitors are ELNA Silmic II, Dale resistors all around, pretty good quality coupling capacitors, excellent tubes, that's without speaking of the wonderful custom made power/output transformers and the oversized custom made too choke (quite big!). And BIG Panasonic film capacitors for power supply smoothing.
All of the connectors are top end quality, that's something I realized because almost all of them (including the volume knob) has been previously used by me in other projects, what means for me that he spent quite a time selecting the best options. The kit includes too a high end ALPS volume pot, quite pricey (20€!!).
Resuming, the most attractive fact of this kit is that, unlike other kits all around that have good quality in general but some components are a bit cheapie, the kit Scott offers is perfect in almost everysense, I cannot comment on any component that I would change. And that you have my word that Scott is far more implied in giving a good customer service than any other dealers I have met.
I will post some pictures soon...
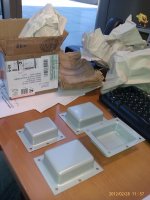
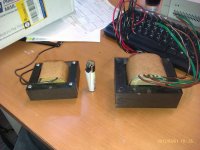
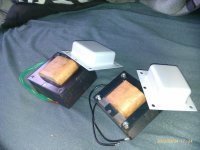
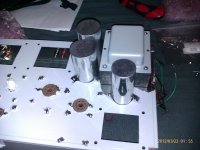
Attached are the pictures of the items as they came, when I took them out of the packaging.
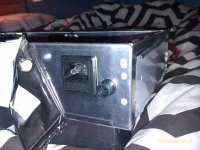
1-. Transformers covers
2-. Filter choke and power transformer
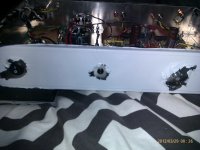
3-. Output transformers
4-. One day hanging around at IKEA I saw it.... that's what my brand new tube amplifier needs! A pair of handy handles! Aestetically pleasing metal CNC finish while giving a way to hold up the amplifier: only 4€ at your nearest IKEA")
1-. Transformers covers
2-. Filter choke and power transformer
3-. Output transformers
4-. One day hanging around at IKEA I saw it.... that's what my brand new tube amplifier needs! A pair of handy handles! Aestetically pleasing metal CNC finish while giving a way to hold up the amplifier: only 4€ at your nearest IKEA
Attachments

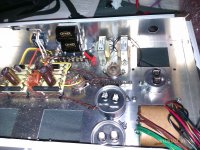
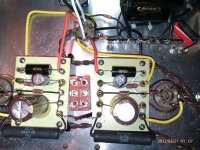
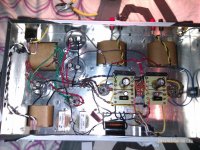
Some pictures as I went through the assembly process. I tried to keep cabling as neat as possible, all cables apart from each other as much as possible, and a quite tight twisting on cables paired (specially if they carry AC).
Attachments
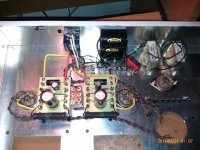
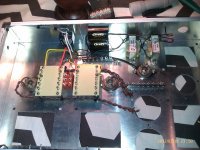
I have made some changes to the original assembly guide, due to different reasons:
1-. Glued not only the big 220uF capacitor, but the smaller 100uF cap against the 0.22uF coupling capacitor too. It seemed to be the only piece "dancing" in the amplifier so, why not?
2-. Neither of the transformers nor the choke are grounded. They are even isolated from the chasis by means of plastic isolators. Is it not generally recommended to ground transformer's core to Protective Earth?
I have volmetered power trafo core and... it is at 39v above ground!! quite enough to shock a wet hand if touched! The other trafos have voltage on them but not as high.
3-. I added a second fuse to the input. IT IS A GREAT FAILURE NOT TO DO IT if you live in a country where you don't know on which pin LINE and NEUTRAL are, like most european countries. If I connect it to the wall, I may be fusing the line (I don't know unless measuring with a voltmeter). If I flip the mains plug 180º, now I am fusing the neutral AND NOT the line. Which is like fusing anything.
If you live in a country where mains plugs on the wall have no polarity, it is a must to add a second fuse. Going further, it is illegal to not do it (fuse mains line). Going further, in case of failure you get a 50% chance of dying electrocuted.
4-. Another importans issue, specially when in the testing stage, is to add a permanent bleeder resistor to dicharge the capacitors. High ohmmic value enough to not suppose a considerable load to the PSU, but low ohmmic value enough to dicharge the capacitors fast enough. I can't remember the value I used, I think it forced around 1-2mA through the resistors, so make the maths assuming +400v. It takes the capacitors (with no tubes plugged) to 0v in around 30 seconds.
5-. No ON light indicator is issued with the kit, so I added a blue LED which serves two purposes:
-Giving an indicator that power is ON and the amplifier is plugged to the wall.
-Because the LED has a voltage drop of 2v, it will shut off as soon as PSU voltage goes lower than 2v (more or less). That helps to show that HV capacitors have no voltage across them.
Attachments
Last edited:
Hi Regi,
The amp looks great. Good job. Glad you like the sound.
In reference to post #121 above, and the transformer core grounding.
Although I have been assured by the manufacturer that the transformer windings are extremely well isolated from the core, I am going to suggest the following additional safety method of mounting the output, & power transformers, and the choke to the chassis:
1. Use the plastic bushings only for the top of all transformers and choke outside the covers, as indicated in the manual. Do not use the plastic bushings between the transformers and choke, and the chassis.
2. Scrape away the varnish from around at least two of mounting holes for the transformers and choke where they come in contact with the chassis.
3. Use a star washer between the two points described above in #2, and the chassis.
I will be notifying all purchasers of the master kit with laydown-style transformers of this additional safety procedure.
With reference to mention of a second fuse: The amp is supplied with an IEC grounded receptacle for connection of AC power. I am guessing your receptacles are the grounded Schuko type? Thanks for bringing this to my attention. I will make an addendum to the manual suggesting the additional fuse for users of this amplifier with European style power receptacles.
Thanks,
Scott
Last edited:
I may agree, this is quite tru regarding amplifier's quality.The demo will be conducted using the 2-way horn-loaded loudspeaker system that I have designed specifically for this outstanding amplifier.
Be prepared to personally witness a new benchmark in music reproduction.
Scott
I have made more tests on in and I have to add that the problem related to lacking bass was due to my speakers. They are small ones and with low sensivity, around 88db/W.
I tested the amplifier on a pair of 91db/W tower speakers and it sounded VERY GOOD! Bass was there again, even it was more present in the room compared to my 300watts amplifier BPA-300. Very creamy and natural sound, I just love it
Scott,
Would details of that "2-way horn-loaded loudspeaker" design be available to those that are geographically challenged and cannot attend, but never-the-less "need" a Hi-Efficiency speaker to go with their amp (like DaveR!!!!).
Best Regards,
TerryO
Thanks Terry, but first, I just need to finish the last project that you encouraged me to work on!
Thanks Terry, but first, I just need to finish the last project that you encouraged me to work on!
Dave,
I have so many ideas and you have so few hours!
- Status
- This old topic is closed. If you want to reopen this topic, contact a moderator using the "Report Post" button.
- Home
- Vendor's Bazaar
- KT88 SE Basic or Master Kit