Hello Everyone,
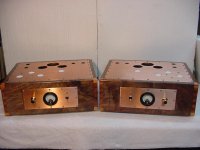
Well, this is my best effort at making chassis from scratch. I will need help making sure I solder all the wires correctly and get the polarity right on some of the parts. These are my first DIY audio amps. Hope these inspire some other new person thinking of doing thier own DIY project.
Well, this is my best effort at making chassis from scratch. I will need help making sure I solder all the wires correctly and get the polarity right on some of the parts. These are my first DIY audio amps. Hope these inspire some other new person thinking of doing thier own DIY project.
Attachments
First, Thank you for the compliments everyone.
Hi Cory,
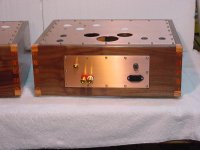
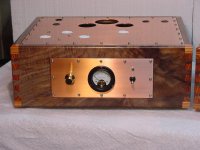
The sockets are Yamamoto's teflon. One is a UX4 for 300b, one a UX5 for 76 type and two are octal for a GZ37 and 6SN7. The majority of the wood is 3/4 solid walnut harvested and milled by a local. The corners are tulip wood from South America and made using an Incra dovetail jig. I capped all the corners with the tulip wood to fix some mistakes and it came out better than expected.
Hello Mr. Daniel,
First I must say I am in awe of your work and you have certainly inspired me with some of your ideas. The holes were tough, very tough. I laid out the dia. with a compass, then drilled little holes completely around the inside edges. I then used a dremel tool with a cloth reinforced cutoff wheel to connect the little holes and drop the center out. Next, using a electric hand drill I used a small diameter metal cutting bit to cut through sharp ridges left. Once they looked round, I used drum sanders , varying in size from 1 inch to 2 1/4 inch, that mount into the drill to round the holes, checking with a dial caliper to make them fairly uniform. They might vary by 10 to 20 thousands.
Hi Cory,
The sockets are Yamamoto's teflon. One is a UX4 for 300b, one a UX5 for 76 type and two are octal for a GZ37 and 6SN7. The majority of the wood is 3/4 solid walnut harvested and milled by a local. The corners are tulip wood from South America and made using an Incra dovetail jig. I capped all the corners with the tulip wood to fix some mistakes and it came out better than expected.
Hello Mr. Daniel,
First I must say I am in awe of your work and you have certainly inspired me with some of your ideas. The holes were tough, very tough. I laid out the dia. with a compass, then drilled little holes completely around the inside edges. I then used a dremel tool with a cloth reinforced cutoff wheel to connect the little holes and drop the center out. Next, using a electric hand drill I used a small diameter metal cutting bit to cut through sharp ridges left. Once they looked round, I used drum sanders , varying in size from 1 inch to 2 1/4 inch, that mount into the drill to round the holes, checking with a dial caliper to make them fairly uniform. They might vary by 10 to 20 thousands.
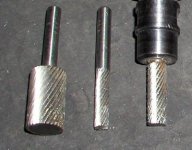
Hi Peter,
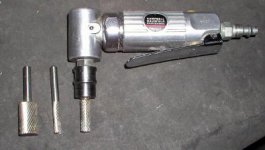
The bit on the left is what my metal cutting bit looks like. It was a cheapy though and seems to wear fast. I mounted the copper in my wood working vise to hold it vertical while I worked on the holes. Once they were all done I spent about a week polishing the plates to remove all the scratches. I wanted a mirror finish, but a local plating shop quoted me $450.00 just to polish them. I used my 8 inch bench grinder and a buffing wheel with compound to get close and then brushed them with 3M metal sanding pads by hand to achieve the brushed look. I coated them with a clear acrylic, non yellowing, paint. Four coats.
Hi Steve,
I have entertained the thought of making some wood bases, but no metal work. Metal is much harder to work without the proper tools. I own a fairly extensive collection of wood working tools and that is one of my hobbies. Now if I could make serious dollars and make enough wood bases, I could buy a CNC knee mill and metal lathe, tooling and be in the chassis business. I am dreaming
Hi Brian and Brett,
Thank you for the compliment.
HOLD ON.....
Hi,
Paul,my sincerest congratulations.
Fabulous looks,really.
While we're at it does anyone use as punching kits for sockets and such?
GREENLEE
Look at the right:"Holemaking"
I find these very handy to have unless you need to do this kind of work on a daily basis.
Any material except very hard and thick (>3mm) steel works very well,moreover it fits tubesockets perfectly.
Nice work,")
Hi,
Paul,my sincerest congratulations.
Fabulous looks,really.
While we're at it does anyone use as punching kits for sockets and such?
GREENLEE
Look at the right:"Holemaking"
I find these very handy to have unless you need to do this kind of work on a daily basis.
Any material except very hard and thick (>3mm) steel works very well,moreover it fits tubesockets perfectly.
Nice work,
Hi Chris,
No, I am in the fine grading trade, Heavy Construction. I am a Journeyman Heavy Equipment Operator. I am some what of an artist at my job. I do finish work with a motor grader and operate several other pieces of equipment equaly well. Doing it for 24 years now.
Just obsessed with everything I do.
No, I am in the fine grading trade, Heavy Construction. I am a Journeyman Heavy Equipment Operator. I am some what of an artist at my job. I do finish work with a motor grader and operate several other pieces of equipment equaly well. Doing it for 24 years now.
Just obsessed with everything I do.

 and show us the finished amps.
- Status
- This old topic is closed. If you want to reopen this topic, contact a moderator using the "Report Post" button.
- Home
- Amplifiers
- Tubes / Valves
- JE Labs 300b round 3. Chassis are Done