Do I have the world's heaviest stereo 2A3 amp?
The PS weighs 42 lbs, the filament source weighs 35 lbs and the tube section weighs 26 lbs, for a total of 103 lbs. The tube section will gain a bit more if and when I try interstage transformers. That addition may reduce the PS weight. But then again, I may add a bit more to that. There's still a bit of area left.
The PS weighs 42 lbs, the filament source weighs 35 lbs and the tube section weighs 26 lbs, for a total of 103 lbs. The tube section will gain a bit more if and when I try interstage transformers. That addition may reduce the PS weight. But then again, I may add a bit more to that. There's still a bit of area left.


Word's lightest
Euh !
A somewhat lighter one ?
http://www.dissident-audio.com/SE_6B4/Page.html
Stereo, of course
Yves.
Euh !
A somewhat lighter one ?
http://www.dissident-audio.com/SE_6B4/Page.html
Stereo, of course
Yves.
arnoldc said:how does it sound?
Light, of course
Seriously, it sounds great (at least to my hears and to the ones of the guy who kept it away !)
The only one thing I've ever sold
Some additionnal details here:
http://geek.scorpiorising.ca/yves-0.html
Yves.
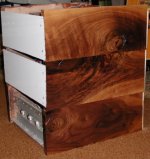
the sides
I got some scrap walnut from a shipping box at work for the sides. The 3 sections are all of equal size. The wood sides are 17 3/4" deep, 7" tall and 15/16" wide. I finished them in Deft lacquer. I think lacquer brings out the contrast in wood. Polyurethane and tung oil dull it. A gloss clear polyurethane is clear, but doesn't show off the wood.
I used .0140" aluminum, 15" wide for the chassis. The chassis is supported by 3/4" right angle aluminum from Home Depot. I used the same right angle mtl to mount the filament current supply.
No feet as of now. The pieces rest nicely on top of each other.
Since I'm new, I don't The pic is shows the knot hole chips rather poorly. The sides actually look pretty nice.
Attachments
slow posting
I have some text and pics ready to post. All my posts must pass the moderator since I'm new. So be patient if my amp is of interest.
Personally I can't wait for it to work again. I think it sound pretty good. My wife, who says she can't hear such things and doesn't have an audio interest, says that it does sound better than my Accurus and my long term loaner pair of Crown M600's from a friend.
Back to building. Yeah.
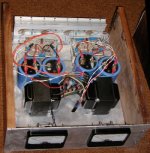
the filament supply
oops, couldn't see the decimal pt when I entered the chassis thickness - should be 0.140", or a reasonably close value
Sure you could use a couple of windings on a transformer and a hum balancing pot, but ....
I used a constant current source. Since the 2A3 is DHT, you need separate supplies for each side. The transformers are center tapped and I used the half voltage for the 2A3 and the full voltage for the ECC99.
I got the transformers off EBay. They are from old Hammond transformers. They are capable of much greater current, but by underspecifiying, there should be less stray fields, no mechanical humming, lower temperatures, better efficiency, no saturation. The fellow that I purchased them from said I might be swimming in the deep side of the pool.
I like a constant current source because you automatically get a soft turn on. You also get a constant current which should be less stress on the filaments. You also can balance the currents on both sides of the DHT. Definately a lot more work. Absolutely no hum from the filaments.
I made the amp last winter and am now packaging it, alas some pt to pt wiring will be disrupted. So it isn't working now. But when it was, there certainly was no hum. Interestingly, while probing for stray fields with my scope ground lead clipped to the tip, the only pickup I was getting was from the ECC99 filament wiring.
I now have a power supply IEC filter/plugin mounted and would be making more progress if I wasn't writing up this stuff. The crappy looking white back panels that you can see from the sides pic are temporary.
I need to upgrade the opamp in the current sources. I know which opamp will work, but can't think of anything else to buy from DigiKey. Right now I'm using a resistor helper.
The meters, again from Ebay, are a recent addition and don't have any circuitry to run them, except on paper. To be used to monitor the filament currents and filament voltage supplies.
Attachments
~ Nice wooden sides. Can I make a suggestion? You can use 17" horizontal rails from 19" rack equipment, and these contain a threaded insert with a large number of 2.5mm holes for bolting top or bottom plates into. They fasten at the sides with 4mm bolts. So what you can do with the wooden sides is put the 17" horizontal rails between them and just bolt them in from the sides. I do this and I must get a photo taken to post it (no digital camera) Of course, you can get half widths, or you can cut the strips down to any length. I've found it a perfect way to make chassis with wooden end pieces - no woodwork needed, no mitred corners, just drill four holes a side and bolt the horizontal rails in. After that all the top and bottom plates just bolt onto the horizontal rails. Cheap and easy and it can look very good with the right wood.
the voltage supply
Andy, thanks for the suggestion. I used the al. angle because it was relatively cheap and easy to get. Much of the amp was built from stuff laying around and not necessarily what I would have preferred. For example, tonight I added connectors to the filament supply - D15 conn w/ ribbon on the outside. Maybe it's for the better since it will lay flat.
-----------------------------------------------------------
the voltage supply
Similar argument for the voltage supply transformers.
I have quite a few transformers and caps laying around so I used some of them. By prudent selection, you get just/close enough to the voltage you want - no voltage dropping resistors. To "isolate the ss from the thermionic", I used LC filtering, with motor run caps for the 2A3s. The ss ps gives a pretty stiff supply.
I started with a single Hammond 125ESE output transformer while I was waiting for my Eastern Audio transformer kit to come in. The Eastern Audio output tx was bettern than the Hammond, but still not good enough. Now the Eastern Audio output transforms is in the LC networks.
The caps in the ss supplies, by running at lower voltages, can be "smaller", with much greater capacity and lower ESR, although stacking them increases the ESR.
The transformers, caps, and bridge rectifiers are bolted to the chassis. The rest is a work in progress.

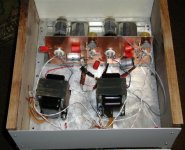
tube section
The Electraprint output transforms are most of the weight here. Adding some interstage transformers should bulk it up.
I used a copper ground plane. Makes connections easier and is a good practice.
The soldering is ok, except the connections are not ohmic. Just there for connectivity and easy change. A good place for later improvement.
Lots of work to be done here. Nothing attached to the chassis.
I have the outputs txrs mounted to some shock absorbers, just because I had them.
--------------------------------------------------------------------------------
So that's why the amp weighs 100+ lbs. Nothing fancy. No brass, bricks or cement. Just a philosophy that more iron is a good thing and the more room, the better.
Attachments
I think now I know the reason why your 2A3 amp is so heavy. You employ separate transformer for all different circuits - HT's and filaments.
I love big irons but they are rather expensive and heavy weight. I just try to strike for the balance.
The Hammond 302AX power transformer is so good that I could build a stereo 2A3 amplifier with all the HT and filament supplies that it needs. No extra transformer.
Johnny
I love big irons but they are rather expensive and heavy weight. I just try to strike for the balance.
The Hammond 302AX power transformer is so good that I could build a stereo 2A3 amplifier with all the HT and filament supplies that it needs. No extra transformer.
Johnny
- Status
- This old topic is closed. If you want to reopen this topic, contact a moderator using the "Report Post" button.
- Home
- Amplifiers
- Tubes / Valves
- world's heaviest 2A3 amp?