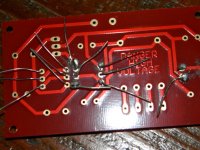
For Christmas I got the Oatley k301 RIAA preamp kit and a soldering pen.
As you might imagine, my initial work on the project has not gone well.
Here it is:
I have a series of closely related questions.
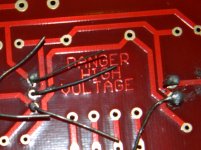
1) Though ugly, will these joints work?
2) If not, can the kit by saved? How?
3) What is the most likely cause of this ugliness and how can I avoid it?
My knowledge here is very limited. I've watched a couple of youtube tutorials and tried to read up on how tubes work, but aside from that my knowledge of electronics is limited to a year of HS physics.
Thanks for any answers you can give me.
As you might imagine, my initial work on the project has not gone well.
Here it is:
I have a series of closely related questions.
1) Though ugly, will these joints work?
2) If not, can the kit by saved? How?
3) What is the most likely cause of this ugliness and how can I avoid it?
My knowledge here is very limited. I've watched a couple of youtube tutorials and tried to read up on how tubes work, but aside from that my knowledge of electronics is limited to a year of HS physics.
Thanks for any answers you can give me.
Attachments
1/ You need proper electronics solder with flux in it.
2/ The iron needs to be hot enough to melt the solder properly.
3/ Clean the tip then tin the tip with a little solder before starting the joint.
4/ Heat up the component leg and the pcb at the same time.
5/ Keep the iron on the joint for a bout 5 seconds to ensure the joint is cooked enough.
2/ The iron needs to be hot enough to melt the solder properly.
3/ Clean the tip then tin the tip with a little solder before starting the joint.
4/ Heat up the component leg and the pcb at the same time.
5/ Keep the iron on the joint for a bout 5 seconds to ensure the joint is cooked enough.
 Oh my
Oh myNo. You need to start over. Those joints are going to be problematic right from the get-go.!
What type of soldering iron are you using?
What type of tip is on the soldering iron? Is it clean? and prepped?
What type of solder are you using?
Clean the mess you have there immediately with some isopropyl alcohol and a small toothbrush or chamois swab.
Then get a flux removal bulb or piece of flux removal braid and remove that mess of old solder pronto!
Once you've done that...get back to us with pics of the board cleaned up...we can go from there.
Nigel's advice is bang on, but I fear well beyond your level of expertise given the first result. Slow and steady..preparation is the key!
IF you go at this again in the same way you are in danger of the board traces lifting off the PCB itself and then you will have real problems!
Last edited:
I would say that your iron was not hot enough. Also, the wire leads look tarnished and needed cleaning. Lightly scraping with a pen knife works well. Also Scotch Brite or one or those green scrub pads for pots and pans. Just be careful not to break the leads if using the knife. The board can be saved. Use a hotter iron with solder wick to remove the old solder. Keep the iron tip clean. (bright with solder) Clean the trace pads if needed with very fine emery paper or Scotch Brite.
What sort of solder, and what sort of iron are you using? I've never heard of a soldering pen (do you mean soldering pencil?)
Since you live in the U.S. get yourself some Kester solder either 60/40 or 63/37 (eutectic) solder with flux. Do not get lead free solder as it is difficult and unforgiving to work with as a newbie, and is not required in the U.S. except in plumbing. And do NOT use plumbing solder or flux! I have run across more than one newbie who did not understand the difference.
Get a nice set of small wire cutters or nippers - these are what I use to cut leads and small wires as well as to scrape the oxidization off of older component leads - new parts with bright tin do not need to be scraped, but your parts look like surplus based on the lead condition.
Solder iron, either an inexpensive Weller or one of the many similar irons - some good deals to be found on eBay.. Stay away from Rat Shat irons they are rubbish..
Since you live in the U.S. get yourself some Kester solder either 60/40 or 63/37 (eutectic) solder with flux. Do not get lead free solder as it is difficult and unforgiving to work with as a newbie, and is not required in the U.S. except in plumbing. And do NOT use plumbing solder or flux!
I have run across more than one newbie who did not understand the difference.Get a nice set of small wire cutters or nippers - these are what I use to cut leads and small wires as well as to scrape the oxidization off of older component leads - new parts with bright tin do not need to be scraped, but your parts look like surplus based on the lead condition.
Solder iron, either an inexpensive Weller or one of the many similar irons - some good deals to be found on eBay.. Stay away from Rat Shat irons they are rubbish..
I would get a solder sucker and get rid of all that, then clean it all out with alcohol, scuff the leads as mentioned and re-solder with a proper soldering iron and solder. I'm not exactly sure what a soldering pen is, but as easy as it is to get reasonably good solder joints with this stuff, I'm sure it's the equipment or solder, not you!
For Christmas I got the Oatley k301 RIAA preamp kit and a soldering pen.
As you might imagine, my initial work on the project has not gone well.
I have a series of closely related questions.
1) Though ugly, will these joints work?
2) If not, can the kit by saved? How?
3) What is the most likely cause of this ugliness and how can I avoid it?
My knowledge here is very limited. I've watched a couple of youtube tutorials and tried to read up on how tubes work, but aside from that my knowledge of electronics is limited to a year of HS physics.
Thanks for any answers you can give me.
If I was given that to clean up here is what I would do... and as it stands now it can be made like new.
(You've been given a lot of good advice, in particular about the correct solders to use... that's vitally important, and also on practicing soldering first with scrap parts).
1) The leads that haven't been soldered should be gently pulled back so that they are at 90 degrees to the board.
2) Make sure the components that haven't been soldered are fitted correctly and flush to the PCB.
3) Snip the leads before soldering leaving about 2.5mm protruding.
4) Make sure the leads are clean and bright where you are going to apply solder. Most modern parts need no attention but those do look a bit crusty and tarnished. A knife as suggested or the finest wet and dry paper to just rub the leads will work well.
5) Get some solder braid to assist with desoldering.
6) The joints already made need all the solder removing and the parts refitting. Get an old scrap remote or anything electronic and practice desoldering. I would apply more solder of the correct type first to the joint while at the same time using the braid to remove all the solder. Once you try it you'll soon get the hang of it.
7) When you come to solder the parts in again slightly bend each cropped lead to around 45 degrees so that it "holds" the part and stops it falling from the PCB.
8) Use a hot iron with a largish tip and simultaneously apply heat to the component while at the same time applying solder. Do not carry solder on the tip to the joint. Apply the solder at the joint as you heat it. It should take around 1.5 seconds per joint of heating to make a perfect joint, any more and you risk overheating the board and components.
I would say that your iron was not hot enough. Also, the wire leads look tarnished and needed cleaning. Lightly scraping with a pen knife works well. Also Scotch Brite or one or those green scrub pads for pots and pans. Just be careful not to break the leads if using the knife. The board can be saved. Use a hotter iron with solder wick to remove the old solder. Keep the iron tip clean. (bright with solder) Clean the trace pads if needed with very fine emery paper or Scotch Brite.
I agree with everything except the abrasives. A 'newbie' doesn't yet have the experience and might cause some damage with too much 'enthusiasm'. There is no damage to the board yet and any of us could have it cleaned up in minutes.
What _I_ would do at this point is to find a junk PCB and try simply heating an existing joint to verify the soldering tool is behaving and get an Edsyn or Paladin solder sucker (I prefer the Edsyn - more power) and try clearing a few holes on the junk board. Then go back to the new board and clean up the old solder. He may simply be too timid to let the parts heat up enough. Solder Wick can be a little more damaging with a newbie than a sucker but that it what practice is for - on the junk. They both have their uses and ends up as a preference. I've seen good and bad work with both. Bad wick doesn't have flux and that WILL frustrate the newbies.
Don't despair. It's only ugly right now. At least you're asking _before_ it's difficult to salvage.
G²
Hi,
Get some vero board and some solid core copper wire and a 25 Watt soldering iron an Antex is fine.
You also need a stand and a sponge <<proper soldering iron sponge to clean the tip of the iron. (which you use when its damp)
The solder your using looks like lead free or has no flux.
So you need good solder.
Don't work on the kit until you have mastered soldering on vero board. 0.1 pitch
It doesn't matter if you make a mess on the vero board and you can practice it will only take a about half an hour to get way better than you are now!
It looks like you have a soldering iron that is not hot enough and wrong solder type!
NB the joints you have made are a non starter. And yes you can rescue it and make it like new just learn to solder!
Don't even try to de solder it until you can make a good joint on vero.
Regards
M. Gregg
Last edited:
Here is an e.g. of a stand and sponge,
Electronics Primer: How to Solder Electronic Components
Its just a quick guide..its not brilliant. The cutters should be side cutters ..
NB a 25 watt iron is enough medium tip..too hot can destroy components. The guide mentions 40 Watt<<er I don't think so but each to his own..
Don't use a gas iron either until you know what your doing..they are great for some jobs but...not hobby electronics on circuit boards..
(Just in case its what your using now)
Regards
M. Gregg
Last edited:
Thanks so much for all the quick replies; I really appreciate that you guys are willing to take time to help a newb out.
A soldering pencil is I'm sure what I meant. It's 25 watts and does not have a third grounding prong. It seemed like I was having trouble getting the solder to melt without touching it directly with the tip. I'm of course very hesitant to blame my equipment for anything at this point though. Do you have any advice on getting better heat conduction out of it?
My solder is 60/40 with rosin core. What thickness should I be using?
I've got some electronic garbage lying around, so I'll order some desoldering braid (hooray for amazon prime) and practice a bit on that.
Thanks again for your time. This seems like a fun hobby and a great community. I just have a bit more learning to do than I had realized.
The first thing I do,
Is tin the component legs,
Then I "wet" the iron tip with some solder.
Then put the iron on the pad and component lead at the same time as I feed solder between the component leg/board and iron tip.
Feed the solder so it contacts the iron tip while the iron tip is in contact with the component lead and the track of the PCB.
The solder should melt easily on the iron tip! If it doesn't then either the irons to cold or the solder is the wrong type.
Lead free can be a pig to work with!
The solder should run like water on the track of the PCB!
Don't hold the iron on the track to long or you will lift the PCB track off the board.
About 2-3 seconds should do it easily. A count of 1 and 2 and 3 the joint should be perfect. Solder off first then the iron a split second behind it!
I also solder in different places on the board not one then the other so the heat is not concentrated in one place ie if a component has several connections I will solder each end then each end next one in etc. I will also feel how hot a component is getting and wait a few seconds for it to cool before I solder again on the same one for it to cool between connections.
Regards
M. Gregg
Last edited:
The first thing that you do with any new iron is to tin the tip.
Once the tip is tinned (take a look at youtube for a howto), you will need to remove the solder blobs that are on the board. By the looks of what is there, they are cold solder joints.
As someone here said, you will need to get some proper 60/40 solder with a resin core. Go to Radioshack and grab some. Also get either a solder sucker or some desoldering braid. At this point I would suggest both.
Get some perf board at RadioShack as well as some solid core wire as someone else here suggested. Practice soldering wire ends together. When you get to a point where you can flow the solder and not melt the insulation around the wires, then you will be good to go as far as building your project.
Learning how to solder just takes a bit of practice. Luckily with the advent of sites like youtube, you can easily find video howto's on just about any subject.
Just remember to not let your parts get too hot. That is easy to do if you don't have a tinned and clean iron tip or if you use a soldering iron that puts out too much wattage for what you are doing.
You may need to file the tip of the iron if you haven't tinned it already.
Hope this helps.
Thanks so much for all the quick replies; I really appreciate that you guys are willing to take time to help a newb out.
A soldering pencil is I'm sure what I meant. It's 25 watts and does not have a third grounding prong. It seemed like I was having trouble getting the solder to melt without touching it directly with the tip. I'm of course very hesitant to blame my equipment for anything at this point though. Do you have any advice on getting better heat conduction out of it?
My solder is 60/40 with rosin core. What thickness should I be using?
I've got some electronic garbage lying around, so I'll order some desoldering braid (hooray for amazon prime) and practice a bit on that.
Thanks again for your time. This seems like a fun hobby and a great community. I just have a bit more learning to do than I had realized.
You've got to touch the joint with the hot tip for everything to melt. Most components will survive a good 5 seconds of heat which is more than long enough to make the joint.
Different guys will describe the solder joint differently. Basically you need two clean surfaces, free of oxides (therein comes the cleaning of the two surfaces to make them shiny). Next thing is to heat both surfaces to about 270 degrees C without them oxidising (this is what the flux does, it prevents oxidising). Both sides of the joint need to get VERY HOT - above 271 deg C. As soon as things get to 271 deg C the solder will melt and make the joint. If either side is too cool or is dirty, the solder will not stick.
Different irons will impart different amounts of heat. Too small an iron will not be able to warm the joint sufficiently. A 25W iron will usually be sufficient but there will be times when you need a lot more heat.
Different irons will impart different amounts of heat. Too small an iron will not be able to warm the joint sufficiently. A 25W iron will usually be sufficient but there will be times when you need a lot more heat.
Last edited:
Don't be afraid of using a large tip in the iron. It will hold the heat and make for easier, quicker and more successful soldering. Also for using braid you need that heat capacity in the tip.
Don't know if the first couple of pictures here help or not but they show braid in action.
http://www.diyaudio.com/forums/parts/127924-working-smd-how-do-without-specialised-tools.html
You can tin (apply a tiny bit of solder) to the braid, then pull the braid round the iron tip (so its all up to temperatue) and apply that to the joints. The solder will be wicked up instantly to the braid hopefully leaving a cleanly desoldered joint.
- Status
- This old topic is closed. If you want to reopen this topic, contact a moderator using the "Report Post" button.
- Home
- Amplifiers
- Tubes / Valves
- I've made an awful mess...