Hi
I have two Maratnz 8b's, all around the serial numbers of 8-7XXX. I have heard that someone repairing 8b's have not seen two of them 100 % the same. Anyway, I guess, and hope their components and schematics will not be too different form each other. They two are primarily stock. But I havent't done a detailed check to see their dissimilarities.
Anyway, I wish to repaint the chassis and bodies. I wanna anyone can tell:
1. the colour code corresponding to the brown tint, and the matt/gloss ratio. Hope this will translate to better looks;
2. the colour code of the grey tint of the capacitors;
3. how can I make silk print screens to replicate the lettering on the top and the back of the chassis? If I can make a good print, it will be worth my effort to repaint it whole in the first place.
4. I used to have a PDF copy of the schematic. Anyone can suggest where I can get a good copy of its manual and schematics?
Thanks.
are the chassis really in need of paint?
doing exact silk screens will be very very difficult and a lot of work.
I'd think you'll need to take photos at high res and go into photoshop to work up the layout and fix any scratches or dings in the lettering.
_-_-
perhaps you want to post some pix?
doing exact silk screens will be very very difficult and a lot of work.
I'd think you'll need to take photos at high res and go into photoshop to work up the layout and fix any scratches or dings in the lettering.
_-_-
perhaps you want to post some pix?
Harleyjon:
Yeah I tried the zilla.li place. All the computers and even my Android phone cannot open the manuals etc. Pressing on their hyperlinks freeze the system. Even after opening up to all cookie ....
Zilla.li ... what is that?
The file is a png and within Google.
I have just checked the address and it works fine.
As to tHe brown and grey colours, I think I might have to bring the tranny housings of the two amps, and a cap, to an auto body shop to get a custom colour match.
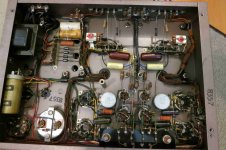
I hope to post more pictures as the project goes. I observed it has clartity and uncoloured highs, but it leaves a lot to be desired in the bass registers no matter what tubes I used, including Mullard xf1, xf2, Shuguang EL34B, JJ, two sets of Tesla brwon bases. And it has been ripped of filtre caps at the "preamp" inputs too. So all its inputs go direct to the 6BH6. My Ampex 6973 console mono's has a lot to offer in terms of "body" and solidness. I guess these may be jsut the kind of characters that individual tube types show.
Anyway, my first 8b measured 364 VDC at the B+, and 406-409 VDC at the plates of the 4 pcs of EL34's. Might this be just about on spec of 360 and 390.
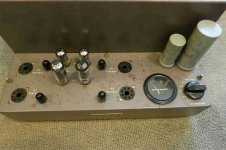
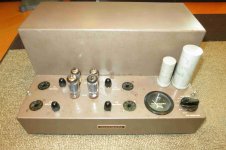
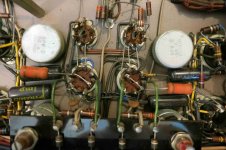
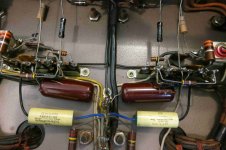
I wish to post pictures about the first Marantz 8b I bought last March, and which is in far better condition than the second one in body condition (tho itself it ain't "good" at all. See the rust). Note that it is using Blackcat and Imp caps. Gosh! Aren't those found usually on Dynaco and Eico?
I hope to post more pictures as the project goes. I observed it has clartity and uncoloured highs, but it leaves a lot to be desired in the bass registers no matter what tubes I used, including Mullard xf1, xf2, Shuguang EL34B, JJ, two sets of Tesla brwon bases. And it has been ripped of filtre caps at the "preamp" inputs too. So all its inputs go direct to the 6BH6. My Ampex 6973 console mono's has a lot to offer in terms of "body" and solidness. I guess these may be jsut the kind of characters that individual tube types show.
Anyway, my first 8b measured 364 VDC at the B+, and 406-409 VDC at the plates of the 4 pcs of EL34's. Might this be just about on spec of 360 and 390.
I wish to post pictures about the first Marantz 8b I bought last March, and which is in far better condition than the second one in body condition (tho itself it ain't "good" at all. See the rust). Note that it is using Blackcat and Imp caps. Gosh! Aren't those found usually on Dynaco and Eico?
Attachments
Last edited:
I've done silk screening on DIY amps before. The most difficult part is coating and exposing the screen. I made artwork in a vector drafting program and printed it in dense black on clear film on a plotter I have access to at work. The screen is available in many sizes already stretched on a frame, which I recommend. You coat the screen with a photosensitive emulsion on both sides using a squeegee to even it out and remove any thick areas. After it dries overnight in complete darkness, place the printed film with the image upside down over the bottom side of the coated screen and cover it with a sheet of clear glass to keep it tight against the screen. Next, expose it to light. I used a clear 150 watt incandescent lamp in a reflective shade with the whole thing sitting on a black cloth to prevent reflections. The instructions with the emulsion will provide distance from the work and time for exposure. When the exposure is done, quickly rinse the screen with a forceful stream of water, *not* in direct sunlight. The unexposed portions of the emulsion will wash out of the screen leaving your image in uncoated screen. Place the exposed screen in position over your work, pour a small amount of ink on one end of the screen and squeegee the ink across the work. Lift the screen and let the ink dry. I sprayed a clear coating over the ink for protection after it dried. You can use a stripper solution to clean the screen for reuse with another image.
rkoonce :
I read your instructions thrice with utmost attention to visualoze what will be going on during silkscreen printing.
So, to begine with, I should take a photo of the print on the 8b, tidy it and scale it on photoshop, and then print them on transparent poly sheets such as those used on a photo prrojector.
Yes, that's what I would do. Actually, for my DIY amps, I scanned my paper patterns used to make the chassis holes and placed the scans full-sized as a layer in my drafting application. A second layer on top if that was where I did the artwork, so I could remove the original scans, leaving only the text over a transparent background. Here's a link to an amp I did this on: Carmen SE 47
I assume that white ink is available for your 8B amps.
I assume that white ink is available for your 8B amps.
- Status
- This old topic is closed. If you want to reopen this topic, contact a moderator using the "Report Post" button.
- Home
- Amplifiers
- Tubes / Valves
- Marantz 8b restoration: colour code, prints, schematics