You are keeping well ahead of me, good work!
I painted the motor run cap bodies, and transformer laminations with a couple of coats of high temp flat black this morning before it started raining.
I got focused and got the build though the grounding strip, and stopped before hitting the turret boards.
I still have to figure out how to finesse wiring the LED bias option, I have the diagram, so it should not be terribly hard, but its still a lot of stuff in a small place.
I have mounted the transformers, and motor run caps. Away this weekend though. Good luck with the testing!
You're not taking the amp and soldering iron with you then I take it.

Lol, they tend to frown on soldering stations in hotels, not to mention all the insulation stripping into the carpet. I will get the wiring done next week one night. Speaking of which, I need to get some alligator clips for my multimeter.
Have a good weekend, and I'm thinking positive thoughts for your testing BlackEdition.
Have a good weekend, and I'm thinking positive thoughts for your testing BlackEdition.
Bones13, thank you for the positive thoughts... because...
IT'S ALIVE!!!!!!
To say that I'm impressed would be a positively massive understatement! I haven't forgotten to post the rest of the log with all the pictures, but, I felt compelled to alert everyone that it is built and pumping amazing tunes through my speakers at the moment.
I've also given the amp a name:
The Heater...
I'm bubbling with a childlike giddiness at the moment! stay tuned for the updates!
...but before I go, I must give a massive THANK YOU to the one and only Scott17! Without his guidance and generosity, none of this would have been possible. I have not been this excited about listening to music in a long time...and that is coming from a truly passionate musician, and music lover. This project has really reignited the fire in me, and I simply cannot wait to listen. I also cannot wait to undertake another audio project...though it is going to be hard to peel myself away from these speakers to do so
Stay tuned!
So this is long overdue, I apologize! School has been really busy, and any time that I've had away, I've been listening to this fantastic system I now have on my hands
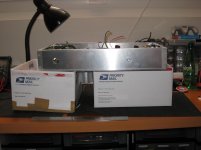
So I've found that two medium flat rate boxes make an excellent stand for working on the amp upside down after installing the motor run caps (Figure 1).
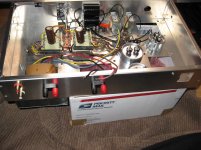
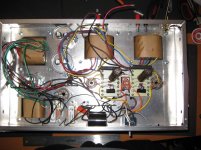
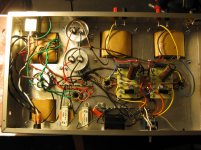
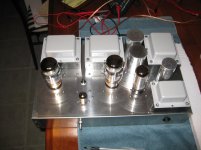
So I installed the first transformer (Figure 2)...and the rest (Figure 3). Then I wired it all up...only after ruining two crimp connectors and going to Radioshack to get new ones during the aftermath of the New England blizzard (of all things to get hung up on...crimp connectors...yeah...) (Figure 4).
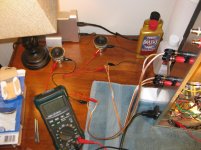
Thus, it was time to test! So I set up my multimeter, and my lovely Boston Acoustics surplus 3W 8ohm speakers (Figure 5).
I then installed the tubes with shivers of excitement coursing through my veins... (Figure 6). I finished the testing...(SPOILER ALERT: Everything tested out ).
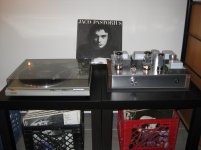
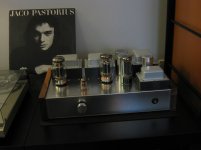
I then proceeded to hook it up to my system. Figures 7-9.
The first record I listened to is an important one to me. As shown in the picture, it was Jaco Pastorius' eponymous debut from 1976 (well before my birth). My father used to play Weather Report for me in the car when I was a very young child, and I simply did not understand it (as most 3-4 year-olds wouldn't). However, in high school, I rediscovered Jaco and simply couldn't get enough. Next to my dad, he became my musical hero. A love of Jaco's music has lead to me meeting and playing in bands with some of my best friends in the world. I used to say "If I am able to play the bass like Jaco, the guitar like Hendrix, and the drums like Billy Cobham, I'll be able to die happy." Not a lofty goal eh!? The harmonics in "Portrait of Tracy" were seemingly more beautiful and haunting than ever before.
After listening to the album (I was so excited, I couldn't be bothered to run it through my spin clean record washer ), I listened to another very important album to me: Little Feat's "Waiting for Columbus." This is another album my dad played for me as a kid. I used to beg for him to play the "bathtub song," (referring to Fat Man in the Bathtub) when we were in the car. My dad happily obliged, and played a game of "find the beat" with me...despite the songs obvious innuendos .
As I sat there, and texted back and forth with my dad describing how amazing the new setup was, I could tell my dad was excited as I was that I had a new HiFi stereo system. He and my mom are going to be visiting me over Easter, and I can't wait to show the new stereo off to them!
Needless to say, we'll be listening to some Jaco, and some Little Feat
So I've found that two medium flat rate boxes make an excellent stand for working on the amp upside down after installing the motor run caps
(Figure 1).So I installed the first transformer (Figure 2)...and the rest (Figure 3). Then I wired it all up...only after ruining two crimp connectors and going to Radioshack to get new ones during the aftermath of the New England blizzard (of all things to get hung up on...crimp connectors...yeah...) (Figure 4).
Thus, it was time to test! So I set up my multimeter, and my lovely Boston Acoustics surplus 3W 8ohm speakers
(Figure 5).I then installed the tubes with shivers of excitement coursing through my veins... (Figure 6). I finished the testing...(SPOILER ALERT: Everything tested out
).I then proceeded to hook it up to my system. Figures 7-9.
The first record I listened to is an important one to me. As shown in the picture, it was Jaco Pastorius' eponymous debut from 1976 (well before my birth
). My father used to play Weather Report for me in the car when I was a very young child, and I simply did not understand it (as most 3-4 year-olds wouldn't). However, in high school, I rediscovered Jaco and simply couldn't get enough. Next to my dad, he became my musical hero. A love of Jaco's music has lead to me meeting and playing in bands with some of my best friends in the world. I used to say "If I am able to play the bass like Jaco, the guitar like Hendrix, and the drums like Billy Cobham, I'll be able to die happy." Not a lofty goal eh!? The harmonics in "Portrait of Tracy" were seemingly more beautiful and haunting than ever before. After listening to the album (I was so excited, I couldn't be bothered to run it through my spin clean record washer
), I listened to another very important album to me: Little Feat's "Waiting for Columbus." This is another album my dad played for me as a kid. I used to beg for him to play the "bathtub song," (referring to Fat Man in the Bathtub) when we were in the car. My dad happily obliged, and played a game of "find the beat" with me...despite the songs obvious innuendos . As I sat there, and texted back and forth with my dad describing how amazing the new setup was, I could tell my dad was excited as I was that I had a new HiFi stereo system. He and my mom are going to be visiting me over Easter, and I can't wait to show the new stereo off to them!
Needless to say, we'll be listening to some Jaco, and some Little Feat
Figures 1-9
Attachments
-
 IMG_0427.jpg592.5 KB · Views: 340
 -
 IMG_0426.jpg843.8 KB · Views: 321
 -
 IMG_0428.jpg867.6 KB · Views: 314
 -
 IMG_0429.jpg820.9 KB · Views: 304
 -
 IMG_0431.jpg806.3 KB · Views: 290
 -
 IMG_0432.jpg715.2 KB · Views: 164
 -
 IMG_0433.jpg589.7 KB · Views: 164
 -
 IMG_0434.jpg590.8 KB · Views: 150
 -
 IMG_0436.jpg531.8 KB · Views: 190
Congrats BE on your pretty amplifier.
I finished mine too, and the power testing went perfect. I am having trouble with one of the channels though (left). It started with no sound, and after going over all the connections a couple of times, I have about 1/3d volume on that side over the other. I have ordered another driver tube. Swapping the power tubes did not change the imbalance.
Open to any other directions from Scott. I took some pictures, and will try and upload them this week of my build.
What anode and cathode voltages did you measure for both channels of the 6N1P?
If you have a 6922 or 6DJ8 you could temporarily install one of those. It won't be ideal but it will be fine for verifying that it is indeed the tube.
I'll be glad to send you another 6N1P if it turns out to be bad.
Scott
If you have a 6922 or 6DJ8 you could temporarily install one of those. It won't be ideal but it will be fine for verifying that it is indeed the tube.
I'll be glad to send you another 6N1P if it turns out to be bad.
Scott
I finished mine too, and the power testing went perfect. I am having trouble with one of the channels though (left). It started with no sound, and after going over all the connections a couple of times, I have about 1/3d volume on that side over the other. I have ordered another driver tube. Swapping the power tubes did not change the imbalance.
Yes, the amp as designed is about 62% of the maximum plate dissipation of the KT88. This allows for extended tube life.
A 3K or 2K7 3W resistor can be paralleled with the 560R KT88 cathode resistor to make a ~470R resistor. This will give you 70% of max dissipation, about 80mA.
Apart from that, the B+ would have to be increased.
The only EL34s I've tried were the Electro-Harmonix brand. I also tried the Electro-Harmonix 6CA7s which I thought sounded better than the EL34s. I still like the KT88s. ;^)
Just my two cents,I like this amp better with el34s I might be wrong but I think the kt88s are not driven hard enough?
Last edited:
It makes a very good looking amp
Scotts planning and design really make this a great looking amp on the inside.
I have an optional LED bias switch and LEDs in this build.
Scotts planning and design really make this a great looking amp on the inside.
An externally hosted image should be here but it was not working when we last tested it.
An externally hosted image should be here but it was not working when we last tested it.
An externally hosted image should be here but it was not working when we last tested it.
I have an optional LED bias switch and LEDs in this build.
Last edited:
- Status
- This old topic is closed. If you want to reopen this topic, contact a moderator using the "Report Post" button.
- Home
- Amplifiers
- Tubes / Valves
- Scott17 KT88 SE Tube Amp Build Log