Hi, Friends
I produced today my new amplifier named Level Five.
After half year of preparing material I finally got around to publish my experience about designing and building an tube amp.
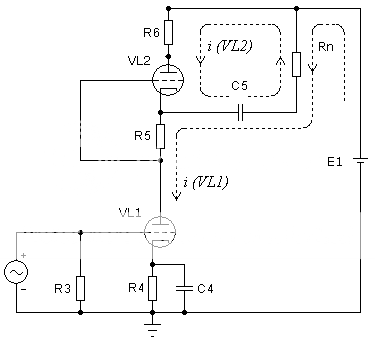
In the winter of 2008 I decided to build Single–Ended Stereo Tube Amplifier, using the 2A3 tube. There are many good solutions in the DIY community, but nothing seemed satisfactory to me. After looking at different circuits in the Internet, I have decided to calculate my own circuit design (see attach). Actually, that was my second DIY tube project.
The amp uses two 6SL7s in the preamp/driver, two 2A3s for the outputs and a 5U4G rectifier. It puts out right around 2.5W in pure Class A. To get more information about internal construction, grounding, component parts etc. please visit Level Five Amp page.
Newbies can follow the schematic diagram and build their own tube amp, circuit is very simple and don't need anything tune. It really helps to understand what’s happening in the construction you create. The sound depends on the passive components used only.
Best Regards, Konstantin
I produced today my new amplifier named Level Five.
After half year of preparing material I finally got around to publish my experience about designing and building an tube amp.
In the winter of 2008 I decided to build Single–Ended Stereo Tube Amplifier, using the 2A3 tube. There are many good solutions in the DIY community, but nothing seemed satisfactory to me. After looking at different circuits in the Internet, I have decided to calculate my own circuit design (see attach). Actually, that was my second DIY tube project.
The amp uses two 6SL7s in the preamp/driver, two 2A3s for the outputs and a 5U4G rectifier. It puts out right around 2.5W in pure Class A. To get more information about internal construction, grounding, component parts etc. please visit Level Five Amp page.
Newbies can follow the schematic diagram and build their own tube amp, circuit is very simple and don't need anything tune. It really helps to understand what’s happening in the construction you create. The sound depends on the passive components used only.
Best Regards, Konstantin
Attachments


Hello, congratulations on your design!
I'm a newbie in tube and will build my first .
I have found many schematic but yours level five looks great!
Is it really simple to build?
I'm a newbie in tube and will build my first .
I have found many schematic but yours level five looks great!
Is it really simple to build?
Hello, congratulations on your design!
I'm a newbie in tube and will build my first .
I have found many schematic but yours level five looks great!
Is it really simple to build?
You are welcome!
Yes, it`s a very simple schematic with minimum components, but first be sure you really want to build your own amp from scratch. Honestly, my first tube project was the STA-35 kit. The kit will allow you to understanding how it works and the concepts of circuit design.
Level Five Amp is really simple construction, but for a first try it is more expensive than cheapest push-pull tube kit.
Yes. I need a cheapest tube kit and your schematic I will keep for the next time.
Thank You, Konstantin, again.
Thank You, Konstantin, again.
Hi, Konstantin!
Congratulation for design and thank you for sharing your amp with us! I'm not expert (in anny way!), but I like to see chokes and tube rectifikation.
Right now I'm contemplating about making DM BL Horn with fostex 126, and I think I could use a little bit more power then 2.5 watt. Anyway, I will follow your site in future!
Hi Konstantin;
what is the purpose of R6?
Also, I often see in designs from Russia usage of nylon cable ties to mount heavy capacitors in high temperature areas. I would definitely recommend to use something more reliable.
Good luck!
what is the purpose of R6?
Also, I often see in designs from Russia usage of nylon cable ties to mount heavy capacitors in high temperature areas. I would definitely recommend to use something more reliable.
Good luck!
zerowaf, Thank You too!
I listen my Level Five Amp with Klipsch RF-15 speakers. Their sensitivity is 96dB,
This is more than enough!
FE126E model? With 94 dB Sensitivity?Right now I'm contemplating about making DM BL Horn with fostex 126, and I think I could use a little bit more power then 2.5 watt. Anyway, I will follow your site in future!
I listen my Level Five Amp with Klipsch RF-15 speakers. Their sensitivity is 96dB,
This is more than enough!
Konstantin, that's a nice looking amp with a good layout. I'm interested to know about the anodised faceplate. Is that something you cut/drill and then have brushed and anodised, or something ready finished that you carefully work afterwards. I wanted to use a black finish, but could not decide what would give a durable finish. The black anodised aluminium look really nice. Well done.
Steve
Steve
I'm interested to know about the anodised faceplate. Is that something you cut/drill and then have brushed and anodised, or something ready finished that you carefully work afterwards.
Steve
Hi, Steve!
I bought a ready-made anodised faceplate. And then drilled carefully, of course, it is not convenient. If it possible - better to do it in reverse order.
Few details about chassis:
This is 19 inch standard rack with 10mm aluminium flanks, with painted black steel covers and additional oxidized black aluminium faceplate. The top cover was drilled in advance on my drawings.
And thank you for feedback!
Hi Konstantin;
what is the purpose of R6?
Also, I often see in designs from Russia usage of nylon cable ties to mount heavy capacitors in high temperature areas. I would definitely recommend to use something more reliable.
Good luck!
My bet is R6 is there to increase the plate load a tad, and perhaps to fine tune the plate voltage of the bottom triode? Though increasing R5 a bit and removing R6 does the same. ???
Nylon straps are an industry standard, quick and easy, and shouldn't be a problem. Granted, high heat makes them brittle, so in 20years or so they may turn brownish and even snap if someone forces them.
Hi Konstantin;
what is the purpose of R6?
Hi,
R6 using in this schematic is the only way to get identical idle current in both tubes.
To get more information please visit:
Level Five 2A3 SE Amplifier - Hints And Tips
and
The Tube CAD Journal,SRPP Optimal Rak Value 3
I can say that the only hot resistor in the circuit, which is located next to a large cap is R1. His aluminum heatsink is attached to the 10mm aluminium flank, so the entire flank is a powerful radiator and the capacitor is not hot.Also, I often see in designs from Russia usage of nylon cable ties to mount heavy capacitors in high temperature areas. I would definitely recommend to use something more reliable.
About designs from Russia:
You also have Russian roots, Anatoly? Russian does not mean necessarily a bad thing, is not it?
I think DIY audio hobby is above our national identity.
The quality of our projects depends only on ourselves and our knowledge.
zerowaf, Thank You too!
FE126E model? With 94 dB Sensitivity?
I listen my Level Five Amp with Klipsch RF-15 speakers. Their sensitivity is 96dB,
This is more than enough!
I think it is 93 dB, but makes no big difference. Thank's again for opinion!
Hi,
R6 using in this schematic is the only way to get identical idle current in both tubes.
Hi Konstantin; I visited your site; it looks nice; now it is your turn to visit a textbook and read about Kirchhoff law. Tubes in SRPP are in series, and it is impossible for them to have different idle currents. Physically impossible.
I would strongly recommend you to examine tube data carefully and think about dependence of linearity on anode voltage. With such voltage available both 6Н9С triodes are already starving. Voltage drop on the resistor helps to increase distortions even more...
High end sound does not mean huge 2'nd order distortions. It is the main mistake of boutique designers and some audiophiles. Relatively high 2'nd order distortion is a trade-off for absence of many other artificial artifacts usually added by transistor amps, and the less distortion is the better. Real high end designers and audiophiles regards sound signature as inevitable evil, but not as a desirable feature.
About designs from Russia:
You also have Russian roots, Anatoly? Russian does not mean necessarily a bad thing, is not it?
Right, but that does not mean I have to repeat the same mistakes amateur designers copy from each other, no matter which nationality/race/religion they belong to.
Nylon cable clamps holding heavy capacitors deteriorate in time. They deteriorate faster under the sun or under the chassis that gets hot from tubes, resistors, transformers. Each 10 degrees C increase speed of chemical reactions twice. Capacitors have voltages on them capable to make an electric arc and ignite surroundings. That means, you have a chance to need help of firefighters in order to save your property (and your neighbor's properties). However, it looks simple, nice and cool, when new, but...
Last edited:
Member
Joined 2009
Paid Member
so it depends on the temperature ?
"General-purpose Nylon 6/6 has good toughness, tensile strength, and resistance to creep, particularly in the high-temperature range. Nylon has excellent wear properties, low coefficent of friction, and exceptional chemical resistance particularly to aromatic hydrocarbons, greases, and oils. Nylon is a hygroscopic material. Moisture acts as a plasticizer reducing the tensile strength, stiffness, and increasing elongation, impact strength, and energy absorbing characteristics. Outdoor weathering can be improved by the addition of carbon black. Nylon will perform well in long range service in most applications at temperatures as high as 185o F (85o C). Nylon is a translucent off-white color"
"General-purpose Nylon 6/6 has good toughness, tensile strength, and resistance to creep, particularly in the high-temperature range. Nylon has excellent wear properties, low coefficent of friction, and exceptional chemical resistance particularly to aromatic hydrocarbons, greases, and oils. Nylon is a hygroscopic material. Moisture acts as a plasticizer reducing the tensile strength, stiffness, and increasing elongation, impact strength, and energy absorbing characteristics. Outdoor weathering can be improved by the addition of carbon black. Nylon will perform well in long range service in most applications at temperatures as high as 185o F (85o C). Nylon is a translucent off-white color"
so it depends on the temperature ?
Yes, it does. Any chemical reaction speeds up twice per each 10 degrees C, as far as I remember from TIASUR university course some 30 years ago... However, we were taught to design reliable equipment (mostly military), though.
Let's ask SY, he is a heavy artillery in this topic.
Also, I often see in designs from Russia usage of nylon cable ties to mount heavy capacitors in high temperature areas. I would definitely recommend to use something more reliable.
I can't comment on the reliability of the nylon tie itself, but I'd wager there is probably a sticky-back square (tie anchor) underneath there. Those adhesive squares don't stay stuck for very long, unfortunately. It'll fall off long before the nylon tie gives up.
I can't comment on the reliability of the nylon tie itself, but I'd wager there is probably a sticky-back square (tie anchor) underneath there. Those adhesive squares don't stay stuck for very long, unfortunately. It'll fall off long before the nylon tie gives up.
Yes, I had such cases with nylon ties on cables. But if a cable falls down it affects looknfeel only, a cable stays there... Anyway I use now for cables ties that have some round ear at the end for a screw.
I'd wager there is probably a sticky-back square (tie anchor) underneath there. Those adhesive squares don't stay stuck for very long, unfortunately. It'll fall off long before the nylon tie gives up.
Hi, Ty_Bower
Don't Panic!
They are attached additionally to the chassis with screws.
In my prior job, I worked as a service engineer on ship propulsin systems. We produced our own systems, installed them, and provided service. I got to see many engine rooms, on boats ranging from small fishing dinghys in a Norwegian fjord to mega trawlers in Alaska. Internally in our and other equipment from such as RollsRoyce, Mitchubishi, Kongsberg, etc, nylon ties is common both for securing and bundling wires, but also to fasten larger single components. Those nylon straps are also very common all over the engine rooms. Some idiot mechanics even use them around hot piping, which I would not.
Either way, I agree there are better materials, such as aluminimum cut in strips and fastened with rivets or screws. But nylon straps are regarded as perfectly ok. And in an amp with hopefully less vibrations and other chemical/mechanical/thermodynamic stresses than a ship's engine room, I will be much surprised if they cause a failure during an amp's lifespan.
Hehe, it's almost funny the details we discuss here, such nit-picking bordering to irrellevance. I had a long break from this forum, and since I picked it up again I have learned a lot, but my productivity has also gone down. Some nights I end up searching the forum instead of sitting down with the soldering iron. I guess we all need some breaks though, so no sweat🙂
Tubes in SRPP are in series, and it is impossible for them to have different idle currents. Physically impossible.
Hi,
Idle, you are right. But alternating currents through the both tubes are not the same. As I see it:
I'll try to check later on the oscilloscope.
- Status
- Not open for further replies.
- Home
- Amplifiers
- Tubes / Valves
- New 2A3 SET / Simple, but gentle sounding amplifier