I have a few tube projects I want to start. They are preamps, phonopreamps and I/V for DAC's. They involve small signal tubes (12ax7, etc) and larger rectifier tubes. I am thinking of using plexiglass. What do you think? Can I just cut 6 pieces and put them together with brackets from a hardware store? I don't mind the transparent look. But what about the temperature? If I put the tubes inside, would they get hot enough to affect the plexiglass? What about grounding? Thanks!
Plexiglass is a bit...eh..."lady dog" to work with. But if you do choose to go that route, you may consider making the brackets out of thicker plexiglass that you drill and tap holes in. That would allow you to screw everything together and create a fairly cool transparent look.
However, preamps, phono stages, and I/V converters are probably the most EMI sensitive circuits you'll find in your audio chain, hence, they will benefit the most from electrostatic screening. You could clad the inside of the plexiglass cage with some copper wire mesh screen and then ground the mesh. You can probably find mesh like that at an art/crafts store.
If you enclose the tubes in any form of case, you need to drill holes in the case for ventilation. You'll need some ventilation even if you choose to have the tubes "top side" as resistors and other components may dissipate a fair amount of power. I suggest looking at George's (tubelab) Lexan Amp.
~Tom
If I put the tubes inside, would they get hot enough to affect the plexiglass?
YES! My first attempt for a Plexiglass amp looked like a potato chip after a few months. The heat from the tubes and the weight of the transformers added up to warp the plastic badly.
I have been using Lexan without a problem. You still want to allow for some air movement so that the heat from the tubes won't fry all of the other parts though. The lifetime of electronics components (expecially electrolytic caps) goes down as the temperature goes up.
Lexan is GE's trade name for polycarbonate plastic. Other vendors have their own names. Hyzod and Tuffak are other names for the same stuff. I find that buying remnants off of Ebay is the cheapest way to get this stuff.
you can use acrylic (common trade names: Plexiglas (one S), lucite, acrylite...) if you keep the power tubes away. It looks best with polished edges and glued construction. It however takes proper tools with proper bits and blades to machine it well, not to mention experience. Cell cast acrylic is a bit easier to work with but many plastic distributors don't stock it and it is more costly.
Polycarbonate makes nice bullet proof windows, but it's greyish edge tint doesn't look as nice and it has a soft surface that scratches easier than acrylic. It can handle the heat better.
Polycarbonate makes nice bullet proof windows, but it's greyish edge tint doesn't look as nice and it has a soft surface that scratches easier than acrylic. It can handle the heat better.
For other on-line sources of various metals and plastics, I recommend McMaster and Online Metals.
~Tom
~Tom
Thanks guys, George, what did you use to screw the whole thing together?
I drilled and tapped the Lexan (ordinary metal drills and taps) and screwed it together with brass 4-40 screws. The Lexan amp was one of my earliest "alternative" construction projects. I have had it for about 5 or 6 years. It has been dragged around, loaned out and taken apart several times. It has held up well, but it does show some scratches now.
I have been taking woodworking classes for a few years now and my construction skills have improved a bit. I may rebuild the Lexan amp some day, but it still works great so I haven't wanted to mess with it. I have built (or started but not finished) several amps that incorporate Lexan in their design.
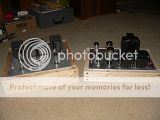
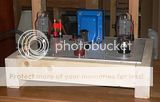
The easiest is a typical wood box with a metal deck, except the metal deck is replaced with Lexan to reveal the Tubelab SE PC board and all the wiring underneath. That one was complete until I stole its power transformer for another project. I have a new one, but no time to finish it now.
The latest project is an ambitious (maybe a bit to ambitious) project incorporating wood, aluminum, diamond plate, and Lexan along with 15 to 20 tubes, two Simple P-P boards, a still unfinished regulator board, some sand state components and a few other unusual design features. It should be finished in a few weeks. It is safe to say that it will look very different.
Look up the local farco plastics. they usually have scraps of Acrylic for very cheap. As you have found, it can be drilled and tapped very effectively. it can also be glued very easily. Get a can of Weld-on #4. Place the two pieces to be welded together and use a bottle with needle dripper to place some weld-on #4 right at the joint. Capillary action will draw the glue into the crack and the glue sets in a matter of seconds. It takes a little practice to get the joints looking perfect, but it is way easier than drilling and tapping for permanent joints.
Last edited:
I have a few tube projects I want to start.
I believe that aluminum plate and framing lumber is as good a place to start as any...
http://i69.photobucket.com/albums/i43/Ty_Bower/Simple SE/P1100383.jpg
http://i69.photobucket.com/albums/i43/Ty_Bower/GetSetGo/GSG_Sovtek.jpg
If I glue them together, how am I suppose to change the tubes?
You glue the sides together like a 5 sided box and have a removable piece that is fastened another way for access (screws and such). Screws look tacky for a complete acrylic box. Think of an acrylic display case in a museum. Beautiful seamless looking joinery.
Here is a tapped horn mockup I made out of acrylic with clear seamless joints. This would look terrible with screws all over.
An externally hosted image should be here but it was not working when we last tested it.
Last edited:
Nice
A friend of mine used to section Perkins engines for display. He used to use chloroform to bond the edges of the acrylic display cases. Is this the way you did it?
Cheers Matt.
Close. I used Dichloromethane solvent cement.
Nice
A friend of mine used to section Perkins engines for display. He used to use chloroform to bond the edges of the acrylic display cases. Is this the way you did it?
I too use chloroform to glue plexiglas sheets together. I would like to point out another option as well (subject to avaliability): "nitro" based wood lacquer solvent. If it is still avaliable in your country, it will serve as excellent plexiglas glue.
In either case (chloroform or nitro solvent) make sure you have some plexiglas filings handy, dissolve them in your glue of choice (keep adding filings or shavings until you get somewhat sticky, very warm honey-like compound) and then smear this goo onto surfaces that are to be glued together. Press them firmly against each other so that you drive the air bubbles out.
This method sounds interesting, but messy. Seems like you would have ooze-out when you press the pieces together. I wonder how well it works by using a bottle with needle applicator without thickening?
Try it out with some scrap bits first to get a feeling of how much is enough. It doesn't take much as the "glue" slightly softens the material and bonds it together. I never had any problems with this method, it didn't take much practice either.
I never considered application via hollow needle because any material used as a glue evaporates eventually, leaving you with a lump of solid plexiglas which you woul have to soften again in order to reuse your applicator (and softening large blob is considerably more difficult than liquifying small shavings). Just smear it onto the surface you wish to glue together with a toothpick or a small spatula.
I never considered application via hollow needle because any material used as a glue evaporates eventually, leaving you with a lump of solid plexiglas which you woul have to soften again in order to reuse your applicator (and softening large blob is considerably more difficult than liquifying small shavings). Just smear it onto the surface you wish to glue together with a toothpick or a small spatula.
Thanks for the great info
Clive my mate had the luxury of large milling machines and polished the edges. They clamped the edge up nice and square with no gaps then just ran chloroform along with a small paint brush relying on cappillary action to draw it in.
Obviosly chloroform is rather hard to get but I do have access to loads of dichloromethane based thinners. I dont know the exact chemical make up but its nasty stuff I will get some and try it out.
Putting filings in to make up a glue or maybe even a thinner varnish is a great idea. Does it dry completley clear?
Thanks to the OP for starting this thread as I have been thinking about using an acrylic tube around some QQV06-40 to allow forced air and keep fingers off the anodes. The air should keep them cool but dont know about radiated IR.
Cheers Matt.
Clive my mate had the luxury of large milling machines and polished the edges. They clamped the edge up nice and square with no gaps then just ran chloroform along with a small paint brush relying on cappillary action to draw it in.
Obviosly chloroform is rather hard to get but I do have access to loads of dichloromethane based thinners. I dont know the exact chemical make up but its nasty stuff
I will get some and try it out.Putting filings in to make up a glue or maybe even a thinner varnish is a great idea. Does it dry completley clear?
Thanks to the OP for starting this thread as I have been thinking about using an acrylic tube around some QQV06-40 to allow forced air and keep fingers off the anodes. The air should keep them cool but dont know about radiated IR.
Cheers Matt.
Putting filings in to make up a glue or maybe even a thinner varnish is a great idea. Does it dry completley clear?
Well, as a former politician woudl put it: that depends on your definition of "clear"
If there is no dust trapped inside the glue or on the surface of sheets being joined together, it will be just as translucent as a sheet of plexiglas. These are usually not quite as clear as a clean glass even if cleaned thoroughlym I always have the feeling that there is some tiny dust clinging to it that cannot be washed away. If that meets your definition of clear then yeah, clear it is. This basically softens both sheets that you are gluing together so don't overdo it with the thinner or you may end up with disfigured material. Try it out on some scrap bits first.
Oh and whatever kind of vessel you decide to prepare your glue in, make sure your significant other will not ask to have it back - once thinner evaporates the leftovers will solidify. You best bet would be something disposable but unless you work in a laboratory you'll probably have hard time getting scrap glassware that was to be junked anyway.
- Status
- This old topic is closed. If you want to reopen this topic, contact a moderator using the "Report Post" button.
- Home
- Amplifiers
- Tubes / Valves
- Plexiglass case for small tubes?