Hello,
I just finished wiring up my most recent build, the Hagtech Clarion 2A3: http://www.hagtech.com/pdf/clarionarticle.pdf
There is something wrong though and I am unsure where to start.
It by nature is a fairy low sensitivity amplifier requiring 4vrms to drive to clipping at a stated 3 watts. I did however bypass the driver cathode and estimate it is now somewhere around 3vrms. The problem is it plays very quiet, like the power is being held back somehow. The reason I say it this way is b/c the strangest thing happens when I power it down with the signal still running to it....the volume increases to what I would think is a normal lever for just a few seconds then fades away. If you power it back up while the volume is coming up it immediately dampens the volume back down to almost a whisper. I have powered it on and off several times and as best I can tell it sounds truly great as soon as you power it down for that 2-3 seconds the volume rises. Anybody have any ideas what could be going on here? Did I wire a cap up backwards or something (don't think I did)?
I have never heard of something like this but I'll bet there is somebody on this post who has. Any help greatly appreciated.
Sincerely,
Jeff Miller
Lawton, OK, USA
Attachments
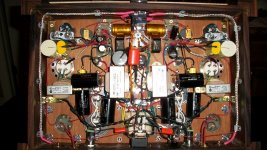
What is the combined DC resistance at output tube's cathode ?
It is supposed to be 680R plus whatever the #47 bulb puts into the path.
It does behave this way on both channels.
I have not yet had the time to put a DDM on it with the tubes in it. I did do some voltage checks without the tubes but they were way off b/c there was no current running through the system. I did a sim on PSUD2 without current running through the system to see if the voltages would behave the same way and they did. The B+ rises to 410v without the tubes, exactly what PSUD2 showed with a 1mA load on the system. So I am pretty sure they are correct but, again, I haven't had a chance to put the voltmeter on it yet with the tubes in and warmed up. I am thinking one of the bias points is off and when the power falls the bias point falls, or something like that.
Another idea is the bulbtype on the cathode of the 2A3 might be the wrong one, I am not home yet but that might explain it, if the bulbis wrong than the cathode resistance would be off and the 2A3 not biased at the proper point, when the power falls off the bulb filament cools a little causing the resistance to drop and the bias point to come in line to where it should. I could just bypass the bulb altogehter and see if that works. Besides that, what else could cause the output to rise as the unit is powered down? I have never seen anything like this before. I am confident that it will sound great once I get it corrected as it sounds really good for that brief period of time when it is powering down.
Jeff
Try disconnect C2 - 10 uF from PS
Why would disconnecting C2 help anything, just curious as to what exactly this "parafeed" cap does anyway to help the amp?
Jeff
It is supposed to be 680R plus whatever the #47 bulb puts into the path.
Schematic says #49 lamp, not #47.
I was just in Lawton, OK a few weeks ago near the Goodyear plant. Wish I knew you were around, I would have begged to come see your amps. The woodwork on this one is absolutely gorgeous. Hope you figure out the difficultly. I'm guessing a voltage check will tell all, and now I'm double suspicious of the lamp in the tail of the finals. Good luck.
Ty,
I actually mis-stated what I intended to say. Either way, I could have the wrong value in and need to recheck them. I sent you a PM with my phone number, please call me next time you are in town you are more than welcome to drop in.
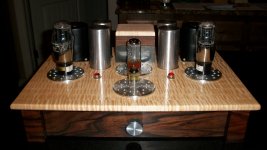
I stepped out on a limb on the wood work on this one and it turned out really nice. It took a little bit of time to cut down the Tiger Maple and laminate it all together but it really wasn't hard to do. I find the best results are fairly simple in design but use very high quality materials. If I had done it in Oak it wouldn't be much to mention.
I am in the process of finishing parts acquisition on the JEL 300B dx and will be building a set of monoblocks the same way I did this one since it turned out so well. Spanish Modena is very hard to find and costs about $20 a bdft but, if you find it, make the investment and get some, it is easy to work with and really looks fantastic. I have probably about $50 in Modena in this amp with all the cut offs required to get what I wanted out of the wood. The Tiger maple is also about $20 a bdft and hard to find, but not as hard as the Modena. The trick to getting the Tiger Maple to look so 3D is to do a sanding with 220, 330, then a final with 400 grit. Before the polyurethane goes on I apply several coats of Danish oil. This MUST dry for 4-5 days before the poly goes on or the poly will never dry right. That is it, easy. If you just try to put poly or lacquer on the maple it will not turn out right, the Danish oil is a must.
Jeff
I actually mis-stated what I intended to say. Either way, I could have the wrong value in and need to recheck them. I sent you a PM with my phone number, please call me next time you are in town you are more than welcome to drop in.
I stepped out on a limb on the wood work on this one and it turned out really nice. It took a little bit of time to cut down the Tiger Maple and laminate it all together but it really wasn't hard to do. I find the best results are fairly simple in design but use very high quality materials. If I had done it in Oak it wouldn't be much to mention.
I am in the process of finishing parts acquisition on the JEL 300B dx and will be building a set of monoblocks the same way I did this one since it turned out so well. Spanish Modena is very hard to find and costs about $20 a bdft but, if you find it, make the investment and get some, it is easy to work with and really looks fantastic. I have probably about $50 in Modena in this amp with all the cut offs required to get what I wanted out of the wood. The Tiger maple is also about $20 a bdft and hard to find, but not as hard as the Modena. The trick to getting the Tiger Maple to look so 3D is to do a sanding with 220, 330, then a final with 400 grit. Before the polyurethane goes on I apply several coats of Danish oil. This MUST dry for 4-5 days before the poly goes on or the poly will never dry right. That is it, easy. If you just try to put poly or lacquer on the maple it will not turn out right, the Danish oil is a must.
Jeff
I case If C2 is not good more some +U, how U will be on cathode, and how will be betweenWhy would disconnecting C2 help anything, just curious as to what exactly this "parafeed" cap does anyway to help the amp?
Jeff
Anode and cathode and what will be work-point of tube. You can measure.
Ty,
I actually mis-stated what I intended to say. Either way, I could have the wrong value in and need to recheck them. I sent you a PM with my phone number, please call me next time you are in town you are more than welcome to drop in.
I stepped out on a limb on the wood work on this one and it turned out really nice. It took a little bit of time to cut down the Tiger Maple and laminate it all together but it really wasn't hard to do. I find the best results are fairly simple in design but use very high quality materials. If I had done it in Oak it wouldn't be much to mention.
I am in the process of finishing parts acquisition on the JEL 300B dx and will be building a set of monoblocks the same way I did this one since it turned out so well. Spanish Modena is very hard to find and costs about $20 a bdft but, if you find it, make the investment and get some, it is easy to work with and really looks fantastic. I have probably about $50 in Modena in this amp with all the cut offs required to get what I wanted out of the wood. The Tiger maple is also about $20 a bdft and hard to find, but not as hard as the Modena. The trick to getting the Tiger Maple to look so 3D is to do a sanding with 220, 330, then a final with 400 grit. Before the polyurethane goes on I apply several coats of Danish oil. This MUST dry for 4-5 days before the poly goes on or the poly will never dry right. That is it, easy. If you just try to put poly or lacquer on the maple it will not turn out right, the Danish oil is a must.
Jeff
I have to agree with Ty, this really is quite a stunning project. You did a great job. I've recently gotten into VERY basic woodworking and I'm totally in love/amazed by the various types of wood out there. If you have any other pictures of the construction process, or other projects, I'd love to see how it went together (especially the laminated maple). I've got some very nicely figured Bubinga that is being fashioned into a chassis for a little Chinese EL84 amp I recently purchased. It's a PAIN to sand, but its pretty!
Unfortunately I did not take any pics of the build process of this amp but I am about to start some monoblocks using the same design for the chassis. I could take some on this project. It was quite simple though, I just ripped a piece of 8" wide x 1" thick piece of Maple lengthwise into 3/8" strips then placed them side by side on the 1" axis (each strip is now 1" wide and 3/8" thick) and glued them together using wood glue and several clamps. Later I sanded it down and applied a piece of 3 ply cherry veneer to the back side to give added strength. Adding the veneer causes the plank to bow away from the veneer so you have to put it under a heavy press (sandwich between 2 pieces of MDF with about 200# on top while it dried) Even with the press it still bowed some but I was able to flatten it out by screwing it down to the chassis frame.
I never start with a plan, I just start cutting wood and see where it takes me. The corners on the chassis were an afterthought, it looked too plain without them.
My monoblock chassis will have a top diameter of 10X14" each with about a 1/2 off set for the frame giving an internal dimension of 10x8" accounting for the 1/2" thickness of the frame material.
I will post some pics on the 300B builder's thread found under my profiles history of posts, you can follow along there as I build this set. It will start in a couple of weeks.
Jeff
Time to buy more tools....
I have bought tools new and tools used and I'm certain the best way to go, at least when you are starting, is used. Hit the pawnshops and garage sales, never give asking price, talk 'em down. My main tools I use are a small craftsman table saw,drill, a power miter saw, and a sander.....and lots of clamps. You would be suprised at what you can do with just these few tools and time. Always take your time, never rush....you will save yourself lots of headaches and wood.
Most big cities will have an exotic lumber outlet, make yourself known there to whoever is in charge and/or friendly and ask them to call you with any specials they might be running. Often these places will get a few wierd cutoffs or oddball pieces of wood in the bundle they buy, these can make great pieces for building amps.....have somebnody there put them aside for you and come around once a month or so. Also, if they actually process the wood there ask them if you cn dig through their scrap pile. These are some of the ways I get great deals on nice wood.
BTW I didn't pay full price on the lumber used for this project. Some were cutoffs and some were oddball pieces, I got both kinds of wood for less than 1/2 of regular price.
Jeff
That is the first thing I would suggest you do.I have not yet had the time to put a DDM on it with the tubes in it.
I'm taking a long shot here, but how bright is the lamp?
Anyway, if my calculations are correct, you should be able to (temporary) bypass the lamp. 680 ohm and a current of 56 mA should give you approx the wanted 40v bias.
To be sure, measure the cathode voltage, if its about 40v when in use, leave the lamp.
If its much lower or higher, try the bypass.
gr. Paul
What a beautiful amp.
Did you check the filament voltages for the 2A3s are correct?
If its not, then the filament tranformers are broken. You can see in picture nr 2 that they are 2.5v CT/ 3A, which is perfect. I suspect that the CT goes to the power-resistor, and then to the bulb. Looks also good to me.
And indeed a beautiful amp! He shure knows how to build them.
I wonder if he made the metal disks by hand, or CNC milled them.
gr. Paul
- Status
- This old topic is closed. If you want to reopen this topic, contact a moderator using the "Report Post" button.
- Home
- Amplifiers
- Tubes / Valves
- Need help solving problem on new 2A3 build