Hi all,
I have been working on my new 845 amp for about 6 months now
This one is taking a lot longer than expected!!
I have posted lots of questions here, some of them not so clever, but I would not have been able to get this far without the help of everyone, so thanks to all who have helped me thus far.
I thought that I would post a couple of progress photos to show where I am at.
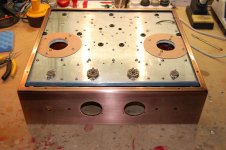
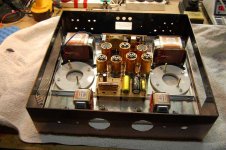
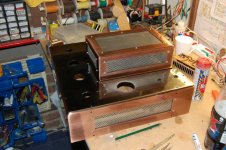
The chassis has been completed (finished in aged copper and pewter) and I have basically completed all of the boards - they just need to be put in the chassis and hooked up.
This amp is huge!! there is a 'mini' second story to house all the chokes. This sits on a top plate that covers the plate that you can see in the picture. I did not include a picture of these as I will post when the amp is completed.
The ceramic insulating spacers were cut out of bathroom tiles and the 845 sockets will mount under these.
I think I should have it finished within a couple of months and will post again with a follow up when I have complected the wiring.
Thanks for he help so far.
Cheers,
Rob
I have been working on my new 845 amp for about 6 months now
This one is taking a lot longer than expected!!
I have posted lots of questions here, some of them not so clever, but I would not have been able to get this far without the help of everyone, so thanks to all who have helped me thus far.
I thought that I would post a couple of progress photos to show where I am at.
The chassis has been completed (finished in aged copper and pewter) and I have basically completed all of the boards - they just need to be put in the chassis and hooked up.
This amp is huge!! there is a 'mini' second story to house all the chokes. This sits on a top plate that covers the plate that you can see in the picture. I did not include a picture of these as I will post when the amp is completed.
The ceramic insulating spacers were cut out of bathroom tiles and the 845 sockets will mount under these.
I think I should have it finished within a couple of months and will post again with a follow up when I have complected the wiring.
Thanks for he help so far.
Cheers,
Rob
Attachments
Hi Nick,
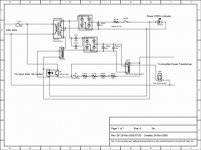
It's a modification of Andrea's 845. Using 12au7 drivers instead of the 12ax7 and a different soft start. Otherwise much the same
http://www.audiodesignguide.com/New845/New845v2.html
I hope that it ends up sounding OK - I have spent a lot of time on this one!
Cheers,
Rob
It's a modification of Andrea's 845. Using 12au7 drivers instead of the 12ax7 and a different soft start. Otherwise much the same
http://www.audiodesignguide.com/New845/New845v2.html
I hope that it ends up sounding OK - I have spent a lot of time on this one!
Cheers,
Rob
rdf said:What's the story on the chassis? Very slick.
The chassis was designed for this amp.
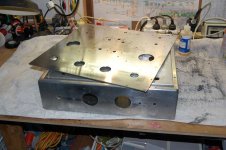
In short, I make it as a cardboard 'mock-up' and then I use a local metal shop to have it made up in aluminum. The guy that I use curses every time that he sees me - he claims that he hates making them as the measurements have to be precise but after a lot of whinging and moaning he eventually turns out good work.
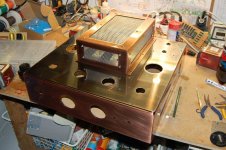
I then have it electroplated and lacquered. In this case antique copper and pewter - a combination I initially did not like but it's now growing on me. The power transformers sit on either side of the little box at the top and the covers of these have been electroplated as well.
There is a top plate and a middle plate. The middle plate has all the components attached to it and the top plate holds the power transformers and sits over the middle plate to hide all of the screws etc. There is also a base cover not shown in any of the photos. The main box and top is 3mm aluminum and the rest (including the middle plate) is 2mm.
In this particular amp there is a another box on top as there were too many transformers and chokes to fit in the main box! Also, lots of ventilation holes covered in steel mesh cut from an old metal tray that I had lying around. There are two large holes at the front for the bias meters (old aircraft ammeters I think).
If you search under my name, you can find some other examples I have made using a similar design.
I have included a couple of extra photos.
Thanks for the interest.
Rob
Attachments
Work in progress
Rob..
A classic in the making.
Who was the Artist who said ...The sculpture was in there, just waiting for me to remove the stone surrounding it.
Very intricate work....A well thought out approach...intelligent design.
Deserving a place in an Art Museum...........Oh thats right, you've gotta finish it first.
__________________________________________Rick..........
So how did you change the soft start??
MichelangeloWho was the Artist who said ...The sculpture was in there, just waiting for me to remove the stone surrounding it.
") ; still has a slight edge over the amp chassis imo
; still has a slight edge over the amp chassis imo Simon
Re: Work in progress
Hey thanks Nick. Actually the cost electroplating was really not too bad. I have to travel over to the other side of Sydney but they are surprisingly cheap. I was lucky to find guys that do it at a reasonable price. The chassis on the other hand....
To be honest the cost of this one has got out of hand and if my wife found out she would skin me!
Thanks Rick. I have attached a copy of the schematic which caused some controvesy at the time but I got it right in the end.
Thanks Nick, that's the idea. When those big old 845's are lit up, that exactly what it should look like. With regards to the 'pewter 'finish, I think that it is chrome that they play with to get the effect but I will give them a call and get back to you with a definite answer.
I don't know Simon - wait till I get those bias meters in there. They really are the real deal. I have modified them with a blue LED backlight
nhuwar said:Ya I do agree that is a great looking chassis. I bet it set you back a few bucks LOL.
I was going to have some electro plating done on one of my chassis until I get the price
But man
Nick
Hey thanks Nick. Actually the cost electroplating was really not too bad. I have to travel over to the other side of Sydney but they are surprisingly cheap. I was lucky to find guys that do it at a reasonable price. The chassis on the other hand....
To be honest the cost of this one has got out of hand and if my wife found out she would skin me!
Richard Ellis said:Rob..
A classic in the making.
Who was the Artist who said ...The sculpture was in there, just waiting for me to remove the stone surrounding it.
Very intricate work....A well thought out approach...intelligent design.
Deserving a place in an Art Museum...........Oh thats right, you've gotta finish it first.
__________________________________________Rick..........
So how did you change the soft start??
Thanks Rick. I have attached a copy of the schematic which caused some controvesy at the time but I got it right in the end.
nhuwar said:I agree with Richard Ellis, a classic.
When I first saw it, it made me think of old Western electric or rca radio transmitters form the 20's. I mean broadcast transmitters.
I have one question what was the metal used for the pewter finish, do you know?
Nick
Thanks Nick, that's the idea. When those big old 845's are lit up, that exactly what it should look like. With regards to the 'pewter 'finish, I think that it is chrome that they play with to get the effect but I will give them a call and get back to you with a definite answer.
Klimon said:Michelangelo
Simon
I don't know Simon - wait till I get those bias meters in there. They really are the real deal. I have modified them with a blue LED backlight
Attachments
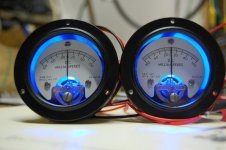
I couldn't resist.
The photo does not really do them justice. The marks on the face are very sharp and clear in real life.
They are heavy, full metal construction (A&M manufactured - formally Weston) and sealed against the elements with rubber gaskets. The face cover is glass. They look like they might have been made for aircraft instrument panels. They are high quality meters and incredibly cheap (I think about 8 bucks each).
Attachments

Rob11966 said:I couldn't resist.
The photo does not really do them justice.
They are heavy, full metal construction (A&M manufactured - formally Weston) and sealed against the elements with rubber gaskets. The face cover is glass. They look like they might have been made for aircraft instrument panels. They are high quality meters.
Rob11966 said:and in the dark - I find them strangely attractive - is that wrong?
SWEET I WANT SOME of those meters, your on a roll man.
As for the pewter, I don,t think it's chrome, you cant make chrome look like that. The closest you can get to it in chrome is what it looks like when it's exposed to high temp. And that has a brown tent to it. The easiest metal to get that color from is lead, which is the main constituent in old pewter. I know thats not what you have as most p[laces wont mess with Pb anymore.
And I don't know what the chemical comp of pewter is now a days. If I were to guess theres probably some tin in there. Thats the only metal beside lead that you can get a grayish patina from.
REALLY I want your your gauges LOL
Nick
nhuwar said:
SWEET I WANT SOME of those meters, your on a roll man.
As for the pewter, I don,t think it's chrome, you cant make chrome look like that. The closest you can get to it in chrome is what it looks like when it's exposed to high temp. And that has a brown tent to it. The easiest metal to get that color from is lead, which is the main constituent in old pewter. I know thats not what you have as most p[laces wont mess with Pb anymore.
And I don't know what the chemical comp of pewter is now a days. If I were to guess theres probably some tin in there. Thats the only metal beside lead that you can get a grayish patina from.
REALLY I want your your gauges LOL
Nick
Thanks again Nick. Have a look at fairradio.com and check out their meter section. It took me a while to find these guys and the communication is brief to say the least but they ship fast and they are cheap. The meters were actually $12!
As for the pewter finish, I will check and confirm.
JoshK said:Did you put a hole through the back side of the meters to pass the LED leads? I have some old stock meters I am using and always wanted to add LEDs to them, but a couple are hermetically sealed.
Hi Josh, these ones were sealed as well. Rubber gasket etc. Despite the stamp on the back indicating that they should not be dissembled, I pulled them apart, drilled a couple of small holes in the back and added the LED. I was afraid that I would destroy the meter but it was actually very straightforward in the end. In fact, they were so well made that everything just came apart beautifully and then back together without a hitch.
Cheers.
- Status
- This old topic is closed. If you want to reopen this topic, contact a moderator using the "Report Post" button.
- Home
- Amplifiers
- Tubes / Valves
- 845 - Progress so far