Mind posting final version. I am ashamed to admit i liked the SS rectification version best, but blame this partially, at least(or completely), on my own ignorance. I wil have to give it a shot, but would like to have your circuit as well. If nothing else, seems clever.
Last edited:
By the way as we speak I'm exporting a dxf for a friend to cnc a plate for the Salas 6v6. (He just completed a diy cnc machine) So I'm curious to see how well it will turn out...Smallest bit he has is 2mm..hence the font and thickness. Still it should look nice.
Cool, like special numberplate car cool kinda.
")
Hey Salas,
Still very much enjoying the Salas 6v6 pre! I find it hard to imagine anything being better. Still have not added the SSHV2's. I just have so little motivation for adding something to a project that works so well.
Regards,
Bas
If it ain't broken don't fix it they say...
Still do publish your B+ PSU config and your heaters PSU config when able since there are experiments going on here and guys would love more options that work well I think.
So how do I make a variable filament CSS best? One way would be to buy an expensive 2-3 W wirewound pot per channel and parallell with a 3 R ish resistor. Can anyone think of a better way?
http://www.onsemi.com/pub_link/Collateral/LM350-D.PDF
http://www.onsemi.com/pub_link/Collateral/LM350-D.PDF
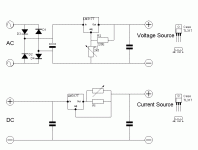
This is what I use. Simple but it works. (Plus I had the pcb's lying around doing nothing) I have the current source after the voltage source. But really some dc followed by a current source is good enough.
The pcbs can still be ordered if you don't want to do it p2p.
Scroll to LM317 PCB
A simple General Purpose PCB for Voltage and Current Sources
Or I'm sure there are cheaper alternatives on ebay.
The pcbs can still be ordered if you don't want to do it p2p.
Scroll to LM317 PCB
A simple General Purpose PCB for Voltage and Current Sources
Or I'm sure there are cheaper alternatives on ebay.
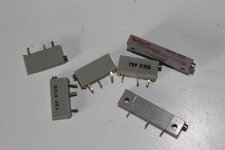
Attachments
Last edited:
So how do I make a variable filament CSS best? One way would be to buy an expensive 2-3 W wirewound pot per channel and parallell with a 3 R ish resistor. Can anyone think of a better way?
http://www.onsemi.com/pub_link/Collateral/LM350-D.PDF
Just check the app notes in that publication
.You can use a fixed sence resistor and a smaller pot for the setting.
Just check the app notes in that publication
You can use a fixed sence resistor and a smaller pot for the setting.
You say fig 22?
Thanks Bas. Doede makes nice stuff, I like him. How do I calculate the wattage needed on the CSS pot? I tried to figure it out the other day but something interupted me.
You know the current going thrue.
Ohms law will tell you the rest.
Then multiply for a good safety margin.
You say fig 22?
I´d say Bas solution is more KISS so go with that
.You don´t need the set span the other solution gives.
I´d say Bas solution is more KISS so go with that
You don´t need the set span the other solution gives.
Guess I'm ending up with expensive pots then since we're talking atleast one watt
Start by figuring out your max and min values for the resistor to get the desired set span.
Then choose a fixed resistor with the max value.
Then another fixed resistor that parallel with the first gives you the min value.
Add a pot in series with the second resistor.
That way you cant frye the pot turning it to zero.
Then choose a fixed resistor with the max value.
Then another fixed resistor that parallel with the first gives you the min value.
Add a pot in series with the second resistor.
That way you cant frye the pot turning it to zero.
Guess I'm ending up with expensive pots then since we're talking atleast one watt
Most current will pass the fixed resistor.
Adding a series resistor to the pot takes away the the high load at lower settings for the pot so no need for a huge pot.
You know the value of the resistor and the current for the tube that gives you the voltage drop across resistor.
Voltagedrop and value of second resistor gives you the max disipation in the pot.
I found those in a box. I dont know their values other then big ones are 200R ans small 100R, but a guess would be 750-1000 mW. I guess I can try with a fixed 2,7 parallelled with a fixed 12R in series with 200VR
2.7R ??
You need to start at a higher value and then lower it by parallel adjust.
3R3?
Sounds good.
Just keep in mind to start with a medium setting so you don´t ´fry the heaters.....
3R3? And maybe go lower then 12 in series with the pot to use that one resisting more then just a few ohms to ease it from passing high current. This is where I get a short in my head when I try calculating the wattage on the pot.
You can look at the series resistor and pot as a voltage divider.
So if you use a smaller series resistor you increase the load of the pot.
From the tube current 0.45A and the total resistor value 2.7ohm you get the voltagedrop over the resistor.
If you split that over the series resistor and pot you can calculate the dissipation in the pot.
Last edited:
Thank you. I know I sound silly here, the VR must pass same current if its serialed with a 6R or a 12R, its just that Im using the few ohms of its full variable resistance with the 12R and somehow something tells me that it going to fry it.
Pen and paper, here I come. Thanks!
Pen and paper, here I come. Thanks!
- Home
- Amplifiers
- Tubes / Valves
- 6V6 line preamp