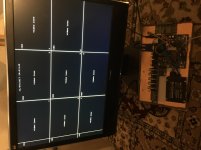
Soldered a number of small boards for ATmega328 and ATtiny85. These are supposed to house programmed chips that will be used in various installations.
The ATtiny will be used in a dia scanner using a projector for dia slides.
Didn't order parts for ALL boards, but I have to complete boards för ATtiny and five for ATmega.
The ATtiny will be used in a dia scanner using a projector for dia slides.
Didn't order parts for ALL boards, but I have to complete boards för ATtiny and five for ATmega.
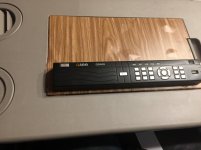
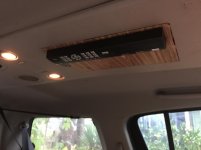
I built a DVR for my car. I was sick and tired of car registrators that do not record when it is needed. I tried several of them, all are crap.
Attachments
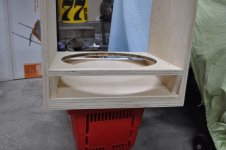
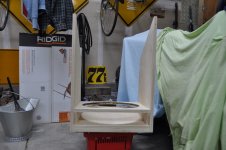
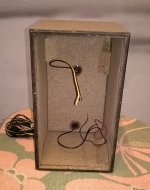
Not audio related, but the ugly table with the desktop PC in the dining room corner had to go.
I'm not sure this qualifies as an IKEA hack, but it does the job. Unused, the PC is now a nice cupboard that fits in with the other stuff in the room...


I used a small IKEA cupboard, fitted it with additional bracing, a VESA screen mount, retractable keyboard and a remote-switchable power distribution. Works nicely! Network connection is via WLAN and Powerlan, so there is only one mains connection going in.
Regards,
Rundmaus
I'm not sure this qualifies as an IKEA hack, but it does the job. Unused, the PC is now a nice cupboard that fits in with the other stuff in the room...
I used a small IKEA cupboard, fitted it with additional bracing, a VESA screen mount, retractable keyboard and a remote-switchable power distribution. Works nicely! Network connection is via WLAN and Powerlan, so there is only one mains connection going in.
Regards,
Rundmaus
3 test tops using the Fane Sovereign 12-250TC.
3 test kickbins using the the box Speaker 12-280/8-W.
numerous 6th order bandpass test subs using the Alpine SWG-1244.
All 12 inch rig (f3 28 hz).
Tops will be 1 to 2 per side.
Kicks 4 to 8.
Subs 8 to 16.
With the tops I am almost satisfied by now.
Kicks still need some fine-tuning.
Subs I am not sure if I should go isobaric on those.
I need to be ready for summer party time.
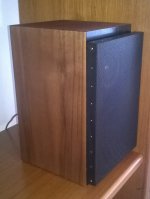
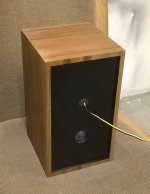
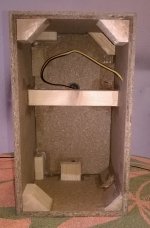
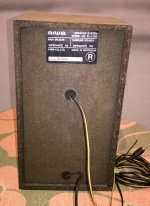
A transformation of "a cap only" crossover speaker into one properly filtered
I've had my share of fun using available scrap pieces of timber and veneer to make it look and sound like more presentable. The set is sounding wonderfully coherent, only light in bass which I don't mind considering TSP.
The original plastic front has made its way to a bin.
I've had my share of fun using available scrap pieces of timber and veneer to make it look and sound like more presentable. The set is sounding wonderfully coherent, only light in bass which I don't mind considering TSP.
The original plastic front has made its way to a bin.
Attachments

Another project of the anno domini 2017. Post #3098.
Chip Amp Photo Gallery
Chip Amp Photo Gallery
Dug up some old projects and made some effort to finish them:
A Digital Noise module, CGS31 from Ken Stone (1st model)
An Analogue Shiftregister, CGS35, also from Ken Stone
and
An SN VOICE module, almost a complete synth based on SN76477.
Also replanned a little regarding the 2SK1058 SE-amp. Had fixed a big box to house it in, but went to my old workplace, cut a few sheets of aluminium for a smaller one. If I don't loose too much initiative I may be able to finish that one in a week maybe.
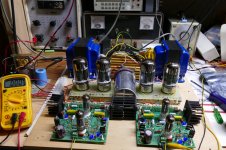
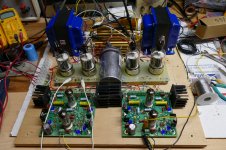
I built a breadboard prototype for what will become a few new amplifiers. This prototype is for evaluating tubes, transformers, and operating conditions.
The first picture shows it with GE 6550A tubes making about 70WPC in triode mode. The second picture shows it with 7403 tubes making 100 WPC in triode mode.
This video shows it annoying the neighbors through speakers at full crank! AKA "4 minutes of LOUD"
YouTube
The first picture shows it with GE 6550A tubes making about 70WPC in triode mode. The second picture shows it with 7403 tubes making 100 WPC in triode mode.
This video shows it annoying the neighbors through speakers at full crank! AKA "4 minutes of LOUD"
YouTube
Attachments
I repurposed an old digitech amplifier that only draws 6 watts at idle to amplify a cheap and nasty chinese wireless doorbell that wasn't loud enough.
I was also going to throw out a set of loudspeakers which weren't of any use to anyone but reused them for the doorbell.
Well its bloody well loud enough now! Big Ben strikes hard in our house.
I'll put it on a timer for now to save on power. But seeing as we have a solar power system here I don't see why I can't increase the power output even further and make the whole house shake whenever the doorbell is rung. *rubs chin*
I'm thinking of improving it by making up a hanging 12 inch open baffle loudspeaker that I can hang from the wall and let the wall act as part of the speaker with a high efficiency driver and running it from a SLA battery with a trickle charger. But I do have some spare 8 inch drivers laying around with a box that I could convert into an open baffle loudspeaker simply by removing the back, I just then need to stash some electronics inside of it and glue a piece of wood on the back to keep it away from the wall by a cm or two.
Last edited:

My Eleaf iStick Pico suddenly died during my happy hour so I turned into a Macgyver with a serious craving for nicotine.
A meter long piece of 1.5mmSQ 2 core speaker wire.
A gutted out Eleaf iStick Pico body.
Some solder.
A 20 amp blade fuse and fuse holder. (to prevent the battery from going kablewy in my hands, its unprotected.)
A DPDT mains latching switch.
and a single 5mm wide rubber o ring (to insulate the vape tank 510 thread from the body to prevent any possibility of a short)
Oh and a rubber band to hold the soldered end of the cable to each end of an 18650 battery.
And 8x soldered connections and 20 minutes later and I had a working vaporiser again.
It will do me until I get paid again and can afford to buy a variable lab bench power supply that will give me at least 4.2 volts at 10 amps (7.5 amps minimum) so I never have to bother around with 18650 cells anymore, or constantly charging batteries for that matter.
I should have done this a long time ago.
Last edited:
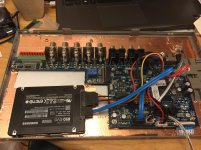
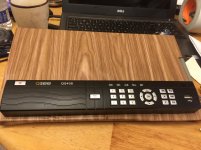
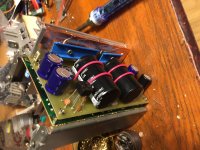
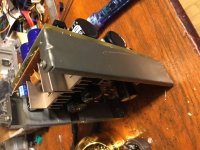
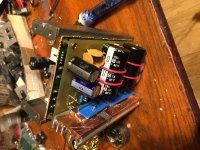
Improved power supply for my console.
Added voltage regulators between rectifiers and existing regulators based on 7815 and 7915. I suppose, ripples went down about 40 dB more.
Added voltage regulators between rectifiers and existing regulators based on 7815 and 7915. I suppose, ripples went down about 40 dB more.
Attachments
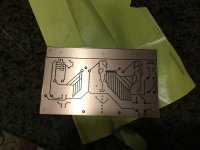
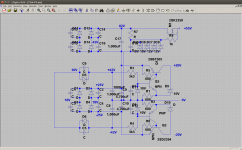
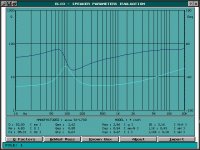
Made a Linkwitz/Reilly 24db/octave 100Hz active filter pcb.
Can you show it?
Can you show it?
An externally hosted image should be here but it was not working when we last tested it.
An externally hosted image should be here but it was not working when we last tested it.
- Status
- This old topic is closed. If you want to reopen this topic, contact a moderator using the "Report Post" button.
- Home
- Member Areas
- The Lounge
- What have you built lately?