Thanks! It was paypal, so it is even easier, I guess.Call them and email them and note the times and dates. Then call your credit card company and put the transaction into dispute. They can help you with this.
I expect they will ask me to send it back and they will send me a proper cover. The thing is that I do not want to pay ~$50 for the shipping, no body would pay 50 bucks for my mistake...
When you say "not supplied with a baseplate" do you mean there is no bottom cover for your chassis at all, or no perforated 'diy friendly' baseplate?
The chassis should come with a black, vented, steel bottom.
The latter. It came exactly as advertised. In my opinion the bottom cover is not sufficiently heavy to support the 14 lb toroidal transformer I intend to use. I'll probably rig a frame out of aluminum bar stock for my power supply and ancillary components if something better doesn't present itself.
Curt C
support the 14 lb toroidal transformer
FWIW, I used a 12lb (5.4kg) transformer in my F5 project, (4U chassis) and thought the exact same thing... It's totally fine. I can't speak with certainty that the 14lb transformer is going to have no problem, but I will bet you lunch at your favorite place that there won't be any issue.
")
FWIW, I used a 12lb (5.4kg) transformer in my F5 project, (4U chassis) and thought the exact same thing... It's totally fine. I can't speak with certainty that the 14lb transformer is going to have no problem, but I will bet you lunch at your favorite place that there won't be any issue.
Thanks for the confirmation, 6L6.
I see no issue except in my, uh, shall we say 'meticulous' nature... I'll cogitate on it and see what my imagination conjures up...
C
I know exactly what you mean - I still have a philosophical issue with the provided sheet metal screws they use in the steel-steel interfaces, but the simple truth of the matter is that those fasteners are the proper thing for the job, regardless of how cheesy they seem. The engineers know what they are doing.
I agree: IMHO, the ‘cheesy’ screws are acceptable if your presumption is they will only be R&R’d a few times. This may very well be the case for the majority of users, so that presumption is likely quite valid.
But in my dream world, I’d rather they punched the hole (leaving a thicker edge) and used self tapping counter sunk machine screws. -A minor point really, considering the quality/fit/finish of the rest of the enclosure.
They really are really first rate.
But in my dream world, I’d rather they punched the hole (leaving a thicker edge) and used self tapping counter sunk machine screws. -A minor point really, considering the quality/fit/finish of the rest of the enclosure.
They really are really first rate.
I just installed the diyAudio Store handles on my 4U chassis. Looks great! But, a couple of issues that the store needs to be aware of.
The cylinder handles are slightly short for the brackets. They move up and down a significant amount. Not enough to fall out, but sort of obnoxious. I added a small piece of cork gasket material into the mounting hole for the cylinder handles, and that stopped the rattling.
Two of the eight screws provided for mounting the brackets onto the front panel were slightly too large in the head diameter. They would not fit completely into the countersunk holes on the back of the front panel. Fortunately, I had access to a nice drill press and some very high quality drill bits, and could open up the holes a bit.
So, there seems to be two QA issues at the vendor.
1. Handle cylinders are slightly too short
2. Provided screws are too large for the 4U countersunk holes.
Normally not a problem for a DIY'er, but these are premium priced products.
These are the ones supplied with the chassis Parts Kit --
Dayton Audio BPFI-G Fully Insulated Binding Post Pair Gold | 091-630
Dayton Audio BPFI-G Fully Insulated Binding Post Pair Gold | 091-630
Has anyone odered the 4 U Delux Chassis with XLR's for an additional fee of $30.00 Euros from the manufacturer? There looks like plenty of room below the RCAs to install XLRs. However, the manufacturer wants CAD drawing of back plate to drill the XLRs. I do not have the software to do this. Hope some else has already done it.
Thanks in advance.
Thanks in advance.
1000volts:
For that price, you might consider getting the 5U deluxe chassis with the plain back panel from diyaudio's store and use Front Panel Express to mill it to your exact specification. Yes, it'd be bigger than what you'd initially wanted, but you'd have plenty of room...
Regards,
Scott
For that price, you might consider getting the 5U deluxe chassis with the plain back panel from diyaudio's store and use Front Panel Express to mill it to your exact specification. Yes, it'd be bigger than what you'd initially wanted, but you'd have plenty of room...
Regards,
Scott
So, there seems to be two QA issues at the vendor.
1. Handle cylinders are slightly too short
2. Provided screws are too large for the 4U countersunk holes.
Normally not a problem for a DIY'er, but these are premium priced products.
We have discussed these two items with Hifi2000 and...
- The next batch of handles will be specially manufactured to have less slack
- The countersunk holes will be slightly deeper in the next batch to accomodate the screws, which the screw supplier made out of specification (slightly larger)
Every little bit of feedback helps improve the product. Thanks very much.
Has anyone odered the 4 U Delux Chassis with XLR's for an additional fee of $30.00 Euros from the manufacturer? There looks like plenty of room below the RCAs to install XLRs. However, the manufacturer wants CAD drawing of back plate to drill the XLRs. I do not have the software to do this. Hope some else has already done it.
Thanks in advance.
This has been a not so uncommon request. I think we'll add them to the next batch. We don't have time to update the CAD diagrams right now, but I'll contact you when we do and you can either order the back panel directly from Hifi2000 or wait for the next batch (probably 4-5 months off).
I am looking for a chassis black powdered coated Steel 19W x 12D x 8H and 1/8" thick aluminum 13.5"x15"x 6" W x D x H
Rear Panel To be punched to my specs.
Thanks
Sorry we don't do custom work. Try Hifi2000 and see what they can do for you.
DIYAudio Store 4U Chassis Modifications
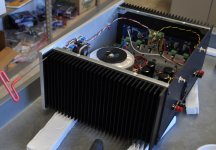
I was disappointed that heatsink removal from the Store 4U Chassis was so difficult after full assembly of an amplifier. Based on my experience with a Hafler 220, I made some modifications to the Store Chassis to make heatsink removal easy. I drilled 4 holes in the corners of each heatsink and in corresponding locations in the attachment brackets to attach the heatsink using #6 socket head screws from the OUTSIDE of the chassis. This allows the heatsink to be easily removed by disconnecting the amplifier PCB connections and removing these 4 screws, which is accomplished in a couple of minutes.
I was disappointed that heatsink removal from the Store 4U Chassis was so difficult after full assembly of an amplifier. Based on my experience with a Hafler 220, I made some modifications to the Store Chassis to make heatsink removal easy. I drilled 4 holes in the corners of each heatsink and in corresponding locations in the attachment brackets to attach the heatsink using #6 socket head screws from the OUTSIDE of the chassis. This allows the heatsink to be easily removed by disconnecting the amplifier PCB connections and removing these 4 screws, which is accomplished in a couple of minutes.
Attachments

HIFI 2000 Customized 3U - awesome
I decided that 4U was a bit too tall for my project so I checked out the standard offerings at HF2000. Unfortunately, they had no back panel laid out like the store options. I contacted Gianluca at HF2000 and he was very willing to make up drawings (for my approval) which modified the 4U rear panel layout for 3U (see pic). Then for a $30 upcharge, he was willing to ship that panel instead of the solid panel on his standard 3U heatsink chassis. Shipping was reasonable and fast and the packing was phenomenal. Just wanted others to know of this option since the store does not have one (but might be a great addition).
I decided that 4U was a bit too tall for my project so I checked out the standard offerings at HF2000. Unfortunately, they had no back panel laid out like the store options. I contacted Gianluca at HF2000 and he was very willing to make up drawings (for my approval) which modified the 4U rear panel layout for 3U (see pic). Then for a $30 upcharge, he was willing to ship that panel instead of the solid panel on his standard 3U heatsink chassis. Shipping was reasonable and fast and the packing was phenomenal. Just wanted others to know of this option since the store does not have one (but might be a great addition).
Attachments
I was disappointed that heatsink removal from the Store 4U Chassis was so difficult after full assembly of an amplifier. Based on my experience with a Hafler 220, I made some modifications to the Store Chassis to make heatsink removal easy. I drilled 4 holes in the corners of each heatsink and in corresponding locations in the attachment brackets to attach the heatsink using #6 socket head screws from the OUTSIDE of the chassis. This allows the heatsink to be easily removed by disconnecting the amplifier PCB connections and removing these 4 screws, which is accomplished in a couple of minutes.
Great idea. I was also disappointed in how the chassis assembles.
- Home
- The diyAudio Store
- Chassis Discussion