All parts are new, unused, in original pkgs. This pkg. does not include: chassis, hardware, wiring, inputs, outputs, AC/EIC connectors, PSU devices, fuse, nor parts that may be needed other than those listed. Opened only to check the orders. Will sell only as a complete pkg. and ship only within CUSA via UPS, FedEx or Priority Mail, insured with delivery confirmation. All items will be packed to insure safe travel in one carton. Expect significant savings on shipping vs. sourcing these parts separately. Buyer pays shipping/insurance costs. Accept Money Order or verified non-credit/debit card PayPal account. Price is $300.00 (Firm). My perfect feedback record on Audiogon and Ebay can be verified. I have some chassis parts to offer the buyer for an additional cost at significant savings described under 'Note' below. Please contact me for more info. Thanks for looking.
Parts for sale include:
2 TECH-DIY F5 kits
Each Kit includes the following:
2 P1, P2 - 5K Bourns 3266W or 3296Trimpot
1 P3 - 200 Ohm Trimpot
1 R1 - 4.7K or 4.75K CMF55/RN55
1 R2 - 47.5K CMF55/RN55
2 R3,R4 - 10 Ohm 1W Panasonic ECG
4 R5,6,21,22 - 2.2K or 2.21K CMF55/RN55
2 R7,8 - 0.68R 3W Panasonic ECG
4 R9,10,11,12 - 100R 3W Panasonic ECG
4 R13,14,17,18 - 100Ω, 0.25W, RN55D
2 R15,16 - 1k CMF55/RN55D
2 R19,20 - 10K CMF55/RN55
2 TH1,TH2 - 4.7K* Thermistor
1 set Q1,Q2 - 2SK170 + 2SJ74 (may be GR or BL)
1 Q5 - ZTX550 PNP Transistor (TO-92)
1 Q6 - ZTX450 NPN Transistor (TO-92)
1 Q4 - IRFP240pbf
1 Q3 - IRFP9240pbF
2 cviller F5 PCBs (Rev 2.0; 2010-10-23)
1 cviller F5 Power Supply PCB
2 cviller F5 rectifier PCBs
2 Conrad Heatsinks MF35-151.5 (Length=151.5 mm; width= 350 mm, Thermal Resistance C/Watt for 80 °C rise= 0.21)
1 4218 Antek toroidal transformer (115v primary, dual 18v secondaries)
Note: Can provide: FPE file/drawing for custom rear panel; file/drawing for custom top panel; 3/8” 6061 aluminum front panel (sized, polished & beveled); .125” 6061 aluminum for bottom panel. The heatsinks will make the sides for the chassis. Assembled amplifier would look like my F3 in the attached pictures. Will discount aluminum if purchased with the pkg. of parts; no charge for drawings. Together with above parts, the whole pkg. will save time and effort and result in a professional looking and attractive F5.
Attachments
If you aren't familiar with Front Panel Express software it's easy to use and available as a free download. You will have everything you need to draw a panel that can be customized to suit your particular needs and tastes. FPE software is available for Windows, MAC OSX and Linus. After you've drawn your panel, with a click of the mouse, you'll receive an itemized description with all details for your panel as well as a price quote. Just click on "Support" if you need help with your drawing.
")
No, I am not in a hurry.Fred, if you're not in a hurry, I don't mind sending the file. It's not on my computer currently since I made the drawing at the location where our diy group meets. I won't have access there until after RMAF and CES. Let me know if this will work for you.
Greatly appreciated.
Thanks!!
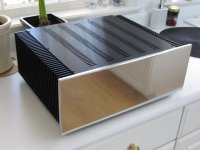
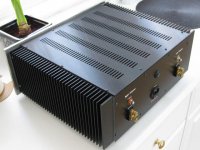
F5 Chassis info.
Thanks to all of you who have shown interest in my F3 chassis pictured with the F5 parts that have been sold.
The chassis was built entirely from separate parts that I sourced and not from a kit. As you can see in the F3 pictures, the Conrad heatsinks formed the
sides. I made the front panel from 3/8” 1061 aluminum. The top and rear panels were made by Par-Metal in NJ and Front Panel Express in Seattle Washington respectively
after submitting drawings. I drew the rear panel using FPE software; the top panel was from a drawing that others in my DIY group had used for other projects.
The bottom panel was purchased from All Metals Inc. in Adrian, MI.
Dimensions:
Front Panel: .675”D X 6.625”H X 18.00”W (6061 mirror finish)
Rear Panel: 3.00mmD X 6.125H X 14”W (Black Anodized)
Top and Bottom Panels: 13.875””W X 13.875”L
(Top panel was made from steel and painted satin black; bottom was
not painted.)
Assembly:
I drilled/tapped holes in the top and bottom edges of the heatsinks
to which the top and bottom panels then were fastened with screws. Holes were also drilled/tapped in the front and rear edges for attaching the front and rear panels.
These same panels were also connected to the front and bottom panels using metal angle brackets and screws.
After cutting the front panel from a larger piece of 6061 aluminum
using a table saw/carbide blade, the edges were filed and beveled using a router. Sanding and polishing steps included:
1st - dry sand with #320 grit (by hand)
2nd - wet sand with #500 (by hand)
3rd - wet sand with #2000 (by hand)
4th - wet sand with #3000 (by hand)
5th - polish with buffer/soft pad and Mother’s Mag & Aluminum
cleaner polish.
After all oxidation was buffed out and the surface as smooth as glass, I then applied 8 to 10 coats of Johnson’s paste wax, hand polishing after each coat with several
microfiber cloths. The front panel on my F3 has remained shiny and relatively free of oxidation after 2 years.
Before assembling the panels, I drilled/tapped the holes into the heatsink sides for mounting the amp boards. Likewise holes needed to secure the
PSU and output capacitor boards, transformer, chassis feet etc. were drilled in the bottom panel. (Instead of the big output cap, I used 15 Elna Silks in parallel per channel.)
Of course I haven’t included every detail, but hope this will give you enough info. to understand how the chassis was made. I'll try posting some pictures that show details.
- Status
- This old topic is closed. If you want to reopen this topic, contact a moderator using the "Report Post" button.