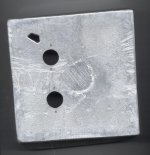
The circle in the middle (on both shots) is what's left of the sprue, where the metal is poured in. I'll try pouring in the edges (bottom) instead next time.
The two round holes are for tubes (the pattern has 5/8" holes, I filed them larger here for 3/4" 9-pin sockets), the third, oddly-shaped hole is a casting defect (mold didn't fill completely).
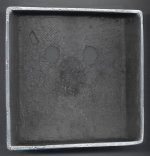
Bottom:
Tim
The two round holes are for tubes (the pattern has 5/8" holes, I filed them larger here for 3/4" 9-pin sockets), the third, oddly-shaped hole is a casting defect (mold didn't fill completely).
Bottom:
Tim
Attachments
What kind of sand did you use? What binder? My furnace doesn't get hot enough on electricity, so I made a body section for propane. It's curing right now. I don't plan to spend much on specialty ingredients. I haven't even made or acquired flask frames yet. I hope my first casting looks that good. I'm dreading that it'll collapse and not be worth the while to remelt.
Dan
Dan
Hey, a fellow caster! ")
I used washed silica sand (unknown grit #) and ball clay (ideally should be bentonite, but that's all I could get; seems any clay will work). Mix and mull it until it gets sticky enough, not too moist, not too dry...
The sand really needs more fine particles, that would fill in the surface real good.
Flasks are simple enough, I just nailed together some 1x4s. Don't forget the alignment pins!
If you want your first casting to come out good, then make sure your sand is good, and at least vent the mold a little so you know gas isn't slowing the pour. A common mistake is pouring too cold (I know it's common, I did it all the time ), for aluminum a red salmon glow is the right temperature. (Be careful in daylight, it's easy to miss the glowing - pour about when it's visibly glowing in that case.)
Just remember that you won't learn anything if everything keeps going right. Make mistakes!
Hmm.. obligatory disclaimer: I assume anyone interested in metalcasting understands the risks involved, and how potentially deadly five pounds of liquid metal flying through the air - propelled by as little as a single drop of water - can be.
Tim
I used washed silica sand (unknown grit #) and ball clay (ideally should be bentonite, but that's all I could get; seems any clay will work). Mix and mull it until it gets sticky enough, not too moist, not too dry...
The sand really needs more fine particles, that would fill in the surface real good.
Flasks are simple enough, I just nailed together some 1x4s. Don't forget the alignment pins!
If you want your first casting to come out good, then make sure your sand is good, and at least vent the mold a little so you know gas isn't slowing the pour. A common mistake is pouring too cold (I know it's common, I did it all the time
), for aluminum a red salmon glow is the right temperature. (Be careful in daylight, it's easy to miss the glowing - pour about when it's visibly glowing in that case.)Just remember that you won't learn anything if everything keeps going right. Make mistakes!
Hmm.. obligatory disclaimer: I assume anyone interested in metalcasting understands the risks involved, and how potentially deadly five pounds of liquid metal flying through the air - propelled by as little as a single drop of water - can be.
Tim
- Is there any interest in these? I can make them in pretty much any dimension, within about 10x10x2.5" for now. (I have a 10x10x2" pattern drying right now, after the varnish dries I'll try casting it and see if I can get it to work well.)
With a little work I should be able to make some nice heatsinks too.
Tim
With a little work I should be able to make some nice heatsinks too.
Tim

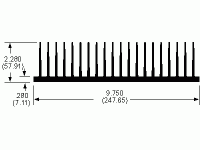
how about this one from aavid?
it's 0.38°C/W, pretty good. almost good enough for the zen v4 anyway...dunno about the other pass amps.
/andrew - looking for a cheap zen v4 heatsink
it's 0.38°C/W, pretty good. almost good enough for the zen v4 anyway...dunno about the other pass amps.
/andrew - looking for a cheap zen v4 heatsink
Hmm, a little tall at 2.8" (that leaves .7" of sand left to support it, not much when you have 50lbs. of it on top, and 5lbs. of aluminum coming in later), but I can make something like that.
Lesse.. 2 1/2" fins, 3/16" at the base, tapering to maybe 3/32" at the end. Back plane can be 1/4" plate...
Should be easy enough to make patterns in any combination of length and width, but there's no way I'm cutting that much after it's cast. (Sux having no bandsaw! )
Tim
Lesse.. 2 1/2" fins, 3/16" at the base, tapering to maybe 3/32" at the end. Back plane can be 1/4" plate...
Should be easy enough to make patterns in any combination of length and width, but there's no way I'm cutting that much after it's cast.
(Sux having no bandsaw! )Tim
Oh.. so it is
Hmmm. I don't really have to buy anything, but time is money, so maybe $20 each? Hmm, I can't find any typical prices to base this on...
Hmm, the fins themselves are 2", that 2.28" figure includes the base..I see...
Tim (guess I better get looking for more scrap to melt )
Hmmm. I don't really have to buy anything, but time is money, so maybe $20 each? Hmm, I can't find any typical prices to base this on...
Hmm, the fins themselves are 2", that 2.28" figure includes the base..I see...
Tim (guess I better get looking for more scrap to melt
)- Status
- This old topic is closed. If you want to reopen this topic, contact a moderator using the "Report Post" button.