BrianGT said:
As goes the wife... I have no wife so there is no problem.
With boxes like that, you might never find a wife.
")
Banned
Joined 2002
BrianGT said:
2nd time in 2 days i've run into galleries put up with that gallery software. On both of them the page blows out so wide as to be almost useless (another generated bug that Exploder ignores encoraging buggy html). Between each column of pictures is about 10 columns of empty space...
dave
Re: quote: As goes the wife... I have no wife so there is no problem.
Actually... she doesn't really care about the size and appearance, but rather the time that I spend on my projects. It isn't too bad, since she is always busy studying (she is a senior Chemical Engineering major at school here at georgia tech... the hardest major at the school)...
It shouldn't look too bad when it is finished. I am covering the top and sides with 1/4" baltic birch, and the bottom with another 3/4" sheet to make the baffle flush with the driver. I will round the edges, and stain and polyurethane it. I haven't found out a good idea for feet yet. Any suggestions? Also, I can't decide on a stain color. What goes good on Baltic Birch?
--
Brian
fcel said:You've got a girlfriend. Girlfriend is same as wife ... almost.
Actually... she doesn't really care about the size and appearance, but rather the time that I spend on my projects. It isn't too bad, since she is always busy studying (she is a senior Chemical Engineering major at school here at georgia tech... the hardest major at the school)...
It shouldn't look too bad when it is finished. I am covering the top and sides with 1/4" baltic birch, and the bottom with another 3/4" sheet to make the baffle flush with the driver. I will round the edges, and stain and polyurethane it. I haven't found out a good idea for feet yet. Any suggestions? Also, I can't decide on a stain color. What goes good on Baltic Birch?
--
Brian
"baltic birch"
That depends on the quality of the top veneer face - and personal taste. Natural or clear coat finishes may not necessarily include UV blockers, and can "suntan" quickly, more so on lighter colored veneers, but even on walnut, mahogany and especially cherry.
"Baltic Birch" is a generic term; to simplify things it's rather like "MDF", in that there is quite a wide range of qualities available, from "shop grade" not much good for anything other than laminating substrate, to premiere "architectural" which is exactly as the name implies (eg Apple Ply at well over $100 per sheet)
Having said that, it's not too difficult to test finishes on a scrap sample. Bear in mind that lower grade veneers may have some wild grain figuring as well as small pin-holes knots and larger patches that appear innocuous UNTIL you put a finish on them.
When all else fails, a sanding sealer or diluted wash coat of lacquer will help even out stain color.
My own finishing regimen:
Natural wood veneers:
Sand to 150G (random orbit)
seal coat
color matched wood filler on splits, knots, etc
hand sand 220G
color if any
minimum 2 finish coats (sand 220G between coats)
For "piano" grade paint finish on plywood or MDF - this can easily take more time than building the boxes (well worth considering contracting the final color coats to an auto-body shop.)
Autobody fine grade Polyester filler to entire surface of plywood, edges and screw holes only on MDF
Sand to 150G (random orbit)
spray color matched primer
hand sand 220G
spray min 2 color coat (auto body grade acrylic, (hand sand 220G - 320G between coats)
spray min 1 clear top coat (rub out with auto body rubbing compounds for sheen to taste)
question on stuffing
I received my stuffing and I also bought some 3M 77 spray adhesive to put it in the boxes. Should I just evenly spread the stuffing around the sides? What is the best way to use stuffing with the box. For my Thor TL speakers, it just sits there, not glued, filling the transmission line. The tempest EBS sub is huge and 64oz of polyfil fills only 1/10 of it. This sub is huge! (it does fit in my civic hatchback.... I am thinking of hooking my car sub amp up to it and see how bass I can get out of my car... (roll the windows down first of course)...
Any suggestions on stuffing the box?
--
Brian
Finishing the Birch
Brian - I'll assume the 1/4" birch ply has as superior face veneer to the baltic substrate(which can be porous and less than pretty)
The pre-stain treatment should be adequate to even out color, just double check compatibility with finish coat. I've got access to commercial woodworking and finishing shop, so I tend to use solvent based conditioners. wiping stains and spray post catalyzed NC lacquers, not polyurethanes, or paints if I can avoid it.
yeah, I went through about 80 sheets of plywood at home depot to find 5 sheets that I like. The face is pretty decent. I expect that they should stain alright.
As for the stuffing, I am planning on just covering the sides all around with it and see how it sounds. It should give me a little over 1" stuffing on the side walls. This should reduce the possibility of a reflection problem, as mentioned earlier in this thread. If I have any problems, I will add more wood inside of it as Dave mentioned. It sounds good now, but I finished kind of late last night and didn't want to wake up my neighbors. I will crank it up today and see how it sounds. I haven't finished the leach superamp for it yet, which should give it 500W into the 4 ohm load it provides.
--
Brian
BrianGT said:If I have any problems, I will add more wood inside of it as Dave mentioned.
Make sure you add it before you put the finish wood on it. Also keep in mind that by adding mass to the panels you will lower the panel resonance modes and need the extra bracing even more.
dave
I would do it now... but I don't have access to a table saw. I am planning on trying it out without the extra braces for now, and not finishing it with the extra birch yet. Then if I can find time in the next couple of weeks to get access to a table saw I will do it.
Will the stuffing help eliminate this problem? Should I put stuffing on the internal braces, or just the sides (I was planning on only the sides).
--
Brian
Will the stuffing help eliminate this problem? Should I put stuffing on the internal braces, or just the sides (I was planning on only the sides).
--
Brian
BrianGT said:Will the stuffing help eliminate this problem? Should I put stuffing on the internal braces, or just the sides (I was planning on only the sides).
No it won't -- it will only help kill higher freq stuff. I'd try some on the braces. Damping in the exact middle of a box is one of the most effective places for it.
The sub is assembled (not finished yet), and I put it in my '98 honda civic hatchback (barely fits). I am driving it with a 360W rockford fosgate amp that i got 3 years ago.
The sub is loud... It shakes the crap out of my car. I have to get out of the car and turn it up with the remote control. It goes pretty low.
I got my 2 leach superamp boards fixed (skipped a jumper and one side was clipping way too early). I also tested my power supply. All that I need to do to it is assemble. It should put out around 500W into the 4ohm load with the bigger transformer.
I am not going to worry about the extra internal braces, as I am probably going to sell the sub to a friend and build another one... (a little smaller next time). I am satisified with the quality of the tempest vented enclosure in the car, and it probably isn't broken in yet. I had to dig out the ear plugs to bear the excessive bass that it puts out. I also couldn't find an available table saw.
I will post pictures on my website in a couple of days. I am finishing my Seas Thor TL speakers for the DIY2002 Atlanta show on saturday (almost done, just need to finish compounding them to get a nice smooth finish).
I have the box cut out for the mid-Q sealed tempest (a bit smaller then 2'x2'x2') and it has a similar mid brace. What is the best way to modify this sub before I put it together. I had an extra sheet of mdf at my friends, and I all of the pieces for the sub with it.
--
Brian
BrianGT said:I am probably going to sell the sub to a friend and build another one...
Beauty. Watch out it could turn into a side job
I have the box cut out for the mid-Q sealed tempest (a bit smaller then 2'x2'x2') and it has a similar mid brace. What is the best way to modify this sub before I put it together. I had an extra sheet of mdf at my friends, and I all of the pieces for the sub with it.
If you can divide the panels into unequal trapezoids (ie an angled brace). Use irrational numbers. For example you could place a brace at 1:1.4142 of the panel and then rotate it about its centre to create placement of an angled brace with a predominantly irrational placement.
Hope that makes sense -- i've been doing such things as 2nd nature for so long ...
dave
Dave,
I really appreciate your advice. I will definately consider it before I start the sealed tempest.
Here is a pic of the sub now. The main baffle is flush except for the speaker jack, because i didn't take the time to make a square countersink hole. I will add the 1/4" birch to the sides next.
--
Brian
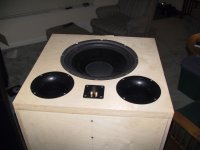
Attachments
- Status
- This old topic is closed. If you want to reopen this topic, contact a moderator using the "Report Post" button.
- Home
- Loudspeakers
- Subwoofers
- Tempest vented EBS subwoofer