thanks man, i apreciate the input ")
i checked the connectors i have, and i think i can fit them in the back of the subs. there is a 1,5cm space on both sides of the vent so i can fit the connectors through there maybe - it wont be much space for screwing on nut to hold the cable, but im sure i will think of something
and yes one pair of connectors will go on the front also but these cables i will pull through the inside of the enclosure (gf hates cables lol i must try to hide all of them as much as possible)
the connector type;
http://www.lautsprechershop.de/hifi/images/polklemme_pk31.jpg
edit - i think i thought of an solution already - if i put the connectors on a small piece of hardwood, i need to just make a slightly bigger hole in the enclosure, and i can screw on the cables before i glue or screw on the hardwood plate to the enclosure, covering the hole for the cables. i have several small pieces of oak which should do the trick.
i checked the connectors i have, and i think i can fit them in the back of the subs. there is a 1,5cm space on both sides of the vent so i can fit the connectors through there maybe - it wont be much space for screwing on nut to hold the cable, but im sure i will think of something
and yes one pair of connectors will go on the front also but these cables i will pull through the inside of the enclosure (gf hates cables lol i must try to hide all of them as much as possible
)the connector type;
http://www.lautsprechershop.de/hifi/images/polklemme_pk31.jpg
edit - i think i thought of an solution already - if i put the connectors on a small piece of hardwood, i need to just make a slightly bigger hole in the enclosure, and i can screw on the cables before i glue or screw on the hardwood plate to the enclosure, covering the hole for the cables. i have several small pieces of oak which should do the trick.
Last edited:
http://www.lautsprechershop.de/pdf/mivoc/aw3000.pdf
Vas=97L
Qts=.31
Fs=27hz
Two of these in a box of around 90L and ported to 27hz with a filter with a Q=2 at 27hz will be -3dB at 27hz.
Looks like a great driver for the money.
Vas=97L
Qts=.31
Fs=27hz
Two of these in a box of around 90L and ported to 27hz with a filter with a Q=2 at 27hz will be -3dB at 27hz.
Looks like a great driver for the money.
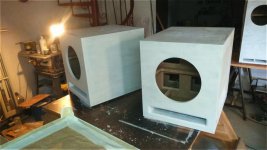
the subs are finally done. well at least the paint/varnish job - next up will be connectors and foam and some wax polish..
these weigh 60 kilos each. its a lot more annoying to move around than i wanted but, once they are up in the living room they wont move ever again these will be the last to be moved since their weight - the harder something freshly painted is grabbed the more likely there will be marks..
ill post pics as soon as i can
these weigh 60 kilos each. its a lot more annoying to move around than i wanted but, once they are up in the living room they wont move ever again
these will be the last to be moved since their weight - the harder something freshly painted is grabbed the more likely there will be marks..ill post pics as soon as i can

the front connectors for the external woofer part of the clam mount needs a little more work.
the separating ring for the clam mount is finished. it took me more or less 3 weeks but i finally did manage to steam bend mahogany strips. the strips were about 8mm thick and this kind mahogany really didnt like to get bent at all, not even after 2 hours in steamer.. i had to do it too many steps to even count them all. also since the wood i cut out the strips from was not too long, i had to do 2 pieces for each ring, and join them in the glue up with scarf joints.
i also as safety measure to prevent the scarf joints to open by time, i glued a few decorative steam bent bits of contrasting birch wood and mahogany to cover the joints.
the subs are ready only need to wax the wood in the separator rings.
only need to wax the wood in the separator rings.An externally hosted image should be here but it was not working when we last tested it.
An externally hosted image should be here but it was not working when we last tested it.
An externally hosted image should be here but it was not working when we last tested it.
An externally hosted image should be here but it was not working when we last tested it.
An externally hosted image should be here but it was not working when we last tested it.
pics of finished subs in corporated into my TARKUS setup!
http://www.diyaudio.com/forums/multi-way/270061-building-tarkus-13.html
http://www.diyaudio.com/forums/multi-way/270061-building-tarkus-13.html
- Status
- This old topic is closed. If you want to reopen this topic, contact a moderator using the "Report Post" button.
- Home
- Loudspeakers
- Subwoofers
- the isocube project