Hello everyone, I have been seen a few cab design and have liked to build a pair of TH18 and a pair of Tham15. My question is, on the TH18 can building, how do you attach the braces on the panels when you are on a tight spot, it is just "GLUE" or you must also use "screws"? Thanks in advance
Ralph
Ralph
Hi and welcome to the forum, I guess it depens what kind of method you use when you build... if you build from inside out, and use the brace as a wedge between two already installed panels, glue could be enought. But screws or nails will secure it 100% so I would recommend that.
I also want to tell you that using the TH18 and the THAM15's together might not work optimally, if you want serious thundering bass from a rig you should stick to the same design, otherwise, happy building")
I also want to tell you that using the TH18 and the THAM15's together might not work optimally, if you want serious thundering bass from a rig you should stick to the same design, otherwise, happy building
Screws, Brad nailes, clamps, etc, all will work nicely. When building a new design (new to me at least), I like to complete dry assemble the first cab with screws, dissasemble, glue and screw the braces to one of the panels they touch based on my desired build order,then glue and screw the whole cab together (minus side 2. Let glue dry overnight, remove as many screws as possible (won't be able to get to a lot of them) Then attach side 2.
Screws, Brad nailes, clamps, etc, all will work nicely. When building a new design (new to me at least), I like to complete dry assemble the first cab with screws, dissasemble, glue and screw the braces to one of the panels they touch based on my desired build order,then glue and screw the whole cab together (minus side 2. Let glue dry overnight, remove as many screws as possible (won't be able to get to a lot of them) Then attach side 2.
Why do I need to remove the screws, I thought that glue + screw hold cabs together better? Thanks
you are welcome to leave the screws in. But for a clean finish, its best to remove the fasteners, and then fill the holes with bondo, or your preferred wood filler,
this way you can use a 3/8 roundover bit on the corners wth a router (without hitting screws and slinging metal into your face), and sand appropriatly (without messing up your sandpaper).
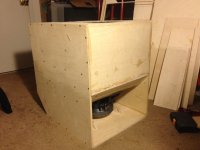
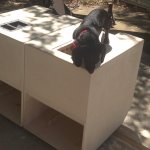
first pic is technically a functional cabinet (with all the screws still in place) . Pic 2 is after I removed all the screws, filled the holes, and did 5 hours of finish work.
Use PL premium adhesive and from a strength standpoint, screws in vs screws out means nothing
If you have never built a horn subwoofer before, I recommend you buy Bill Fitz maurice Auto Tuba, Or T18 plans, as that cab can be built for under 150 dollars, and it will teach you the basics of horn subwoofer construction (knowledge of which you can apply to a tham or a th18 build afterwards).
this way you can use a 3/8 roundover bit on the corners wth a router (without hitting screws and slinging metal into your face), and sand appropriatly (without messing up your sandpaper).
first pic is technically a functional cabinet (with all the screws still in place) . Pic 2 is after I removed all the screws, filled the holes, and did 5 hours of finish work.
Use PL premium adhesive and from a strength standpoint, screws in vs screws out means nothing
If you have never built a horn subwoofer before, I recommend you buy Bill Fitz maurice Auto Tuba, Or T18 plans, as that cab can be built for under 150 dollars, and it will teach you the basics of horn subwoofer construction (knowledge of which you can apply to a tham or a th18 build afterwards).
Attachments
Last edited:
you are welcome to leave the screws in. But for a clean finish, its best to remove the fasteners, and then fill the holes with bondo, or your preferred wood filler,
this way you can use a 3/8 roundover bit on the corners wth a router (without hitting screws and slinging metal into your face), and sand appropriatly (without messing up your sandpaper).
first pic is technically a functional cabinet (with all the screws still in place) . Pic 2 is after I removed all the screws, filled the holes, and did 5 hours of finish work.
Use PL premium adhesive and from a strength standpoint, screws in vs screws out means nothing
If you have never built a horn subwoofer before, I recommend you buy Bill Fitz maurice Auto Tuba, Or T18 plans, as that cab can be built for under 150 dollars, and it will teach you the basics of horn subwoofer construction (knowledge of which you can apply to a tham or a th18 build afterwards).
Thanks for the insight, did you mentioned the Auto Tuba or the T18 because it's economical to built or because it teaches more than the rest of the cabs that Bill Fitz offers? I have the plans for the Tuba 30, can I build that one instead for the experience? Thanks
Thanks for the insight, did you mentioned the Auto Tuba or the T18 because it's economical to built or because it teaches more than the rest of the cabs that Bill Fitz offers? I have the plans for the Tuba 30, can I build that one instead for the experience? Thanks
The T30 are just as fine as the T18 and AT(The plans are very informative so this is a good advice from Sine), I have four T30's and one AT, it's a joyful experience and you will learn a LOT from the mistakes and such from the first cab, making your second cab twice as fast to assemble and of better construction.
Good luck with the builds
Use PL premium adhesive and from a strength standpoint
Great glue but unnecessary in this application. Even on butt joints, yellow glue is more than adequate.
I have always built just using screws and no glue.
I then cover the cabinet in thin carpet to hide all the screws etc.

wouldn't reccomend that, especially for a horn
wouldn't reccomend that, especially for a horn
lol
I just build sealed cabinets.
My speaker cabinets have been used for disco and guitar work and none have fallen apart yet. despite being thrashed night after night.
A horn is quite different, I would definitely use glue on those.
Great glue but unnecessary in this application. Even on butt joints, yellow glue is more than adequate.
I disagree. I feel like PL Premium is the gold standard for DIY horns. Tacky to hold joints, very viscous to stay where you want, has volume to fill joints, and expands to make sure everything's sealed up tight. Plenty of strength to boot. I can understand using wood glue if everything's precision cut and you have plenty of clamps around, but PL is fantastic for a novice.
Great glue but unnecessary in this application. Even on butt joints, yellow glue is more than adequate.
Agreed. I use yellow glue for all of my builds. Small gaps can be filled in by using thinned yellow glue and sawdust. And for plywood cabinets, thinned yellow glue can also be used to seal the edges and minimize splintering.
- Status
- This old topic is closed. If you want to reopen this topic, contact a moderator using the "Report Post" button.
- Home
- Loudspeakers
- Subwoofers
- Building TH-18 Cabs