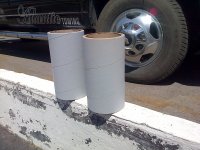
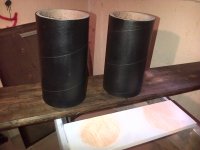
Bass typically sounds best to me when the subs are close to the ground on a sub dude or something similar. But since not all rooms like to cooperate making modes trickier to tame Im using something higher in this case. I found that raising subs merely a couple of inches away from the floor can greatly open up tuning options and help get you better sounding bass slam where you do most of your listening. In my case I got the best results with them elevated 15 inches. I went through a bunch of tubes experimenting with different heights, but I get them for free at work so its all good.
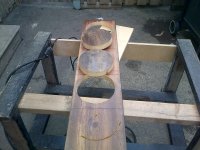
I made a few prototypes with double and then quadruple 4 inch pillars but much preferred the substantial look of single 7.50s as it really helps tie them in with my m&k subs that have 8 inch drivers.
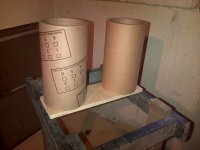
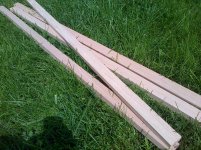
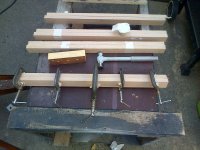
Most of you have probably seen the threaded rod and tube diy speaker stands and maybe even made some. Thats where Im going with these, there so simple to make and look good. They also give you the option of sand filling which I plan to do with mine.
Basses will be of .75 baltic birch and the pedestals 1 and 1 eighth inch (sorry busted keyboard) ash. Again aiming for a chunky monolithic look.
Not only can stands manipulate modes they can also effectively decouple your subs from the floor. In my case I got some pretty cool stuff to help further with that, but more about it later.
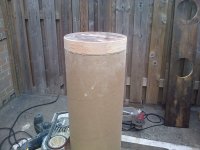
On to step two, cut to length and laid down five or six thin coats of primer with adequate dry time in between. I will knock down the paper fur with 0000 steel wool. It tends to come off easier after the primer sets up they become brittle and cut away easier. This should give me a nice consistent surface after hitting them with some matte black crinkle. The paint Ill be using is made by tremclad. Its intended purpose is rust protection on steel but I find it one of the best paints to use on wood and wood composites.
I made a few prototypes with double and then quadruple 4 inch pillars but much preferred the substantial look of single 7.50s as it really helps tie them in with my m&k subs that have 8 inch drivers.
Most of you have probably seen the threaded rod and tube diy speaker stands and maybe even made some. Thats where Im going with these, there so simple to make and look good. They also give you the option of sand filling which I plan to do with mine.
Basses will be of .75 baltic birch and the pedestals 1 and 1 eighth inch (sorry busted keyboard) ash. Again aiming for a chunky monolithic look.
Not only can stands manipulate modes they can also effectively decouple your subs from the floor. In my case I got some pretty cool stuff to help further with that, but more about it later.
On to step two, cut to length and laid down five or six thin coats of primer with adequate dry time in between. I will knock down the paper fur with 0000 steel wool. It tends to come off easier after the primer sets up they become brittle and cut away easier. This should give me a nice consistent surface after hitting them with some matte black crinkle. The paint Ill be using is made by tremclad. Its intended purpose is rust protection on steel but I find it one of the best paints to use on wood and wood composites.
Attachments

I know my thread isnt as entertaining to you as it is to me but Im having some fun with this 
As with any drool worthy finish preparation is of the utmost importance. I knocked off all of the fur balls with the steel wool but something else requires my time, will paint next time. Laying down the black is going to be a real tasty treat. My good friend is going to be water jetting me some stainless steel symbols I drew up they will be finished in brush and go on the column fronts. They will contrast very well with the matte. Low pro is the delicious look im after here.
As with any drool worthy finish preparation is of the utmost importance. I knocked off all of the fur balls with the steel wool but something else requires my time, will paint next time. Laying down the black is going to be a real tasty treat. My good friend is going to be water jetting me some stainless steel symbols I drew up they will be finished in brush and go on the column fronts. They will contrast very well with the matte. Low pro is the delicious look im after here.
Attachments

Are you concerned with moisture migration around the ends?
If you want to go an extra measure you could seal the paper with some type of glue mixture. I got a bag of play sand at home depot I will bake it that kills any potential living organisms and further dries it. And line the tube with sealed 1 mil plastic.
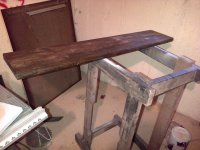
I might use this piece of heavy old growth for the bases instead, and spike them. I have some heavy gauge metal pedestal tops I salvaged off other speaker stands. Luckily I dont throw anything out if I think I might have a use for it later . Originally I thought that base material was not quite deep enough, the depth fits the boxes perfectly. Then thought with sand spikes and a couple layers of quality sponge good chance they will absorb 100 percent of any immediate vibration and not let it enter the floor. Ill see if I can get away with that.
. Originally I thought that base material was not quite deep enough, the depth fits the boxes perfectly. Then thought with sand spikes and a couple layers of quality sponge good chance they will absorb 100 percent of any immediate vibration and not let it enter the floor. Ill see if I can get away with that.Attachments
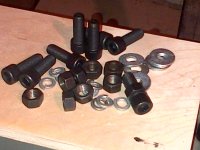
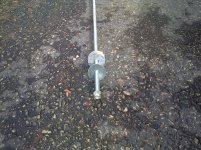
Some extra large .75 x 2 inch shank blue steel hex, spikes will mount to these. Or I will turn them down to points on a lathe until borrowing shop time is possible. Initially I was just going to sponge the bases, the sponge is very effective. I guess it was too easy and I came up with more ideas as I went along.
Attachments
A second coat is required, this stuff takes a few days to set up its still tacky after a full day, and has some sheen left to it. So far its not looking as flat as I had expected.
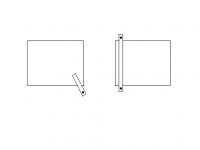
Ive two ideas for attaching the spikes, on the angle or at a 90.
The bases and feet will be strong and substantial. I have some solid pieces of rectangular aluminum the hexes will bolt up to. After I get them mocked up I might use my polishing blocks to pretty them up a bit. I dont like too much bling on anything, a little in the right places does more for aesthetics.
Attachments
I changed my plans a few times but now have some concrete ideas Im sticking with. I picked up some perfect red oak from my local rona since I dont have access to a jointer. I will laminate 2 together to make into rails and stain them a rich burgundy wine colour with low gloss clear over it. The hexes will bolt up to the ends. I do have access to a drill press so I will be counter sinking the hex heads. The jumbo machined spikes should look classy once there all mounted in place.
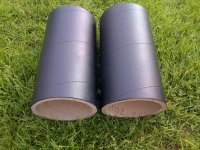
I applied a second coat on the tube columns yesterday. The paint appears flatter after the second coat, Im very happy with how it turned out.
And some 3.8 threaded rod with poly locks to hold everything together.
I applied a second coat on the tube columns yesterday. The paint appears flatter after the second coat, Im very happy with how it turned out.
And some 3.8 threaded rod with poly locks to hold everything together.
Attachments
Last edited:
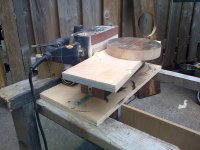
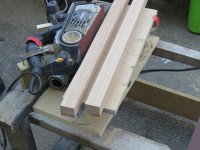
Some more progress. I achieved the clean look I wanted by mounting my belt sander on a 90 and working them down to meet the tube diameter.
Since they will be holding 5 or 10lbs Of sand I should glue them in place along with the threaded rod. They will be very secure.
Since they will be holding 5 or 10lbs Of sand I should glue them in place along with the threaded rod. They will be very secure.
Attachments
This is really a good thread
Hello neighbor to the north:
IMO this is a really good thread. I have access to a few tubes through work as well, but none are with the super thick walls like shown in your pics.
I have used the 3 inch diamtere ones to make legs with (for various/shelves or stands) and the 8inch dia. ones I use for short transmission lines behind mid-bass and mid-range drivers.
I did howevere, source some thick walled ones from outside of work (like yours) to make woofer enclosures with.
For what it's worth, I also agree with you, woofer enclosures should be raised up off of floor level by several inches to sound best.
Keep your progress reports coming !!
Thanks Scott. The midbass is nice when its aiming at you up at or closer to ear level for sure. In a future speaker build I will use more of these tubes to seperate the mids from the woofer waves.
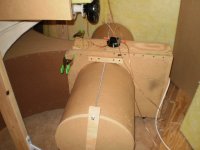
I did a partial mock up on one stand, theres lots of meat there to secure the hardwood rails to. The top bases are heavy cast iron with threaded holes for spikes, but I will be using a couple layers of spongy foam instead. Ill get glueing up my rail pieces tomorrow.
Seeing it together the circles need to be black to blend in for a cleaner look. The cherry stained oak should really pop against the flat black. One other option is to paint them gun metal to tie them in to the subs, they have gun metal grey baffles. Though I kinda like the thought of the cherry better.
Attachments

Last edited:
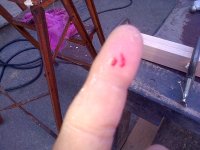
When the woman is away I have more time to play so getting a lot done. I laminated the oak to add some chunkyness for nice looks and more strength, 1.5x1.5 inch square. Next to clean them with the beld sander trim and cut out the recesses I need. Also drill for the hexes. Most of the hard stuff is over with. Oh and the radial arm saw got me, the gaurd is broken so I have to manually raise it and hold it as I cut. This is what not to do lol. Im just lucky it wasnt still pwered on and the brake almost had the blade stopped when 5 or 6 of the carbides made contact. I kind of thought it was funny someone in the boards just yesterday recommended anti abrasion gloves. Just lucky I guess.
Attachments
threaded rods
I like to use threaded rods as well. We must be related !
I'm looking forward to seeing your final install.
I shouldnt of cut the threaded rod, It would be better to run them through the entire assembly including through the center of the base x rails, it will further strengthen everything and tie the whole system into one.
I like to use threaded rods as well. We must be related !
I'm looking forward to seeing your final install.
Attachments
The hex bolts Im using are intended for leveling machinery where it meets the floor and hold up a couple ton of weight, certainly over kill for my application. I dont want even a hint of vibration making it into the floor. My m&k 8 inch subs weigh a wopping 22lbs each, but in the future when I can find more Ill be stacking them 2x2.
I decided to leave some hardware exposed, just because it looks cool.
I decided to leave some hardware exposed, just because it looks cool.
- Status
- This old topic is closed. If you want to reopen this topic, contact a moderator using the "Report Post" button.
- Home
- Loudspeakers
- Subwoofers
- my EZ sub stands