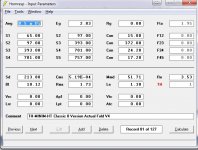
Okay I was able to do a quick impedance sweep. Which took two hours, because Praxis was being weird. My thoughts:
1. It's even closer than I expected...even up to the higher order modes.
2. Looks like some bracing around the mouth might be in order...even for this sub.
3. Looks like the copper pole cap is doing it's job on inductance, though the higher than predicted impedance in the 300Hz to 2kHz is a bit weird.
Scott
That looks pretty good IMO. Did you do a t/s param check on the driver? Perhaps actual Le is a bit higher than spec'd, which would account for the higher than expected impedance above 100 Hz or so. It also looks like the resonance frequency for your horn came in just slightly lower than the sim, which isn't necessarily a bad thing
") .
.That looks pretty good IMO. Did you do a t/s param check on the driver? Perhaps actual Le is a bit higher than spec'd, which would account for the higher than expected impedance above 100 Hz or so. It also looks like the resonance frequency for your horn came in just slightly lower than the sim, which isn't necessarily a bad thing
No I didn't do a T/S check, I was just too impatient. I'm very happy with the agreement, closer than many I've seen. Though I did check and re-check dimensions in the model and in building it a bunch of times.
Scott
What are the outside dimensions of the cabinet?
27" Tall, 23.75" Deep, 14.875" wide.
Or
68.58 cm * 60.325 *37.7825
I just reread thru the post...Congratulations on the girls!!!!! They sure change things...
You're telling me! Yikes. My house has exploded in pink and perfume.
SpeakerScott: what plate amp did u use?, good match?
gychang
I use a BASH500 from Parts Express. I didn't build it into the cabinet though...its in a separate enclosure. I find amplifier matching to be an awkward term. It's enough power, sounds great and has the features I need. So, yes? It's a good match?
Scott
Scott,
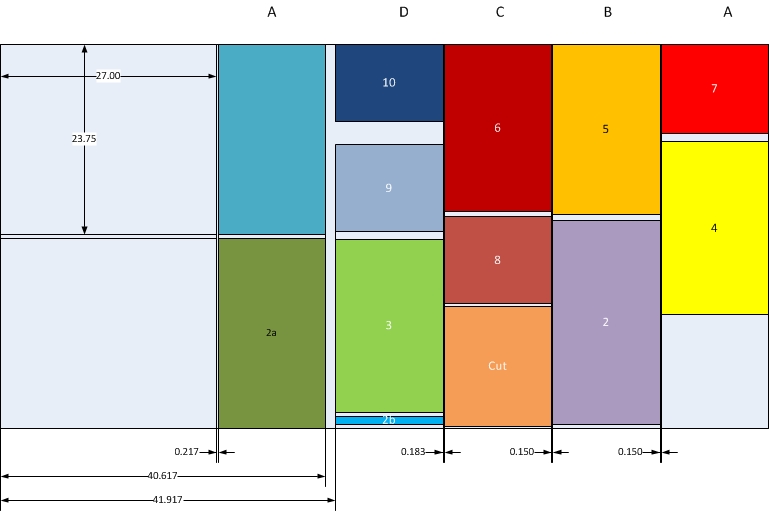
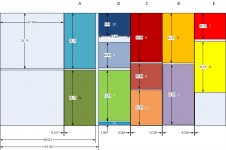
Do you happen to have a list of the sizes of the pieces illustrated in your cutlist layout diagrams.
The illustrations you provided are great, but unless I make a full size layout with pieces positioned as in your "relative position" illustration, there is no way for me to know (as an example) the size of the piece labeled as "9"
Thanks in advance... Joe L.
Scott,
Do you happen to have a list of the sizes of the pieces illustrated in your cutlist layout diagrams.
The illustrations you provided are great, but unless I make a full size layout with pieces positioned as in your "relative position" illustration, there is no way for me to know (as an example) the size of the piece labeled as "9"
Thanks in advance... Joe L.
I purposely have not provided the dimensions since I think it would be a mistake to pre-cut all of the pieces. Tolerances stack up way too quickly and pieces won't be the right length, especially with the oddball angle ~1.8 degrees of the expansion. I have a Delta Unisaw and I wouldn't attempt it, only with CNC. I did it by laying out the lines on the two pieces (as shown in the photo) and then transferring the dimensions from the lines to the actual pieces. Most pieces got 2 or three trips to the table saw. I also made a jig to reset the blade angle for the bevel cuts. I think this method contributed to my measured results matching the simulation so closely.
Scott
Last edited:
While I very much admire your construction technique, I think your decision to not supply cut-sheet dimensions will prevent many from duplicating your project, especially those like myself who do not have a table saw where we can make two or three trips to cut each piece to size. At least now I know the lack of dimensions was not an oversight.I purposely have not provided the dimensions since I think it would be a mistake to pre-cut all of the pieces.
Scott
I have built about a dozen or so speaker enclosures at this point in my speaker building hobby, and have done it with a saw-board, a skill-saw, and circular saw. Unfortunately, I do not have access to a table saw. (nor room to keep one) The last set of folded horns I constructed I was able to convince a friend to assist in cutting pieces to size based on a cut-sheet I created. (I was adapting a "bass-stick" design by JBell posted on this forum) I enlisted his aid (and his tablesaw) since I was making 4 folded horns, and the ability to cut sets of pieces to the same size with a single setup made the cutting go a lot quicker. Unfortunately, my friend with the saw has since passed away, so a Saturday in his workshop is no longer possible.
I agree, getting all the widths the same is critical so the sides will attach without leaks, but a given piece being 1/8th of an inch off in length would not cause issues in 95% (or more) of the construction of your folded horn. The errors are not really cumulative in most cases. Your cut-sheet layout makes that easy, since five cuts across the 4 foot dimension, if done accurately, would guarantee the sides would seal easily.
The very small angles involved combined with PL Polyurathane glue would probably allow your fold to be created with all 90 degree cuts followed perhaps with a small amount of sanding on the bottom front at the throat of the horn. I know you angled the blade, but that is a luxury more easily done with the table saw.
In my case, I took the pieces cut by my friend at his house back to mine, and did the actual glue up and assembly at home on a tarp in my living room. (My wife was very understanding) We did not angle the tablesaw blade for any of the cuts.
My modified "bass-sticks" came out pretty decent. You can see them here: http://www.diyaudio.com/forums/subwoofers/144589-dual-mcm-flh-5.html#post2528179
They do use the MCM woofers you initially considered, but subsequently elected to seek better.
If I had seen your thread first, I might have learned your method of laying out the pieces. I will admit that was a real challenge for me when I was performing my construction. I really like how you did the initial layout with the masking tape. I like even more how you apparently finished the sides, then removed the tape leaving the un-finished spots under the tape as a guide for glue-up. I had not seen that technique before and it is really great. You taught me a great trick for my next folded horn project.
Again, I admire your work... so please take my feedback as constructive, but from someone who is not as fortunate to have a tablesaw and a well equipped woodworking shop as you.
Oh yes, congrats on the newly adopted members of your family. I am sure your folded horn sounds awesome, and hope that you'll get years of use from it... Did you ever get a chance to measure a SPL frequency response curve of your folded horn before your two girls arrived? The last chart you posted was an impedance measurement.
Respectfully,
J. L.
Last edited:
I have built about a dozen or so speaker enclosures at this point in my speaker building hobby, and have done it with a saw-board, a skill-saw, and circular saw.
J. L.
I am in the same boat...
gychang
I am in the same boat...
gychang
You know, it had never dawned on me that someone would try to make this with a circular saw. Um...well...here's the deal.
The PL construction adhesives I've used don't cure all that hard. I don't like it for enclosures, because while it's great for filling gaps it's not good for coupling pieces together mechanically. It'll hold forever, but they aren't held all that tight. In fact I've seen it used most in flooring and stairs where some movement is allowed and the squishyness of it helps prohibit squeeks.
I used Titebond II + pocket screws where I could.
That said...I see the need. I've attached the dimensions. The fold angle is 1 degree except for the last mouth piece which is 5.3 degrees.
Attachments
Oh yes, congrats on the newly adopted members of your family. I am sure your folded horn sounds awesome, and hope that you'll get years of use from it... Did you ever get a chance to measure a SPL frequency response curve of your folded horn before your two girls arrived? The last chart you posted was an impedance measurement.
Respectfully,
J. L.
No I haven't measured the response yet. Praxis is running better with help from Bill Waslo, and I just updated my SoundEasy license. Next time I get a chance to take the sub to my work, where I can get into a big auditorium and measure with reflections a long way away I will do so.
My next two projects are Synergy horns and dual tapped horns with either Dayton Ulti-Max 10" or 12" woofers. Hornresponse has those at anywhere from 10-12dB more output and extension to 15Hz.
I just posted the cut dimensions for the pieces, and my reasoning for not using PL adhesive.
I too would like to try a synergy horn. But I'll wait for warmer weather before I start making any sawdust out in the driveway. Best collection of info and links I've found is here: Index of DIY Synergy and Unity HornsNo I haven't measured the response yet.
My next two projects are Synergy horns and dual tapped horns with either Dayton Ulti-Max 10" or 12" woofers. Hornresponse has those at anywhere from 10-12dB more output and extension to 15Hz.
Thanks for the added info on the cutlist. It is appreciated.I just posted the cut dimensions for the pieces, and my reasoning for not using PL adhesive.
I too prefer Titebond 2, and pocket holes where possible. The PL Polyurethane glue is not the same as ordinary construction adhesive. I've used construction adhesive when doing rough framing. As you said, it stays somewhat flexible. PL Polyurethane is not the same thing as subfloor adheasive, although they do list that as one possible use for it. PL Polyurethane sets up pretty hard overnight. I'd have no issue with it in a tapped horn. The major advantage is its gap filling ability. The set of 4 "Bass Stick" front-loaded-horns I built two years ago have shown no issues at all with the PL Polyurethane adhesive. Tomorrow I'll attempt an experiment to judge the relative hardness of the PL glue vs the plywood itself. Should be interesting.
Thanks again,
J. L.
I too would like to try a synergy horn. But I'll wait for warmer weather before I start making any sawdust out in the driveway. Best collection of info and links I've found is here: Index of DIY Synergy and Unity Horns Thanks for the added info on the cutlist. It is appreciated.
Thanks again,
J. L.
Yeah, that's the thread that got finally had enough stuff into it where portions of my brain said...yeah...I can do that too.
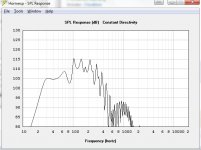
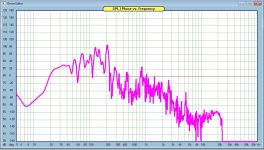
I took a quick room sweep of the 8" tapped horn at the listening position today....here's the response I got.
Ignore the absolute scale, SoundEasy measurements are relative for now...it's not referenceced to 2.83V or anything like that. Based on the look of the thing I don't trust below 15Hz or above 22Khz.
Scott
Attachments
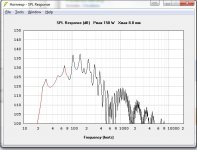
Scott,I took a quick room sweep of the 8" tapped horn at the listening position today....here's the response I got.
Looks good, appears it goes even lower than the sim.
Does some of the ripple go away if you put the mic at the horn mouth?
Art
Attachments

Scott,
Looks good, appears it goes even lower than the sim.
Does some of the ripple go away if you put the mic at the horn mouth?
Art
The impedance suggests it goes a bit lower than the sim as well. I haven't had a chance yet. Any time I drag out the microphone the kids want to "help" which usually ends in me repairing something.
Next time I get a chance while they are out with my wife I'll try it.
Scott
- Status
- This old topic is closed. If you want to reopen this topic, contact a moderator using the "Report Post" button.
- Home
- Loudspeakers
- Subwoofers
- Inexpensive entry to the world of Tapped Horn subs...