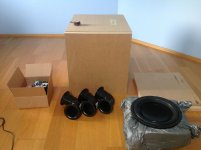
Let the building begin!
Excellent! I'll be following you in a month or so, so please post up how everything goes together!
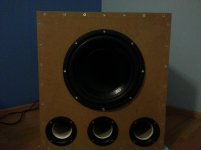
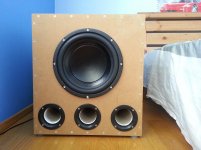
build is finally complete!!!!! well...sort of . We need to apply some paint to the box but that will happen later, sometime around summer. The sub itself is a beast, it weighs over 50 kg overall. The sound is incredibly loud yet deep and clean (now all i have to do is get monitors which can math this sub ). THe theoretical f3 of this thing was around 20 hz however i think the actual f3 is even lower as it can play 16 hz with quite a lot of power and no problems at all
Anyways, here are some more photos:
well...sort of . We need to apply some paint to the box but that will happen later, sometime around summer. The sub itself is a beast, it weighs over 50 kg overall. The sound is incredibly loud yet deep and clean (now all i have to do is get monitors which can math this sub ). THe theoretical f3 of this thing was around 20 hz however i think the actual f3 is even lower as it can play 16 hz with quite a lot of power and no problems at all Anyways, here are some more photos:
Attachments

update!!
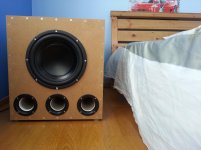
The subwoofer is thoroughly broken in and it sounds great! I'm still stuck with some shitty sony bookshelves which I will burn once I get myself a pair of Monitor Audio Bronze BX2 bookshelves . Anyways, on the bottom of the sub you can see two grey foam pads. These are Sonic Design damping feet: SD damping feet for loudspeakers
they work like a charm, parents aren't whining about the house shaking that much anymore and i feel the imaging/dispersion of the bass in my room has improved. This is important because i have a vaulted roof which messes up the sound dispersion in my room. Soon I will paint the inside of the ports, in black of course, and after my summer vacations from school I will paint the whole sub.
How do you think i should go about painting the sub? I wanted to have a wood finish but i dont know how to use wood stain and i dont wanna risk anything. Is it possible to slap on some veneer at this stage?
The subwoofer is thoroughly broken in and it sounds great! I'm still stuck with some shitty sony bookshelves which I will burn once I get myself a pair of Monitor Audio Bronze BX2 bookshelves
. Anyways, on the bottom of the sub you can see two grey foam pads. These are Sonic Design damping feet: SD damping feet for loudspeakersthey work like a charm, parents aren't whining about the house shaking that much anymore
and i feel the imaging/dispersion of the bass in my room has improved. This is important because i have a vaulted roof which messes up the sound dispersion in my room. Soon I will paint the inside of the ports, in black of course, and after my summer vacations from school I will paint the whole sub.How do you think i should go about painting the sub? I wanted to have a wood finish but i dont know how to use wood stain and i dont wanna risk anything. Is it possible to slap on some veneer at this stage?
Attachments
Subwoofer Painted!
It was a hard job to paint the subwoofer, because my childish ways made me unable to be patient enough to wait to paint the sub enclosure AND THEN mount the driver and all. I actually completed painting in the end of August.
Anyway, my Swedish friend and I managed to do it. We took the sub out and covered the driver with plastic film and tape so the poor weather wouldn't get to it. And we started painting with rollers .
I bought the indoor wood paint so it took a **** load time and it wasn't drying fast enough outdoors. So i brought it inside and continued. Overall, I put on 3 layers of paint and 2 layers of primer.
The primer was made by mixing wood glue with water.
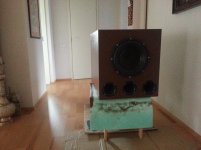
Firstly, using auto body filler I filled in the gaps and the screws and 'levelled' the surface so it would seem smooth. I brushed primer all over the sub, then I sanded the surfaces of the sub, after added a coat of brown paint with the roller and sanded once more. This process was repeated once more after the first coat of paint had dried. And the final coat of paint was just added onto the existing coat of paint without any sanding or priming.
So here is how it looks like!
It was a hard job to paint the subwoofer, because my childish ways made me unable to be patient enough to wait to paint the sub enclosure AND THEN mount the driver and all. I actually completed painting in the end of August.
Anyway, my Swedish friend and I managed to do it. We took the sub out and covered the driver with plastic film and tape so the poor weather wouldn't get to it. And we started painting with rollers
.I bought the indoor wood paint so it took a **** load time and it wasn't drying fast enough outdoors. So i brought it inside and continued. Overall, I put on 3 layers of paint and 2 layers of primer.
The primer was made by mixing wood glue with water.
Firstly, using auto body filler I filled in the gaps and the screws and 'levelled' the surface so it would seem smooth. I brushed primer all over the sub, then I sanded the surfaces of the sub, after added a coat of brown paint with the roller and sanded once more. This process was repeated once more after the first coat of paint had dried. And the final coat of paint was just added onto the existing coat of paint without any sanding or priming.
So here is how it looks like!
Attachments
- Status
- This old topic is closed. If you want to reopen this topic, contact a moderator using the "Report Post" button.
- Home
- Loudspeakers
- Subwoofers
- Hard to make choices with DIY subwoofer