CNC grooves is a nice implementation. Very clean! Thanks for sharing.
yeah they did well, i never thought of that until the guy mentioned it to me. I'll keep you posted on the build as i go along.
yeah they did well, i never thought of that until the guy mentioned it to me. I'll keep you posted on the build as i go along.
Hello Sal, nice built. What plywood you used? Thanks
Hello Sal, nice built. What plywood you used? Thanks
it was birch plywood supplied by CNC projects who cut it for me as well. The wood is heavy but very strong and easy to work with.
I was thinking of a future sub cab made of aluminium with rubber lining to stop resonance of the metal....not sure if this is feasible though? I love the plywood cab but it's bloody heavy!
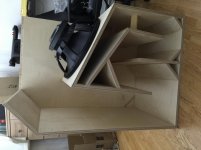
well I'm taking the plunge...I've got the wood cut and also the CNC guys cut grooves on both side parts which made things a million times easier to put this together. once it's together it'll be sanded and ready to for spray shop! looking forward to trying the beast.
I dont suppose you still ahve the CNC / CAD files?
I just tried to make a build and they are terrible. They cuts dont line up. Looks **** house.
The bracing will be done tonight/tomorrow and simply from pieces of 2x2 apart from the back brace which will be from the original design. The plywood is ridiculously strong and I reasly don't think too much bracing is needed!
The cad file I used was from post #6 guys") the CNC company added the grooves in themselves and I very much doubt they'll send me the modded file :/
the CNC company added the grooves in themselves and I very much doubt they'll send me the modded file :/
The cad file I used was from post #6 guys
the CNC company added the grooves in themselves and I very much doubt they'll send me the modded file :/CAD Files have to be imported into a CAM System to make the final CNC File - most CAM Systems have their own formats and files are tuned to a specific machine with ah specific router. Its easier to simplay take the CAD File and add the CNC relevant stuff than to adapt a file trageted on a different CNC machine...
and im sure it won't take long to add the grooves in as the cad file is pretty detailed in post #6
Post 6 is a pdf drawing of the cad model. Is there a Solidworks or other 3d cad file somewhere?
If you'e going to the trouble of getting cabs CNC-cut that's one part you should never skip. The bracing being off just a bit (even a 16th of an inch) in either size or placement can cause a cab to get "twisted" and the final panel not line up. Even if everything else is perfect. And at thay point you can't beat it into submission with clamps - you just have to live with it and sand one edge down after the fact. If you haven't glued them in yet, I'd get those on the CNC pronto. If the bracing isn't known computer accurate before assembly it needs to be test fit. Temporarily tack in place, test the last side for fit, adjust if necessary, repeat. Or end up hitting the final result with a belt sander, which defeats the purpose of the extra expense.
Bracing
As far as I found out in my TH's, you NEED bracing to keep the panels "at rest" while at high volume. I found, that you need to brace all panels that have one side facing to the outside world, so to speak. So front / top / back / bottom NEED bracing and it was a very good solution to make that a one peace brace. Top here is already braced by the 45 degree reflectors.
Inside panels DO NOT need bracing, since the air inside the TH is "almost" moving consistently, resulting in all inside panels "almost" not to vibrate.
The outside panels, however only have one side that gets bombarded with vibrating air, and since they all have different sizes, it becomes kind of a vibrating circus, so bracing it is.
In this TH18, it would mean front panel, back panel (attached to top) and bottom panel (attached to back). The bottom panel only gets a bit of bracing, if you put the "one peace" back brace in, so maybe it is better to make two braces, one back and one bottom which goes at least to the point where the arrow / dotted line from the centre of the driver hits the bottom.
My tow pennies of contribution
Just wondering, the Middle brace that goes from top to bottom, is that purely for bracing the rear and bottom panels? If so, can't I just put a steel/aluminium bar down both panels?
As far as I found out in my TH's, you NEED bracing to keep the panels "at rest" while at high volume. I found, that you need to brace all panels that have one side facing to the outside world, so to speak. So front / top / back / bottom NEED bracing and it was a very good solution to make that a one peace brace. Top here is already braced by the 45 degree reflectors.
Inside panels DO NOT need bracing, since the air inside the TH is "almost" moving consistently, resulting in all inside panels "almost" not to vibrate.
The outside panels, however only have one side that gets bombarded with vibrating air, and since they all have different sizes, it becomes kind of a vibrating circus, so bracing it is.
In this TH18, it would mean front panel, back panel (attached to top) and bottom panel (attached to back). The bottom panel only gets a bit of bracing, if you put the "one peace" back brace in, so maybe it is better to make two braces, one back and one bottom which goes at least to the point where the arrow / dotted line from the centre of the driver hits the bottom.
My tow pennies of contribution
Bracing while building
I also found out, that the order to build these TH's is "inside - out" against one side panel. I mean, you start with one side panel and add the middle (90 degree angled) first and work to the outside of the box panel by panel. Panels that have a bracing panel attached, I put together before placing them into the box.
This way, you can add the bracing panels including screws. Adding braces in an almost completed box, becomes a nightmare while add screws will be very difficult / impossible.
- Home
- Loudspeakers
- Subwoofers
- TH-18 Flat to 35hz! (Xoc1's design)