I think its back to the drawing board on this project before I cut up some BB. I started thinking last night about the signal path length of that type of horn and realized this may not work so well in my room. Right now all my signals are time aligned either by speaker, like my mains and center, or in all the speakers in the 7.1 layout with Audyssey.
I don't know how long the path is on the TH, but it is way longer than any speaker I have. That could throw a wrench in my setup timing. I may have to re-evaluate and go back to looking at a ported enclosure to better match my mains.
Arghhhh!
I don't know how long the path is on the TH, but it is way longer than any speaker I have. That could throw a wrench in my setup timing. I may have to re-evaluate and go back to looking at a ported enclosure to better match my mains.
Arghhhh!
sounds like u are nearly there. I say finish it, hook it up, and see if u like it. If you don't, give it to a friend for Xmas or sell it.
Also it sounds like u do have TA capabilities, so just add the path length to the TA.
True. I can manipulate the TA with my crossovers. I will have to study things a bit before finally deciding which way to go. Right now, approaching Christmas, I'll be busy anyway. That should give me some time to research the issues.
There is no general release construction diagram available for it. It was released for a limited time as a kit, but that option has ceased. You will have to work it out for yourself, but the driver specs were never made available, so you really have no chance.where is the building print for the spud dts10???? i have a bunch pix but no schematic???
where is the building print for the spud dts10???? i have a bunch pix but no schematic???
if you google "th spud clone" there is a thread for the older dual 8 inch spud, it contains a diagram with measurements.
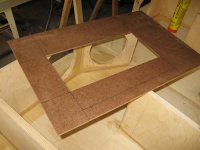
After much thought and some research I decided this project was worthwhile. Worst case I lose some time and 5 sheets of BB. It turns out the template for making interior dadoes (sp?) was a life saver. It made the project go much faster and made a huge difference when putting things together. This would definitely have been a major pain without exactly matching the top and bottom large pieces.
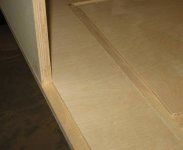
Here is a picture showing the dadoes cut into one of the panels. Prior to starting with the router, I designated a 'master corner' on each panel so that they would match exactly at the time of construction.
I want to thank jblauvelt for his initial post and his great ideas on how to make this build as easy as possible. The OP seems to suggest that the build took a weekend. Wow, that is super fast. I have been working on this on and off for two weeks. Of course, I'm just a novice woodworker and it was a learning process at times.
Attachments
Last edited:
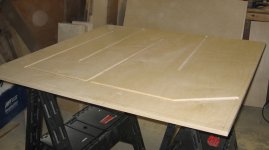
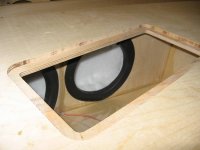
Based on pictures of other builds, I wanted a convenient access panel to the woofers in case of problems, or if I ever needed to replace a driver. I created another template so I could match both subs and also ensure the access panel location would work.
Attachments
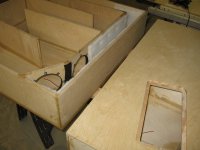
Interior almost complete on both units. Still need a little more polyfill near the horn exit. Then I chose to mount the drivers before I permanently mounted the last piece. It just made it easier to mount drivers, wire and check continuity. Wired in series I got 6.6 Ohms, which should be correct.
Attachments
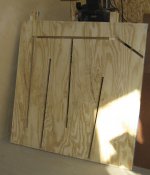
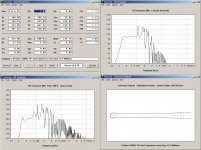
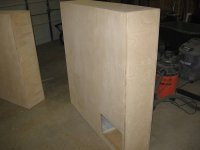
Units finally complete and sanded, waiting for paint. Prior to sanding and working on the exterior I took one of the subs outside and ran some frequency sweeps through the sub.....plot to follow. As you can see, the sweeps were satisfactory and prepped for paint.
Attachments
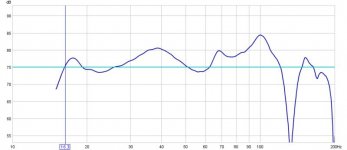
The first day I ran REW it was raining, so I ran the plot with the sub inside the shop with the mouth of the horn aimed outside. Amazingly, I got a very similar response as I did in this run. The run below was done outside with the sub flat on the ground. Horn mouth pointing up. I used my shop receiver to run the sweep, so nothing with real power. I think it has 70 wpc.
I am pleased with the performance, but can't figure out the dip near 120Hz. I beleive the sub will work well for my LFE channel, from 15Hz to 125Hz. The system delay measured by REW was right at 6 ms. BTW, this is a totally uncorrected plot.
I have already started painting and will have more shots later.
Attachments
While I'm thinking about this, I'll add some comments on the build.
Although it was not complicated, it took much longer than I expected. Partly because I was building two units, and partly due to my lack of skill with woodworking. I certainly learned quite a bit.
I used the PL construction adhesive since I needed a glue that would 'fill' voids well. In retrospect, I would still use it, but only for the interior parts. It is very messy and not easy to remove excess. For the outside seams I should have used carpenters glue since the sides did not need voids filled. The excess I got on the sides needed to be sanded, which was a pain. I figured paint wouldn't stick too well to that product.
The rabbet and dado idea worked very well for the cabinet and the access panel.
I also spent quite a bit of time dry fitting things since I did not trust my skill to be right on every time.
Another issue was taking guesses at the length of the interior panels. I was glad I dry fit everything first since I had misjudged the length of one panel, making one of the turns narrower than the horn width before and after the turn. I figured that wouldn't work, so had to shorten the panel in question.
I chose to ensure the speakon connector and access panel were on the low pressure side of the enclosure to preclude any chance of leaks in the high pressure section.
The biggest problem I had ocurred when I went to put the last large piece on one of the units. I had cut a dado on an end piece too deep ( where the angled driver baffle meets the end piece), so when I screwed the end piece in, it pulled the end in and bowed the BB. When I went to dry fit the large top section....it didn't fit! It took me about two hours to break that joint loose and pull the end piece away enough to allow the top to fit the rest of the enclosure. I could have saved myself a lot of time and stress if I had dry fit the top on WHILE I screwed the sides on. Live and learn.
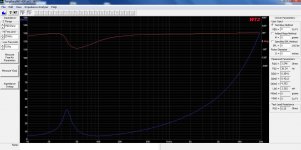
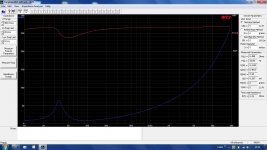
Great build, and as far as I'm concerned any build where you don't lose a finger is a good one! Don't forget to do a few impedence measurements of your completed box.
Amen to that! This was actually my second attempt at a speaker build. My first journey down that road was my DBB main speaker build. I liked them so much, they replaced my Khorns as main speakers. As you can see by my avatar, it is a two way speaker with dual 15" woofers.
Once I get the subs up to my room and set up again, I will run an impedance plot for the drivers in the enclosure.
- Status
- This old topic is closed. If you want to reopen this topic, contact a moderator using the "Report Post" button.
- Home
- Loudspeakers
- Subwoofers
- Th spud