Took a bit of a break this weekend from the bathroom renovation project that I am working on at the moment to build a pair of TH-SPUD clones. I know what some of you are thinking...and that is not an argument that I want to get into.
I had several constraints that I needed to take into account. I have a 96" wide, 96" tall 12" deep area to work with, but was limited to only having access to the top 12" x 96" panel. Basically, I have an entertainment center that has a 12" deep recess that is 96" wide located in the center of it. So any sub box would have to fit within that pocket and the wall. The entertainment center has no top over the sub-pocket so all sound energy needs to be focused up at the ceiling.
Since I needed something that has a slender footprint...it also meant that I could not utilize anything larger than a 10" sub if I was going to go with the TH route. The THT was a consideration at first, but the limited depth of the space that I had to work with ruled that one out. I checked out Volvotreter's designs, but couldn’t find one that I really was excited about that would fit within my space requirements. End result, I ran across all of the threads that are out there regarding tapped horns, the TH-SPUD and the DTS-10. There is a ton of information out there. There are the leaked plans of the TH-SPUD, there are plenty of interior photos of the DTS-10 (which can be corrected for lens distortion) and then measured accurately in a CAD drawing programs, and then there are people who just post the actual dimensions. I'll be honest. I used the plans as a starting point. I imported the plans into a CAD program, scaled everything appropriately, and then began connecting all the lines and getting measurements from the CAD program.
With the known dimensions, I plugged them into a free program called CutList. CutList will take the dimensions and quantities of parts and lay them out in the most efficient manner. A few minutes in CutList and then click print.
Off to the shop.
Next on the agenda was to cut down the sheet goods. I had picked up 4 sheets of 3/4" ultralight MDF for both of these cabinets. I know that Birch-ply would have been a better choice, however, cost was a concern and I wanted to use something that measured a true 0.750" thick. If I had to do it again, I might try a different material.
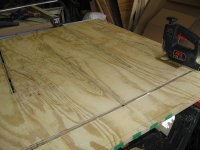
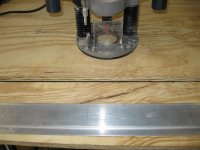
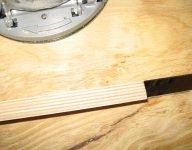
Next step was to create a template for the router to cut all of the dados accurately and consistently. I laid out all of the lines for the interior walls on a scrap piece of plywood. Using a straight edge and a 3/4" straight-cutting router bit, I cut out the full 3/4" depth of the plywood where the interior walls would be placed using a plunge router.
Once I had the template ready, I clamped it to a side-panel and then used a 3/4" flush-cut bit to create the dados on the interior sides of the side-panels. I cut all of the 1/4"-deep dados about an inch longer than they needed to be. This left me a little bit more room to work with when placing the panels. All of the dados were sized just right, perhaps a hair over, but still everything fit really well. The great thing about the template is that it can be used to cut either side-panel. Face up it will cut the left panel, and when you flip it over, it creates the mirror image...perfectly. I really liked using the template for this. There are a lot of interior parts in these cabinets all at different angles and trying to build one of these without the template would be hard. The template just took all of the guess work out of it and in total it took me less than 30 minutes to route out all of the interior dados on the 4 panels. If you are going to make something like this, save yourself the headache of trying to get the layout right 2 or 4 times over...use a jig!
After cutting the interior dados, I used the table-saw with a dado and sacrificial fence to put the 3/4" dado along all 4 edges of the panels. I could have done this with the router, but the saw seemed quicker.
With the side panels completed I ripped seven 9.5" wide x 96" long sections of the MDF. Then with the dimensions I had printed out, I started cutting up everything on the miter-saw. I used stop blocks on every cut to ensure that everything was cut the same way. I cut all of the parts for both cabinets at once, thus minimizing setup.
I used a circle cutting jig on the router to cut the openings for the subwoofers and speaker terminals. Super-simple!!! This is also the best time to mount the T-nuts! Simply use one woofer as your template, mark them, drill them out and then press-fit the T-nut into place.
With one side panel on the bench, I put a liberal amount of PL adhesive into the interior dados and then started by placing all of the interior panels in place. I used more PL and some 1.5" brads to hold everything together until I was able to connect all of the interior panels together with screws. After that I put a good bead along the joint between the panel and the interior walls. It takes about 3 tubes of PL per cabinet.
Next I took the other panel, and put more PL into all of the interior dados. Flip that panel over and then place it on top of the other assembled parts. The fact that there are dados for everything really really makes it very easy. You get one interior wall in place and then us a mallet to knock the others into position. It sounds harder than it really is. I could not imagine trying to line everything up with only pencil marks. Once would be bad enough...but to try to do it 4 times would be tough. Again, shoot it with a few brads.
With the interior walls resting between the side panels, drag out the 3/4 template that I used earlier and place it on top of the cabinet, aligning it carefully. This makes a perfect guide for screw placement. About 30 screws later, one side panel is solidly attached to the interior walls. Remove the template, flip the whole assembly over so that the other side panel is facing up, reapply the template and add more screws. Now both sides are solidly attached to the interior walls.
The long, thin exterior walls go in next. Lots of PL, some clamps to squeeze everything tight, a few brads and then a bunch of screws to hold it all together.
Now for the access panel. Using the screws as a good guide to tell me where the interior walls were, I plotted out a large rectangular opening near where the woofers mount. I cut it out with a circular saw. I used a handsaw to get the corners cut all the way through. Remove hatch. Use the router with a rabbeting bit and then create a lip all the way around the opening for the hatch. Next I measured the overall size of the opening including the lip, and cut those panels on the table saw. Again, using the rabbeting bit in the router, I put a matching lip on the hatch. Test fit -- Good to go.
Vacuum out the cabinet, get it clean, and then wire and mount the woofers. I used foam weatherstripping as gasket material, and then pulled the wires from both woofers out through the speaker terminal hole. Flip the polarity on one woofer, and then wire in series. Confirm 7.2 ohms with the meter and put in the speaker terminal and then seal up the hatch. (earlier I had forgotten to wire them in series, and had a 2 ohm load...the amplifier really did not like that too much).
Done!
Overall...They are big!!! The DTS-10 is bigger, but still. A 45" x 48" x 11" box is pretty large...pretty close to 16 cubic feet (outside). With the lightweight MDF, one person can pick the sub up and carry it around, although I would not want to carry it more than a few feet. Wheels were invented for a reason!
Okay, so how do they sound?
I don’t have much time with them at the moment, but so far I am really impressed. I have a 50wpc Harman AVR-20 receiver for the garage (garage sale special) that I used for my initial impressions. I paralleled the two subs onto one channel of the receiver and then found a radio station to play around with the things.
First thing that I noticed was, that even though I was running them full range, that all of those folds were doing a great job keeping the high frequencies from escaping. I did a basic sanity check, polarity, phasing, leak testing, making sure the cabinets were not buzzing or rattling, etc., just to make sure I didn’t break something.
Next thing I did was to do what anyone else would do...I cranked up the volume! WOW...4 8" drivers should not be able be this loud...not with the amount of power that I had going to them. So far so good! They were loud, but they were not going real deep. I was just listening to FM which doesn’t really have too much bottom end, so I went and got my laptop and an 1/8" to RCA adapter. Fire up YouTube and search for bass test / subwoofer test. I played around with a few of them for a bit and found one stepped incrementally through from 1 hz to 100 hz. I played this one over and over, gradually turning the volume up louder and louder. The two TH-SPUDs clone give a lot of output down low. At 40 and 30 hz, shelves and light fixtures were rattling pretty good. At 20Hz, you could feel the air pressure changing in the shop with the big door open. I wouldn’t say it was loud, because it wasn’t, but you could definitely feel the pulses from about 25 feet away (in a room node). At 10 HZ you could still hear the pulses. They were not as easy to hear as the ones at 20hz, but they were clearly there, along with my circle cutter jig moving back and forth on the wall (25 feet away). Again, this was all with a decent 50w amplifier pushing both. I did not try to play them to the point where they would distort...I was just having some fun.
I went back to playing music and they seemed pretty good. They seem quite articulate...definitely not one-note bass. They did not seem to have a strong initial crack to the kick-drums, but I doubt that playing them the way that I did was doing anything to help matters.
I am really impressed with these clones. Tapped horns are new to me, but really are quite capable machines. I have a pretty good car audio background and I'd say that these two clones remind me of 8 10"s, but these clones seem to do better down low. Again, loud, but not brutal. I really need to get them in the house to properly measure them.
I don’t have any measurement devices as of yet, but hope to have them in the house in a week or so. Once in the house, I'll look at getting the mic and then following up. I intend on driving them with about 250-300 watts per cab. I never listen to movies at reference level, but I do want a lot of headroom in the bass department. I think I have it!
Value -- 10
Difficulty -- 7
Performance -- 9 initial impressions
Size -- 2
I had several constraints that I needed to take into account. I have a 96" wide, 96" tall 12" deep area to work with, but was limited to only having access to the top 12" x 96" panel. Basically, I have an entertainment center that has a 12" deep recess that is 96" wide located in the center of it. So any sub box would have to fit within that pocket and the wall. The entertainment center has no top over the sub-pocket so all sound energy needs to be focused up at the ceiling.
Since I needed something that has a slender footprint...it also meant that I could not utilize anything larger than a 10" sub if I was going to go with the TH route. The THT was a consideration at first, but the limited depth of the space that I had to work with ruled that one out. I checked out Volvotreter's designs, but couldn’t find one that I really was excited about that would fit within my space requirements. End result, I ran across all of the threads that are out there regarding tapped horns, the TH-SPUD and the DTS-10. There is a ton of information out there. There are the leaked plans of the TH-SPUD, there are plenty of interior photos of the DTS-10 (which can be corrected for lens distortion) and then measured accurately in a CAD drawing programs, and then there are people who just post the actual dimensions. I'll be honest. I used the plans as a starting point. I imported the plans into a CAD program, scaled everything appropriately, and then began connecting all the lines and getting measurements from the CAD program.
With the known dimensions, I plugged them into a free program called CutList. CutList will take the dimensions and quantities of parts and lay them out in the most efficient manner. A few minutes in CutList and then click print.
Off to the shop.
Next on the agenda was to cut down the sheet goods. I had picked up 4 sheets of 3/4" ultralight MDF for both of these cabinets. I know that Birch-ply would have been a better choice, however, cost was a concern and I wanted to use something that measured a true 0.750" thick. If I had to do it again, I might try a different material.
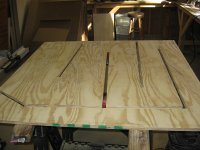
Next step was to create a template for the router to cut all of the dados accurately and consistently. I laid out all of the lines for the interior walls on a scrap piece of plywood. Using a straight edge and a 3/4" straight-cutting router bit, I cut out the full 3/4" depth of the plywood where the interior walls would be placed using a plunge router.
Once I had the template ready, I clamped it to a side-panel and then used a 3/4" flush-cut bit to create the dados on the interior sides of the side-panels. I cut all of the 1/4"-deep dados about an inch longer than they needed to be. This left me a little bit more room to work with when placing the panels. All of the dados were sized just right, perhaps a hair over, but still everything fit really well. The great thing about the template is that it can be used to cut either side-panel. Face up it will cut the left panel, and when you flip it over, it creates the mirror image...perfectly. I really liked using the template for this. There are a lot of interior parts in these cabinets all at different angles and trying to build one of these without the template would be hard. The template just took all of the guess work out of it and in total it took me less than 30 minutes to route out all of the interior dados on the 4 panels. If you are going to make something like this, save yourself the headache of trying to get the layout right 2 or 4 times over...use a jig!
After cutting the interior dados, I used the table-saw with a dado and sacrificial fence to put the 3/4" dado along all 4 edges of the panels. I could have done this with the router, but the saw seemed quicker.
With the side panels completed I ripped seven 9.5" wide x 96" long sections of the MDF. Then with the dimensions I had printed out, I started cutting up everything on the miter-saw. I used stop blocks on every cut to ensure that everything was cut the same way. I cut all of the parts for both cabinets at once, thus minimizing setup.
I used a circle cutting jig on the router to cut the openings for the subwoofers and speaker terminals. Super-simple!!! This is also the best time to mount the T-nuts! Simply use one woofer as your template, mark them, drill them out and then press-fit the T-nut into place.
With one side panel on the bench, I put a liberal amount of PL adhesive into the interior dados and then started by placing all of the interior panels in place. I used more PL and some 1.5" brads to hold everything together until I was able to connect all of the interior panels together with screws. After that I put a good bead along the joint between the panel and the interior walls. It takes about 3 tubes of PL per cabinet.
Next I took the other panel, and put more PL into all of the interior dados. Flip that panel over and then place it on top of the other assembled parts. The fact that there are dados for everything really really makes it very easy. You get one interior wall in place and then us a mallet to knock the others into position. It sounds harder than it really is. I could not imagine trying to line everything up with only pencil marks. Once would be bad enough...but to try to do it 4 times would be tough. Again, shoot it with a few brads.
With the interior walls resting between the side panels, drag out the 3/4 template that I used earlier and place it on top of the cabinet, aligning it carefully. This makes a perfect guide for screw placement. About 30 screws later, one side panel is solidly attached to the interior walls. Remove the template, flip the whole assembly over so that the other side panel is facing up, reapply the template and add more screws. Now both sides are solidly attached to the interior walls.
The long, thin exterior walls go in next. Lots of PL, some clamps to squeeze everything tight, a few brads and then a bunch of screws to hold it all together.
Now for the access panel. Using the screws as a good guide to tell me where the interior walls were, I plotted out a large rectangular opening near where the woofers mount. I cut it out with a circular saw. I used a handsaw to get the corners cut all the way through. Remove hatch. Use the router with a rabbeting bit and then create a lip all the way around the opening for the hatch. Next I measured the overall size of the opening including the lip, and cut those panels on the table saw. Again, using the rabbeting bit in the router, I put a matching lip on the hatch. Test fit -- Good to go.
Vacuum out the cabinet, get it clean, and then wire and mount the woofers. I used foam weatherstripping as gasket material, and then pulled the wires from both woofers out through the speaker terminal hole. Flip the polarity on one woofer, and then wire in series. Confirm 7.2 ohms with the meter and put in the speaker terminal and then seal up the hatch. (earlier I had forgotten to wire them in series, and had a 2 ohm load...the amplifier really did not like that too much).
Done!
Overall...They are big!!! The DTS-10 is bigger, but still. A 45" x 48" x 11" box is pretty large...pretty close to 16 cubic feet (outside). With the lightweight MDF, one person can pick the sub up and carry it around, although I would not want to carry it more than a few feet. Wheels were invented for a reason!
Okay, so how do they sound?
I don’t have much time with them at the moment, but so far I am really impressed. I have a 50wpc Harman AVR-20 receiver for the garage (garage sale special) that I used for my initial impressions. I paralleled the two subs onto one channel of the receiver and then found a radio station to play around with the things.
First thing that I noticed was, that even though I was running them full range, that all of those folds were doing a great job keeping the high frequencies from escaping. I did a basic sanity check, polarity, phasing, leak testing, making sure the cabinets were not buzzing or rattling, etc., just to make sure I didn’t break something.
Next thing I did was to do what anyone else would do...I cranked up the volume! WOW...4 8" drivers should not be able be this loud...not with the amount of power that I had going to them. So far so good! They were loud, but they were not going real deep. I was just listening to FM which doesn’t really have too much bottom end, so I went and got my laptop and an 1/8" to RCA adapter. Fire up YouTube and search for bass test / subwoofer test. I played around with a few of them for a bit and found one stepped incrementally through from 1 hz to 100 hz. I played this one over and over, gradually turning the volume up louder and louder. The two TH-SPUDs clone give a lot of output down low. At 40 and 30 hz, shelves and light fixtures were rattling pretty good. At 20Hz, you could feel the air pressure changing in the shop with the big door open. I wouldn’t say it was loud, because it wasn’t, but you could definitely feel the pulses from about 25 feet away (in a room node). At 10 HZ you could still hear the pulses. They were not as easy to hear as the ones at 20hz, but they were clearly there, along with my circle cutter jig moving back and forth on the wall (25 feet away). Again, this was all with a decent 50w amplifier pushing both. I did not try to play them to the point where they would distort...I was just having some fun.
I went back to playing music and they seemed pretty good. They seem quite articulate...definitely not one-note bass. They did not seem to have a strong initial crack to the kick-drums, but I doubt that playing them the way that I did was doing anything to help matters.
I am really impressed with these clones. Tapped horns are new to me, but really are quite capable machines. I have a pretty good car audio background and I'd say that these two clones remind me of 8 10"s, but these clones seem to do better down low. Again, loud, but not brutal. I really need to get them in the house to properly measure them.
I don’t have any measurement devices as of yet, but hope to have them in the house in a week or so. Once in the house, I'll look at getting the mic and then following up. I intend on driving them with about 250-300 watts per cab. I never listen to movies at reference level, but I do want a lot of headroom in the bass department. I think I have it!
Value -- 10
Difficulty -- 7
Performance -- 9 initial impressions
Size -- 2
Nice write up, I also find it impressive how 8" drivers can go so low, it goes right in the face of the myth that you need huge drivers for sub 30Hz bass. ")
I'm guessing it can be done with 3.Thanks for the write up and pics. I've long wanted to build some of these as clones, and still might at some stage.
Edit: out of curiosity, how many sheets of 2400x1200 (96 x48) did it take to make them?
Use them as DR's and you might get deep, but you won't have enough volume displacement to go loud too unless you use lots of them.Nice write up, I also find it impressive how 8" drivers can go so low, it goes right in the face of the myth that you need huge drivers for sub 30Hz bass.
Mine too, but better to ask someone whose done it.I'm guessing it can be done with 3.
U
Mine too, but better to ask someone whose done it.
Each sub uses 2 sheets of wood. Get all the dimensions and then enter them into CutList. It will lay it all out for you.
Last edited:
jblauvelt, I hope you don't mind if I tack my project onto your outstanding build description. Frankly, in my research, you have the best description of how to actually create the tapped horn. You have also been nice enough to answer my questions and help me get started. Thank you very much.
In any event, here goes.
I have a 5000 cu. ft. media room that needs more subwoofer than my longtime SVS 20-39 PC+ can provide. I have mostly a DIY system and right now, the LFE sub is the weak point. I looked at several options, like an IB and would really have liked to build one, but my room just doesn't lend itself to an IB setup. I worked for a while on a large ported enclosure with an 18" woofer, but ran into some issues there as well. After reading some of the posts on the TH build, I decided to give it a try. Money is a factor, so this build would be rather easy and inexpensive relative to the other options.
Following jblauvelt's lead, I made a template or pattern to guide my router when I make the dadoes in the side panels. I took great care to draw the dimensions on a 3/4" piece of 45"x48" plywood. Checked the dimensions three times to ensure I didn't mess up.
Attachments
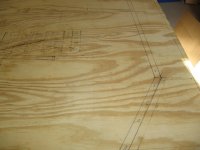
I used my plunge router with a 3/8" straight router to create the template. I measured the fence distance on the fly for each cut rather than take the time to make some sort of jig. Problem with a jig is that the cuts are at an angle, so your standard jig may not work as easily as you would like. I'm sure good woodworkers can make suggetions on how t make this process easier.
Attachments
- Status
- This old topic is closed. If you want to reopen this topic, contact a moderator using the "Report Post" button.
- Home
- Loudspeakers
- Subwoofers
- Th spud