Go for it!
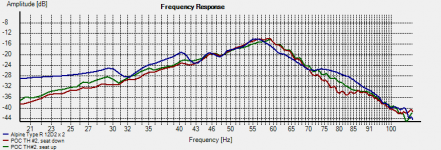
Here ya go - FR measurements, taken with the mic on the dashboard, the EQ set flat and the LP filter on the deck set to 200 Hz (its highest setting).
From the results, the POC#2 TH is a few dB more sensitive than my current car audio subwoofer system above around 57 Hz to 70 Hz, and matches it all the way down to around 43 Hz (probably a bit lower as I couldn't remove the car audio subwoofer box from the car so it likely acted as a parasitic resonance around that area in the response curve). The car audio subwoofer system however is better below that frequency. As you can see from the response curve, the rear seat had a pretty significant impact above 70 Hz.
Sound-wise it delivered the goods all the way up to the point it was being over-driven, which was pretty damned loud at that point! However my car audio subwoofer system, which consists of two Alpine Type R 12D2s wired to present a 2 ohm load to the amp, sounded better and got louder IMO, though it took quite a bit more power to get there. Bear in mind we're comparing a cheap $65 12" P.A. driver with 5mm Xmax to two pretty good car audio 12" drivers with 20mm Xmax each, presenting 1/4 of the load to the same amp! The amp is capable of delivering 1200W RMS to the Alpines and maybe about 300W to the Dayton PA310 in the POC#2 TH.
Attachments
Hi Brian Steele,
Thanks for the data in Post #115. Would you have any measurements of the difference w/ and w/o a grill or cross-bracing in the mouth, or an easy way of getting that measurement?
Regards,
That may take some time to get done. There's no local source of grill material, and if I put a cross-brace in the mouth, I'll need to come up with a way of making it removable (in order to be able to remove the driver if necessary).
At the moment I'm thinking of using metal right-angle braces in the corners and a metal brace across the bottom panel to reduce its tendency to flex.
Hi Brian,
That would be interesting, how about a piece of 2x4 w/ a long clamp for a test? I just cannot get over the simulation pictures Xoc1 showed here: http://www.diyaudio.com/forums/subwoofers/190635-th-18-flat-35hz-xoc1s-design.html I'm sure you remember those. Those flapping side and bottom boards are really something.
Regards,
Hi Brian,
That would be interesting, how about a piece of 2x4 w/ a long clamp for a test? I just cannot get over the simulation pictures Xoc1 showed here: http://www.diyaudio.com/forums/subwoofers/190635-th-18-flat-35hz-xoc1s-design.html I'm sure you remember those. Those flapping side and bottom boards are really something.
Are you referring to this image?
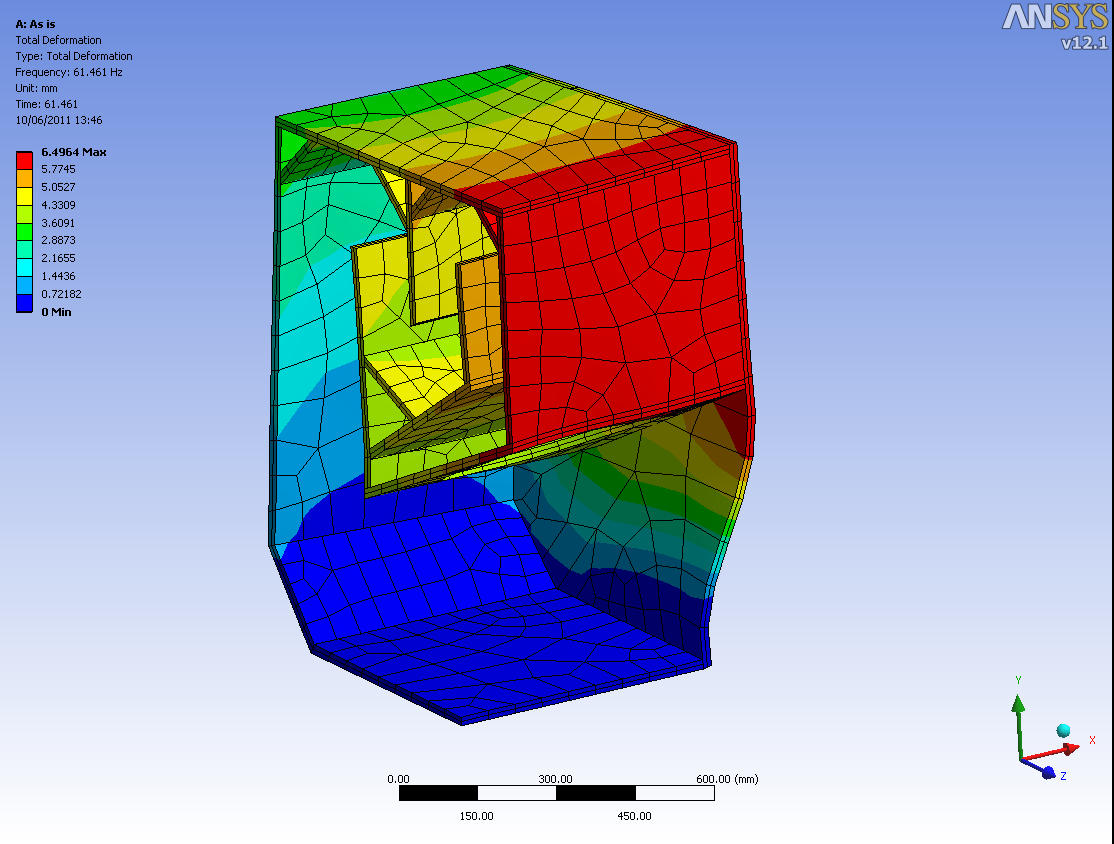
Yeah, I can see that big open mouth with no bracing being an issue (especially if thinner ply is used to build the box), though I don't think the displacement will be anywhere near the amount shown in that image, LOL.
A metal grill would be perhaps the best way to brace the mouth and protect the driver at the same time. I think the impact of a decent grill on the frequency response should be minor.
Unfortunately I can't get material for a metal grill here. I've tried to stiffen up the mouth a bit with some metal corner braces. It seems to help a little bit (using the "tap" test), but the high power tests I have planned for tomorrow will let me know if they're enough.
Hi Brian,
I cannot find the other pictures that Xoc1 posted concerning FEA, and the effectiveness of bracing. I found a picture NEO Dan posted http://www.diyaudio.com/forums/subwoofers/190635-th-18-flat-35hz-xoc1s-design-117.html#post3207946 that was supposed to be very effective bracing in the mouth. And epa suggested pipe w/ allthread: http://www.diyaudio.com/forums/subwoofers/190635-th-18-flat-35hz-xoc1s-design-17.html . And I may as well add jbells grill picture: http://www.diyaudio.com/forums/subwoofers/190635-th-18-flat-35hz-xoc1s-design-2.html .
Regards,
Last edited:
Bruce Edgar uses a diagonal corner reflector in his showhorn article. I am a bit stuck now between continue area and this reflector. Since it pinches the horn area... Can anybody help me out? I am looking for better midrange response. This is for a "w" bin style cabinet not for a tapped horn.
-Edit- problem solved, the expansion in the first fold acts like extra volume, creating lowpass filter effects like adding volume to your front chamber in a frontloaded horn.
image
-Edit- problem solved, the expansion in the first fold acts like extra volume, creating lowpass filter effects like adding volume to your front chamber in a frontloaded horn.
An externally hosted image should be here but it was not working when we last tested it.
image
Last edited:
Here ya go - FR measurements, taken with the mic on the dashboard, the EQ set flat and the LP filter on the deck set to 200 Hz (its highest setting).
From the results, the POC#2 TH is a few dB more sensitive than my current car audio subwoofer system above around 57 Hz to 70 Hz, and matches it all the way down to around 43 Hz (probably a bit lower as I couldn't remove the car audio subwoofer box from the car so it likely acted as a parasitic resonance around that area in the response curve). The car audio subwoofer system however is better below that frequency. As you can see from the response curve, the rear seat had a pretty significant impact above 70 Hz.
Sound-wise it delivered the goods all the way up to the point it was being over-driven, which was pretty damned loud at that point! However my car audio subwoofer system, which consists of two Alpine Type R 12D2s wired to present a 2 ohm load to the amp, sounded better and got louder IMO, though it took quite a bit more power to get there. Bear in mind we're comparing a cheap $65 12" P.A. driver with 5mm Xmax to two pretty good car audio 12" drivers with 20mm Xmax each, presenting 1/4 of the load to the same amp! The amp is capable of delivering 1200W RMS to the Alpines and maybe about 300W to the Dayton PA310 in the POC#2 TH.
Nice comparison!
As I continue to struggle using your spreadsheet I am curious why I cant get anything correct. I downloaded post #106 and tried plugging in my HR parameters. But everything the box is not enclosing the folds. So I must be doing something wrong.
It could be that your chosen TH alignment is simply not suitable for a THAM-type fold as-is. You may have to adjust S4 up or down or opt for a different path length in order to get it to fit.
Cracking spreadsheets Brian, (and for those that don't have Excel, they work fine in Open Office), thanks.
Just a quick thought, is there any way of pulling out the individual lengths of the sample points? I've done a design using the SS spreadsheet, and am having a little difficulty laying it out full size. If I knew the sample lengths, I could plot them using a compass and that would give me some useful assistance in getting everything lined up.
cheers
Cracking spreadsheets Brian, (and for those that don't have Excel, they work fine in Open Office), thanks.
Just a quick thought, is there any way of pulling out the individual lengths of the sample points? I've done a design using the SS spreadsheet, and am having a little difficulty laying it out full size. If I knew the sample lengths, I could plot them using a compass and that would give me some useful assistance in getting everything lined up.
cheers
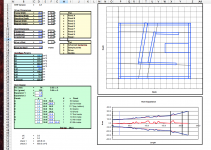
I've include the guidelines plot option in the spreadsheet just for that purpose.
Here's how to use them - deselect all the plot options except "Panel C", "Advanced Centerline" and "Guides" by replacing the x's with o's. The guide lines will be shown in black. Place your mouse over the ends of each guide line and you'll get its relative position to the bottom left corner of the panel. Use that to draw the guidelines out on the full-size panel.
At this point, you can then enable the plot option for the other panels in the spreadsheet to see how they're positioned with respect to the guidelines. You can also use the drawn-out guidelines to determine the dimensions of the braces that you'll need to make for your build (the current version of the spreadsheet does not provide dimensions for the braces - the next version might
")
...Place your mouse over the ends of each guide line and you'll get its relative position to the bottom left corner of the panel...
Rats, the mouse-over bit doesn't work in Open Office...

Well, I found a version of Office 2000 on an old Bootcamp backup, fired it up, did some layout, and started chopping wood. Thanks Brian.
What's that little rectangular cutout in the upper right hand corner all about?
Bear in mind that the spreadsheet gives exact dimensions. I suggest leaving a little extra length on the rear panel, then trim to fit.
Well, I found a version of Office 2000 on an old Bootcamp backup, fired it up, did some layout, and started chopping wood. Thanks Brian.
Something does not look right with that layout. At the second bend, the cutout for the internal panel seems a bit too close to where the external panel is going to be, which means that the horn is going to be pinched at this point. And the expansion at the last few bends seems to be a bit off.
If you post up a screen capture of what the spreadsheet looks like, I can take a look at it for you.
Rats, the mouse-over bit doesn't work in Open Office...
Is this last "Office 2000" the MS product?Well, I found a version of Office 2000 ..........
I think the parallax might be to blame
I've enclosed a file anyway if you want to take a look. The production version is a little, but not significantly, tweaked, but that's on the laptop and not handy.
I know I'll need a a few angled blocks to pad out some of the corners, but the rebates are just for the structural stuff.
I've enclosed a file anyway if you want to take a look. The production version is a little, but not significantly, tweaked, but that's on the laptop and not handy.
I know I'll need a a few angled blocks to pad out some of the corners, but the rebates are just for the structural stuff.
Attachments
Last edited:
- Home
- Loudspeakers
- Subwoofers
- Spreadsheet for Folded Horn Layouts...