I suspect it would be easier to just include the additional area sliders.
What I meant was that in the input menu you have all the necessary fields, although not sliders. Not as fancy but less space ;-)
I still don’t know why sometimes the rest of the input menu is greyed out.
It's because the system you have specified doesn't require those fields. In the case of your Bessel horn example, the horn can have only one segment, which is why the inputs for the other three segments are disabled.
And I still don’t understand why I sometimes can have different values in the S-position (in this case S3) as the section end point and then next starting point but sometimes it’s not possible.
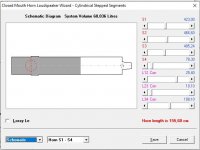
It depends on whether or not you have specified stepped segments. (The S1 to S5 labels switch from black to red when stepped segments are specified).
I don’t really understand why the length fields (Con, Bes etc) sometimes is impossible to get a value in when trying (with an error message that the value is zero, which it is as the field change the value to zero whatever value that is put in there)...
It's because you haven't specified a flare type at the same time as entering the axial length value. You can't have a segment with a length but no flare.
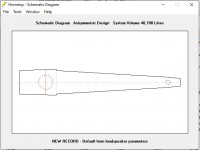
The first "section" actually section 1 and 2, where the driver is positioned is represented as cylyndrical instead of cylindrical as they are, but the next section is actually presented as cylindrical for some reason
Sorry, I don't understand.
I did notice that your ”Ang” is 2,0xPi and mine is 0,5.
You have assumed that the loudspeaker is positioned in a corner, I am assuming that it is positioned on the floor away from any walls.
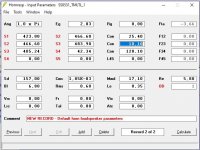
What i mean with cylindrical is that S1=423, S2=466 and S3=484 together is making a cone (with two sections/volumes) where the driver is positioned. But in the LsW is will change to two different cylinders with the area 423 and 466 cm2.
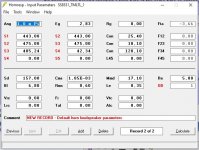
To start with I changed the area for the two different sections/volumes to be the average of the cone area. Section/volume 1 area = 444, and s/v 2 area = 475 before starting to look at filling, impedance etc.
Still not exactly the power handling etc of the initial S1-S2-S3 cone but as close as it´s going to get without the abilitiy to use cones/tapering in the first part of the TL in LsW (Loudspeaker Wizard).
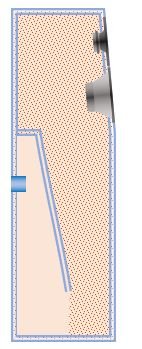
I have jumped around and tried to find where to change the open end to a closed end with a port/vent. Haven´t found it. Everything the same but with close end and a port/vent at 108 cm of the 120 cm into section/volume 3, and the extra section/volume picking up the rest 12 cm to get to 120 cm.
To start with I changed the area for the two different sections/volumes to be the average of the cone area. Section/volume 1 area = 444, and s/v 2 area = 475 before starting to look at filling, impedance etc.
Still not exactly the power handling etc of the initial S1-S2-S3 cone but as close as it´s going to get without the abilitiy to use cones/tapering in the first part of the TL in LsW (Loudspeaker Wizard).
I have jumped around and tried to find where to change the open end to a closed end with a port/vent. Haven´t found it. Everything the same but with close end and a port/vent at 108 cm of the 120 cm into section/volume 3, and the extra section/volume picking up the rest 12 cm to get to 120 cm.
Attachments
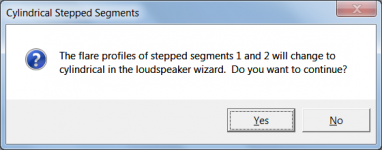
What i mean with cylindrical is that S1=423, S2=466 and S3=484 together is making a cone (with two sections/volumes) where the driver is positioned. But in the LsW is will change to two different cylinders with the area 423 and 466 cm2.
That's why the message shown in Attachment 1 is displayed before the Loudspeaker Wizard opens. Without more area sliders in the wizard, it's the best that can be done when stepped segments are specified.
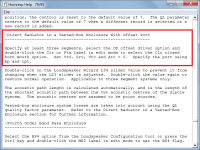
I have jumped around and tried to find where to change the open end to a closed end with a port/vent. Haven´t found it.
See Attachment 2.
Attachments
Instead of using the suggested smaller areas of the different sections I used the average of the throat and mouth areas (averag or the conical area) after going from input parameters into LsW (where conical becomes cylindrical) seem more correct to me. Are there any theory against this?
Next design is where the LsW automatic adjustments gets a little bit troublesome. When designing with OD, tapering and a port/vent. Shown after and before the automatic adjustment. Quite different designs (with the preferred design shown to the right with the SS 8531G00 and the SS D2608/91300+WG). And making this with "averages" seem i little bit too far away from the original design.
I understand the "slider space challenge", and the possible challenges in calculate power response, filling, impedance and all the other stuff with conical volumes rather than cylinders.
Attachments
Last edited:
Are there any theory against this?
Not really. It's just a matter of making the best approximation that you can, given the circumstances.
I understand the "slider space challenge"
I have started looking at what would be required to include the necessary additional sliders. All I have confirmed at this stage is that it would be a lot of work to implement. If I do decide to proceed, don't expect to see anything for a month or so - it is not a trivial exercise that we are talking about here.
I can't resist a challenge...
Thanks for the answer David.
Whwn it comes to "...don't expect to see anything for a month or so..." it´s not really someting expected either. We all know you have a long list of whishes from us. So whenever somewhere in the future you think of taking on this challenge it will be really appreciated.
Whwn it comes to "...don't expect to see anything for a month or so..." it´s not really someting expected either. We all know you have a long list of whishes from us. So whenever somewhere in the future you think of taking on this challenge it will be really appreciated.
Comparing two acoustic pressure graphs
Hello David, hope you're doing fine.
First off thank you for your awesome software. It's a blessing to have such an easy-to-use and powerful program at hand.
So I've been working on this horn and I noticed that I simply can't compare two acoustic pressure graphs. I wanted to compare the 0-degree (on-axis) SPL graph for two designs. Here's what I did:
I enter the data, click Calculate. The acoustic "power" page and I click on "directivity" option, proceeding to the on-axis acoustic "pressure". I see the graph. Everything fine.
Then I return to the input page, change the data, calculate, go to the acoustic power page in order to access the directivity tab. The I open the on-axis pressure graph, click "compare previous" and it compares the pressure curve with the power curve of the same design, a comparison I didn't wanna have.
I think we can solve the problem by making the acoustic pressure page "skicky", meaning we can make it so once the "calculate" button is pressed, the acoustic pressure page doesn't change back to acoustic power.
.
Best regards, Ali.
Hi Ali,
When you have the first pressure chart displayed, either right-click the mouse anywhere on the chart and select the 'Capture current results' pop-up menu option, or simply press Ctrl+C to capture the results. After the second pressure chart is displayed, the two sets of results can then be compared by either selecting the Tools > Compare Captured menu command or by pressing the F4 shortcut. Pressing F4 again will remove the comparison. To release previously captured results either right-click the mouse on the chart and select 'Release captured results', or simply press Ctrl+R.
When you say that you go to the acoustic power page, the Acoustical Power chart can of course be set as the default result window by selecting Tools > Options > Acoustical Power.
Stay safe,
David
I wanted to compare the 0-degree (on-axis) SPL graph for two designs.
When you have the first pressure chart displayed, either right-click the mouse anywhere on the chart and select the 'Capture current results' pop-up menu option, or simply press Ctrl+C to capture the results. After the second pressure chart is displayed, the two sets of results can then be compared by either selecting the Tools > Compare Captured menu command or by pressing the F4 shortcut. Pressing F4 again will remove the comparison. To release previously captured results either right-click the mouse on the chart and select 'Release captured results', or simply press Ctrl+R.
Then I return to the input page, change the data, calculate, go to the acoustic power page in order to access the directivity tab.
When you say that you go to the acoustic power page, the Acoustical Power chart can of course be set as the default result window by selecting Tools > Options > Acoustical Power
.Stay safe,
David
Runtime error 6
I get an overflow error 6 when trying to add filters and it crashes out of the program. HR version 50.90
source:
ID=48.20
Ang=2.0 x Pi
Eg=77.46
Rg=0.00
Fta=0.00
S1=1.00
S2=1642.00
Par=0.10
F12=0.00
S2=1642.00
S3=1642.00
Par=72.90
F23=0.00
S3=1642.00
S4=1642.00
Par=193.40
F34=0.00
S4=1642.00
S5=1642.00
Par=1.00
F45=0.00
Sd=1210.00
Bl=33.87
Cms=8.48E-05
Rms=13.17
Mmd=307.68
Le=2.80
Re=3.30
TH=2P
Vrc=0.00
Lrc=0.00
Ap=1245.00
Lpt=232.40
Vtc=40000.00
Atc=2500.00
Pmax=1500
Xmax=12.0
Path=0.0
Mass=0.00
Re'=0.00
Leb=0.00
Le=0.00
Ke=0.00
Rss=0.00
Rms=0.00
Ams=0.00
Fr1=300.00
Fr2=150.00
Fr3=0.00
Fr4=0.00
Tal1=100
Tal2=30
Tal3=100
Tal4=100
Comment=B&C 18DS115-4 - ParaRoar beta 1
~~~~~~~~~~~~~~~~~~~~~~~~~~~~~~~~~~~~~~~~~~~~~~~~~~~~~~~~~~~~~~~~~~~~~~~~~~~~~~~~~~~~
FILTER
0 0.00 0.0 -1 0 0.00 0.0 -1 0 0.00 0.0 -1
0 0.00 0.0 -1 0 0.00 0.0 -1 0 0.00 0.0 -1
100 25 25 100
4 30.50.5
0.50.50.50.5
SSSS
1111
104
0022
1111
111
021
~~~~~~~~~~~~~~~~~~~~~~~~~~~~~~~~~~~~~~~~~~~~~~~~~~~~~~~~~~~~~~~~~~~~~~~~~~~~~~~~~~~~
Can someone confirm?
I get an overflow error 6 when trying to add filters and it crashes out of the program. HR version 50.90
Can someone confirm?
I get the same error using your exported record, will investigate tomorrow.
I get an overflow error 6 when trying to add filters and it crashes out of the program.
Hi USRFobiwan,
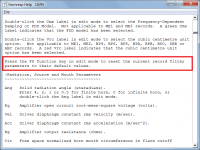
The filter data in your record has been corrupted. There is an explanation for this if the record was generated a long time ago, or is a new record that used an old record as a starting point. (There was a bug in the system that meant that the filter data could sometimes be corrupted, but this was subsequently fixed). Otherwise, I don't know what the cause is.
The easiest way to fix the problem is simply to press the F8 function key in edit mode to reset the current record filter parameters to their default values.
For a more elegant solution to this legacy issue, I will have a look to see if it would be feasible to trap such errors and automatically reset the filter parameters without the user even being aware that it has happened.
Stay safe,
David
Attachments
Last edited:
I will have a look to see if it would be feasible to trap such errors and automatically reset the filter parameters
Unfortunately it is not feasible. The current manual reset arrangement using the F8 key will be retained.
David is it maybe an option to extend the 'F8 filter reset' with a clear all filters in all records?
For example with Shift+F8, goes over and reset the filter in all the records in the *.dat collection.
Also is there an easy way to go to the last record in the collection when opening the collection. I know you can use File > Find Records and select last one there. But it's just that more convenient when navigating.
Maybe a checkbox under Options "[v] open last added record" so when you open a collection it opens the last added record? or shift-click [Next] ?
Hi USRFobiwan,
I think it is probably safer to leave things as they are, so that there is absolutely no chance of an inadvertent global reset of all records when the actual intention was to reset just the current record only. Hopefully the number of records with corrupted filter data should not be too high.
In the next update errors generated by faulty filter data will be trapped and a message will be displayed explaining how to fix the problem. As previously advised it is not feasible to automatically repair the data, so providing a more meaningful error message prior to the program closing, is probably the next best thing that can be done.
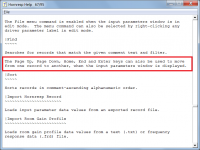
There certainly is, simply press the End key....
See the attachment for details of the other available navigation keys.
Stay safe,
David
David is it maybe an option to extend the 'F8 filter reset' with a clear all filters in all records?
I think it is probably safer to leave things as they are, so that there is absolutely no chance of an inadvertent global reset of all records when the actual intention was to reset just the current record only. Hopefully the number of records with corrupted filter data should not be too high.
In the next update errors generated by faulty filter data will be trapped and a message will be displayed explaining how to fix the problem. As previously advised it is not feasible to automatically repair the data, so providing a more meaningful error message prior to the program closing, is probably the next best thing that can be done.
Also is there an easy way to go to the last record in the collection when opening the collection.
There certainly is, simply press the End key...
.See the attachment for details of the other available navigation keys.
Stay safe,
David
Attachments
- Home
- Loudspeakers
- Subwoofers
- Hornresp