hey everyone im very much a newbie at all this and i bought a eti-480 not so long ago from dicksmith.
I put it together fine except when i came to wiring everything else into it, i got caught up. Just really simple things like the polarity of the input signal. Where do you plug the negative terminal of the speaker wire into and a few other little things
so i was wondering does anyone have a really really basic diagram of how it wires into everything else. btw it is a 100w version
thanx
")
hi Clum,
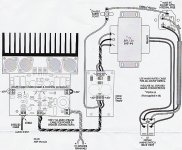
The PSU shown in the circuit is the DSE recommended PSU for the ETI480 as well as the ETI480. So I'd guess the wiring will be very similar.
Quote: "This power supply can run either the Silicon Chip SC480 power module (K3431) or the older ETI480 power module (K3442). "
I have attached a picture of the ETI480. The only "real" difference to the SC480 is the speaker GND wire location. Personally I would wire the speaker GND straight to the star earth.
Didn't the ETI480 kit come with a wiring schematic?
BTW: The SC480 is only $25 at the moment.
regards
Attachments
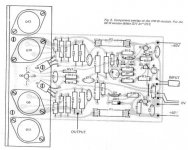
yeah thats the diagram that came with it the power side of things is fine i worked that out, but which wire on the input is positive. and where is the other output for the negative? i just don't know and ive read those instructions like 10 times trying to figure it out aswell as reading various stuff on the net and kit books to try and work out if there is some basic knowledeg i am missing.
thanx
thanx
- Status
- This old topic is closed. If you want to reopen this topic, contact a moderator using the "Report Post" button.
- Home
- Amplifiers
- Solid State
- eti-480 help